Working with Transparencies
Transparency Flattening and Sharpening
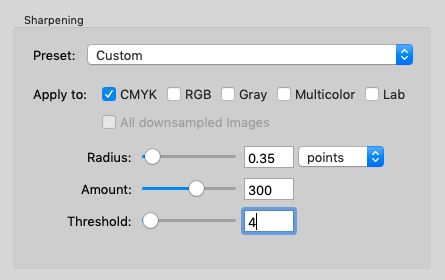
Many users often think of only photographic images when sharpening PDF data. However, when flattening transparencies, vectors and texts can also be converted into pixel-based images. These pixel-based images are treated like photos when the Sharpening option is activated This can lead to adverse results. A difference in sharpness between adjacent objects in the form of a vector or text can cause visual issues and inconsistencies. For production, sharpening effects should always be tested in advance.
Use caution when flattening transparencies with ZePrA. Sharpening takes place before conversion and flattening. In contrast, sharpening without transparency reduction in ZePrA takes place after conversion.
Depending on the composition of the elements in the layout software on the one hand, and the parameters for flattening the transparencies and sharpening in ZePrA on the other, extreme sharpening can produce visually undesirable effects.
The negative effects only become apparent at the most extreme sharpening Amount with a Threshold of 0. Since JPEG artifacts usually show minimal color differences, a high Threshold is the most important factor to avoid unwanted effects.
The following example shows the effects of different sharpening levels. In this case, the graphic designer has placed an object with drop shadow over a gradient.

When flattening the transparencies, the flattened elements were compressed using the JPEG format. With an extreme sharpening setting, the artifacts part of the gradient underneath the drop shadow, which is usually invisible, become intensified when converted into a JPEG image. The following sharpness settings were used from top to bottom:

- No Sharpening
- Radius 0.35 points, Amount 80, Threshold 8
- Radius 0.35 points, Amount 300, Threshold 4
- Radius 0.35 points, Amount 500, Threshold 0
Converting PDF files containing transparencies
When converting PDF files with transparencies, the transparencies can either be preserved or flattened using Transparency Flattening.

During conversion, each object – with or without transparency – is converted separately, preserving the structure of the PDF document.
Unfortunately, there are so many variations in the blending of transparencies and the stacking order of semi transparent objects that there is no simple rule as to when transparencies ought to be flattened or not.
Flattening requires the resolution of the platesetter to be specified; therefore, it is best to perform transparency reduction as late as possible in the workflow.
ColorLogic recommends performing the conversion in ZePrA first without transparency flattening and then to check the converted file with a transparency-compatible PDF viewer (e.g. Adobe Acrobat Pro or Callas PDF Toolbox). If the converted file is visually correct and the desired total amount of coverage is maintained, continue working with the file.
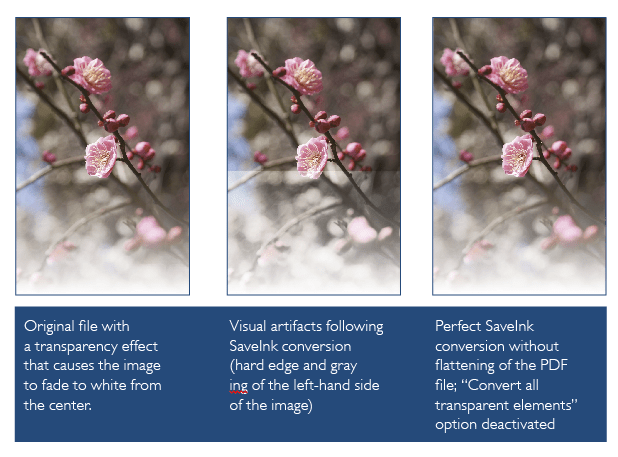
If the file contains artifacts after conversion, uncheck the Convert all transparent Elements in PDF Files checkbox under Configurations/PDF and convert the file again.

This changing this setting often helps to preserve the impression of the original file (see figure below), since ZePrA excludes certain transparency modes from the conversion.
The checkbox Convert all transparent Elements in PDF Files is active by default.

However, if there are still artifacts after deactivating this function, use Transparency Flattening.
Note: Transparency Flattening is based on the Callas SDK, which in turn uses Adobe’s PDF engine for transparency flattening. Therefore, the results achieved with ZePrA’s Transparency Flattening are identical to those achieved with the current versions of Callas pdfToolbox.
Converting Spot Colors containing Transparencies
For transparency flattening of PDF files containing transparent objects composed of process and spot colors, Adobe’s transparency flattening preserves spot colors to preserve the impression of the original but sets them to “Overprint”. Transparency-reduced PDF files should therefore always be viewed with “Overprint preview” enabled in the PDF viewer (e.g. Adobe Acrobat Pro). Simple PDF viewers, such as the Preview in macOS, or many apps on tablets, display such files incorrectly due to the missing overprint feature.
If ZePrA is to be used for high-quality spot color conversions instead of the PDF preflight program or the RIP, activate the checkbox Convert Spot Colors under Configurations/Spot Colors and spot colors are converted to process colors in the best possible way.

Note: Spot colors that are converted will be set to “Overprint” due to the transparency reduction and can mix with process colors. This can lead to unwanted results and the disappearance of converted spot color objects. If this happens, select Transparency Flattening and either Dissolve Overprinting or use the extreme method Rasterize Document.

Transparency Flattening, Image Quality, and File Size
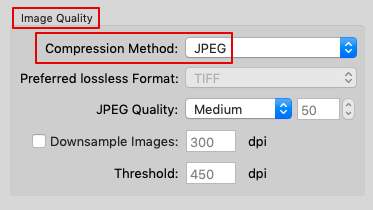
When reducing transparencies, the resulting rasterized objects are created with lossless ZIP compression. This guarantees the best quality but also results in larger files compared to JPEG compression. Even PDF files with JPEG-compressed images will have ZIP-compressed images due to transparency flattening. If the file size is to be reduced, and a reduced quality is acceptable, change the Compression Method to JPEG (in the Image Quality panel under Configurations/Options).

Note: The Compression Method is only considered by ZePrA when performing a conversion. When performing a Transparency Flattening without conversion, no compression change is made, and rasterized objects are ZIP-compressed.

