DeviceLink Editing
Overview
One of the most powerful features of CoPrA is the ability to create customized DeviceLink profiles based on individually adapted test charts (EditTargets). This smart way to create DeviceLink profiles opens up a multitude of possibilities.
Use this tool for recurring retouching work on similar image data, convert RGB data to CMYK or Multicolor data in a controlled way, factor in required gradation changes automatically into your data – the possibilities are almost unlimited.
These profiles can be used to automate color processing with software such as ZePrA.
Each EditTarget contains color patches for the color spaces RGB, CMYK, Gray or Lab in the upper left corner and includes the gray axis, primaries and secondary colors. These color patches are mandatory for the calculation of the DeviceLink profile and included in the calculation.
Open one of the provided EditTargets (for CMYK, RGB, Grayscale or Lab) in an image editing program (like Adobe Photoshop) and perform all desired color corrections. Additionally, other images may be added to the chart to fully adapt it to your requirements. Corrections, filters, masks and effects must include the test patch in the upper left corner to create a DeviceLink from the EditTarget.
Notes: All DeviceLink corrections are not image-specific corrections, but global corrections applied to all image data undergoing the conversion process.
When editing Lab EditTargets an abstract profile will be generated.
Edit Targets included with CoPrA
About Edit Targets
The motifs of a test image play a central role in the creation, control and optimization of DeviceLink profiles. They should cover all areas that are significant for the application of the DeviceLink profile. Each color space which is used in conversions requires its own relevant test image, i.e. the color spaces Gray, RGB, CMYK and possibly Lab. Test images for these color spaces are provided by CoPrA (shown below).
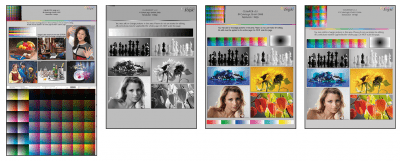
Compilation of Photographic Motifs
The chosen photographic motifs should cover various areas such as skin tones, neutral tones, shadows, highlights and saturated colors. It is advisable to use test images which are applied industry-wide, such as the Roman16 test images of the ECI or the BVDM or images of the ISO (if available). Some of these images are included in the EditTargets provided by CoPrA (for example CLEditCMYK_Large_v31_144dpi.tif). Additional images from your production enhance the significance of the test images.
Gradients
Gradients are generally a critical factor in color conversions, both when using traditional ICC device profiles for source and target or when using DeviceLink profiles. The Homann Smoothness Inspection gradient test form is intended for the assessment of possible breaks or artifacts. It is included in the test file CLEditCMYK_Large_v31_144dpi.tif.
Pure CMY Colors
The test image should also have pure colors in various shades, particularly for CMYK-to-CMYK conversions. They should be positioned at the edge of the test image and should be large enough to allow direct comparison and measurement before and after conversion. This is important on proofs, for the use of colorimeters or the eyedropper tool in Photoshop.
How to create DeviceLink profiles with edited charts
Select your editing workflow
The DeviceLink Editing process begins with the selection of one of the three available editing workflows. These workflows are used to create new DeviceLinks, modify existing DeviceLinks or to create DeviceLinks from edited images.

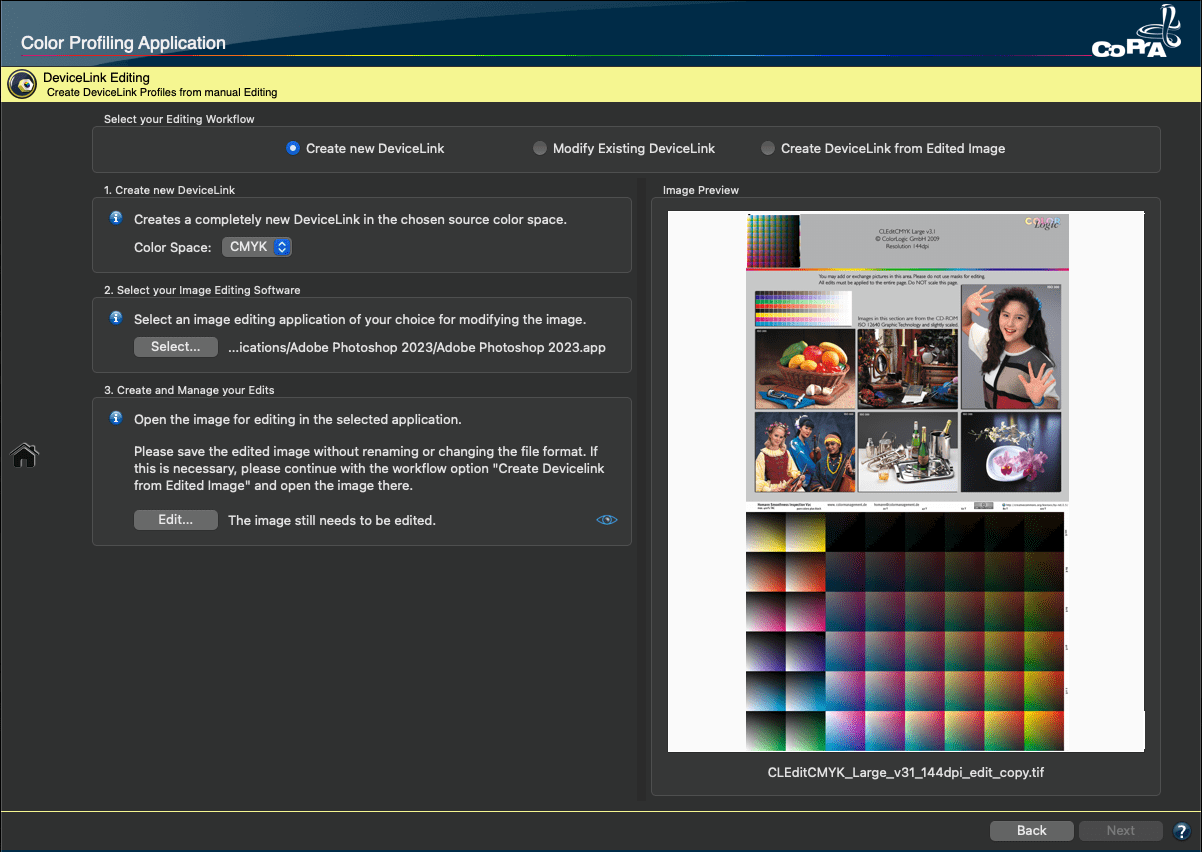
For the first two workflows it is not necessary to select the required EditTarget manually. Simply Select the editing software of your choice and click Edit. This will automatically open the appropriate EditTarget (EditTargets are provided with CoPrA for CMYK, RGB, Grayscale or Lab) in your editing software (e.g., Photoshop).
Now any desired color corrections can be applied and the edited EditTarget can be saved. CoPrA automatically recognizes the saved EditTarget.
To start the DeviceLink Editing process, choose one of the following editing workflows:
- Create new DeviceLink
- Modify existing DeviceLink
- Create DeviceLink from edited image
Create new DeviceLink
Use this workflow to build a new DeviceLink from scratch.
- Choose the appropriate color space (the source color space from which the color conversion will be performed).
- Select an image editing application (e.g. Adobe Photoshop) to modify the image.
- Click on the Edit button and apply your edits. Make sure that you save the edited image without renaming or changing the file format. If this is necessary, please continue with the workflow option Create DeviceLink from edited image and open the edited image there.
- Click on Next.
Modify existing DeviceLink
Here you can select an existing DeviceLink profile which you would like to optimize.
- Select the DeviceLink you would like to modify.
- Select an image editing application (e.g. Adobe Photoshop) to modify the image.
- Click on the Edit button and apply your edits. Make sure that you save the edited image without renaming or changing the file format. If this is necessary, please continue with the workflow option Create DeviceLink from edited image and open the edited image there.
Note: The EditTarget will automatically be converted with the selected DeviceLink from step 1. - Click on Next.
Create DeviceLink from edited image
- Select and open the already edited image, e.g. one of the ColorLogic EditTargets supplied with CoPrA .
- Click on Next.
This is the area where you determine the settings of the DeviceLink Profile.
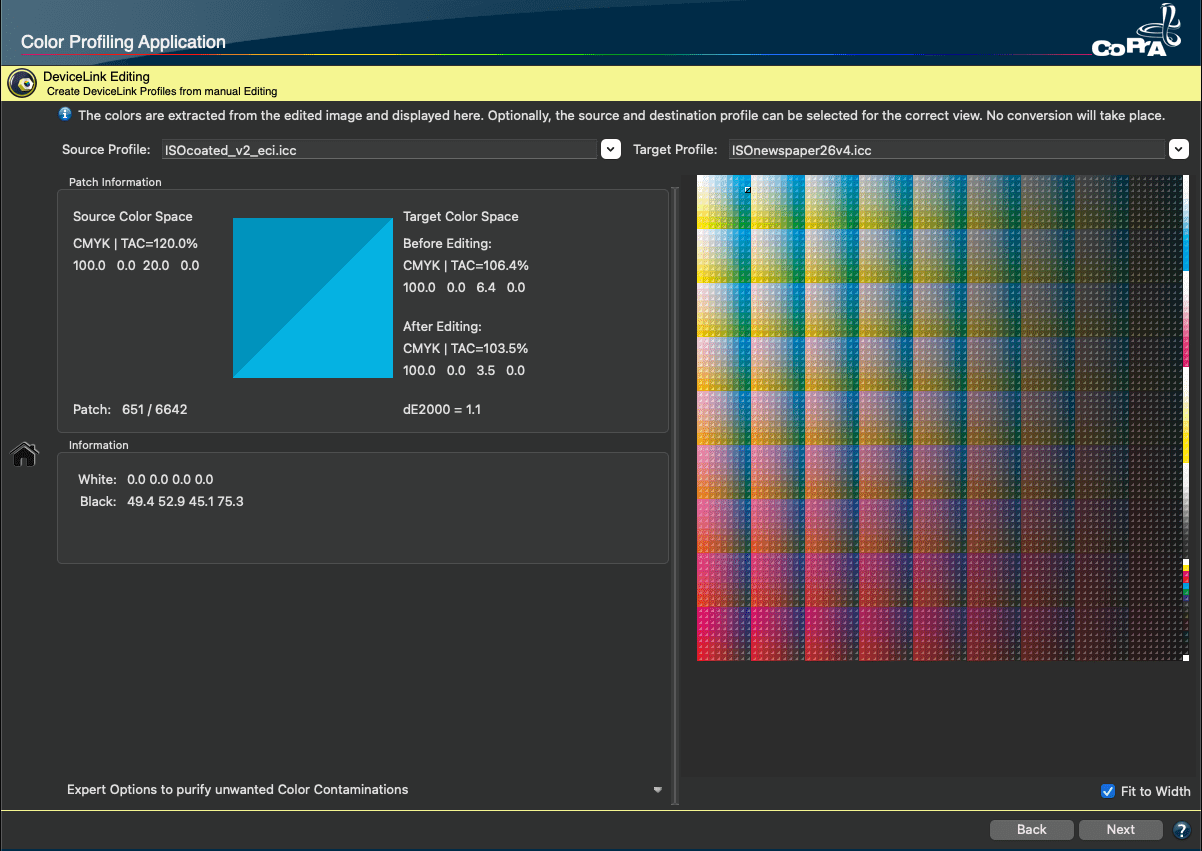
If a profile is embedded in the opened EditTarget, it is automatically selected as the target color space. If this is not the case, the Source Profile and the Target Profile are also selected automatically if they are found on the system or if the profiles are embedded in the DeviceLink profile.
If the profiles cannot be found automatically, the source and the target profile can be assigned manually. Assigning profiles is useful as color patches will then be displayed with true colors in CoPrA as well. A further advantage of edited DeviceLinks with assigned source and target profiles is that these profile information are stored in the PSID tag of the created DeviceLink profile, so it can be used by intelligent workflow solutions like ColorLogic’s smart color server ZePrA to automatically create configurations.
Note: For the created DeviceLink profile the source and target profiles are of no importance.
Patch Information
The modifications for each patch can be evaluated by moving the mouse over the patches on the right side.
In the Source Color Space section, the original unedited EditTarget is used as a reference.
Two information are displayed in the Target Color Space area:
- Before Editing shows the pure conversion to the target profile, without considering the edits.
- After Editing shows the impact of the edits. The difference between the two can be assessed from the TAC, the DCS values and the DeltaE2000 value.
The reference value of each color patch is located in the upper left half of the diagonally split color patch, the edited value is in the right lower half. When the mouse pointer is moved over the chart, the color patches are displayed along with other color information including a difference display (color space, TAC value and DeltaE2000 differences).
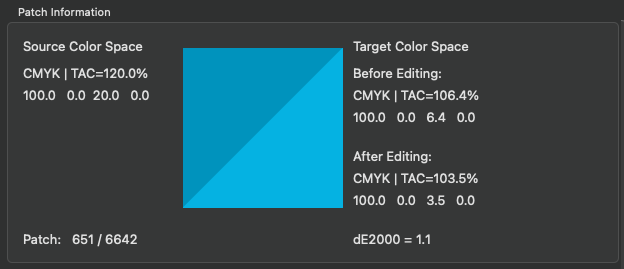
Example: Converting the edited image from the source profile ISOcoated_V2_eci.icc to the target profile ISOnewspaper26v4.icc had an impact on the yellow channel, which was reduced from 20% to 6.4% (Before Editing).
The edits to the image also had an effect on yellow – it was reduced to 3.5%. The difference after conversion and editing has a dE2000 of 1.1 (After Editing).
Information
Shows the color space values of the White and the Black point and information/warnings about the selected exceptions.

Expert options to purify unwanted color contaminations
In contrast to the exceptions when creating DeviceLink profiles from ICC profiles, the exceptions under Expert options to purify unwanted color contaminations in the Editing tool ensure that any contamination caused by manual editing of the EditTargets is removed. Among other things, these exception rules define how pure colors, secondaries, gray, duplex and triplex colors are structured in the DeviceLink. The selection of these rules considerably determines the quality of your DeviceLink profile.
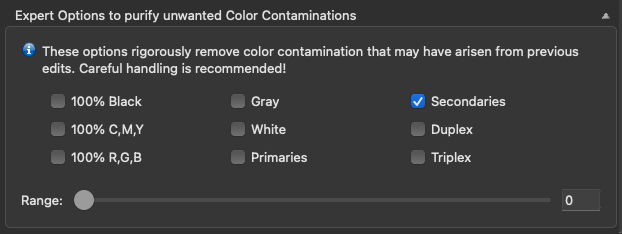
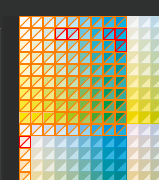
All color patches that are handled by the selected exception are highlighted in the graphical representation by an orange border. Color patches that are affected by the selected exception are highlighted in red.
In addition, under Patch Information/Target Color Space/After Editing + Expert Options the color space and TAC value are updated and the DeltaE2000 value with exception (in the middle) or without exception (on the left) is shown.
The calculated DeltaE2000 distance between these two values (After Editing and After Editing + Expert Options) is the value in brackets. This corresponds to the DeltaE2000 value from CoPrA 8 and 9 and defines the impact of the Expert Options on the edits.
Typically, exceptions are not applied as this would change the edit, but sometimes unwanted changes occur during manual edits, which can then be removed using the exceptions.
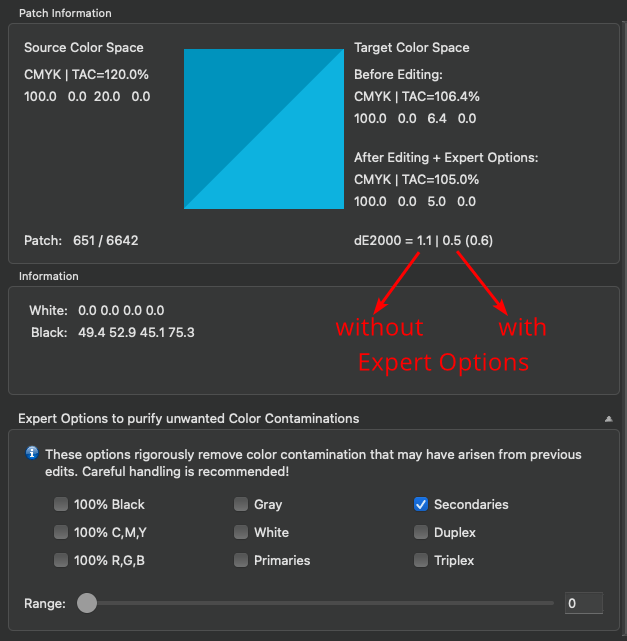
Example: When the Secondaries expert option is applied to the sample workflow, it affects the Yellow channel again. The exception increases the value for yellow from 3.5% to 5% and the dE2000 distance to before editing is now 0.5 (After Editing + Expert Options).
The calculated dE2000 distance between these two values (3.5% After Editing and 5% After Editing + Expert Options) is the value in brackets (0.6).
When moving the mouse pointer over a color patch, it is highlighted by a black or white frame and the source and target color space values are displayed. By pressing the ‘Alt’ key on the keyboard the color patch is captured allowing to quickly and easily check whether and to what extent it is affected by an exception. Exceptions which are not available are grayed out. This may be the case when a dependency between exceptions exists, or when exceptions are not relevant for a specific color space.
100% Black: Protects 100% black, so 100% K remains 100% K and will not be supplemented with or replaced by CMY. Additional color portions will be deleted. For a conversion of an RGB source profile into a CMYK target color space 100% Black ensures that an RGB value of 0, 0, 0 is converted to 100% black. For example, it prevents pure black RGB text from being composed of four colors in the CMYK profile after the conversion.
100% C,M,Y: Protects cyan, magenta and yellow. The 100% values of C, M and Y are retained after the color conversion at 100%. Additional color portions will be deleted. The slider Range specifies how far adjacent color patches are included.
100% R,G,B: Protects pure red, green and blue. The 100% key values of red, green and blue are retained after the color conversion at 100%. The slider Range specifies how far adjacent color patches are included.
Gray: Protects the single color structure of black from 0 to 100%. Additional color portions will be deleted.
White: Protects the paper white. This is especially useful when you would like to achieve an absolute colorimetric simulation for proofs without a simulation of the paper color (e.g., for aesthetic reasons).
Primaries: Protects the single color structure of primary colors.
Secondaries: Protects the two color structures of secondaries.
Duplex (a primary color plus black): Prevents color contaminations of duplex colors. If editing of the test chart causes contaminations of duplex colors by adding primary colors, these impurities will be removed.
Triplex (two primary colors plus black): Prevents color contaminations of triplex colors. If editing of the test chart causes contaminations of triplex colors by adding primary colors, these impurities will be removed.
Range: The slider Range allows to specify how far adjacent color patches will be included. All color patches that are affected by the selected exception are highlighted in the graphical representation by a red border showing the color areas which are affected immediately after moving the slider. Move the slider to a high value to avoid hard edges, move it to a low value to increase color accuracy.
Finally, click Next to proceed to the profile creation dialog to complete the process and create the custom DeviceLink.
Profile Processing
Format, Size and Further Processing
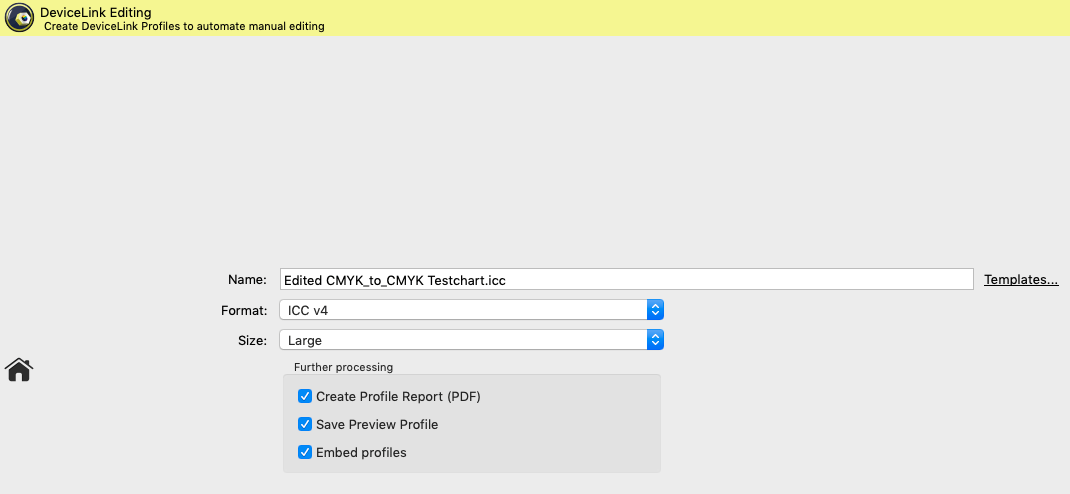
Name: Type in a Name for the profile.
Templates: Allows to select and combine name components from a list of options and save them as custom templates. The last selected template is used when creating new profiles, so the naming of profiles is automated.
Available naming options depend on the current profile type and include Date, Date/Time, Measurement data file name, Source and Target profiles, Name of the current preset and others. Each name component can be added at a user-defined position under Template (the position is selected with the mouse pointer). The Example section below shows the resulting name. Additionally, user defined text can be added at any position within the Template field.
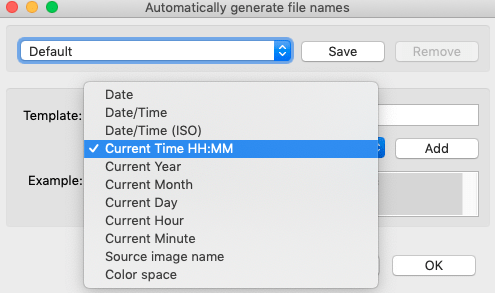
Format: Define the Format of your profile. An ICC format in accordance with specification v2 is recommended as basic setting however, the newer format ICC v4 can also be chosen. In this case, please ensure that your programs support this format correctly.
Note: ColorLogic products handle and use ICC v4 profiles consistently and correctly.
Size: The setting Large is recommended. The size specifies the number of grid points in the profile and determines the amount of disk space required for the generated profile. Small profiles should only be used for test purposes. Very Large profiles can slow down further processing in subsequent programs. Additionally, some programs are not able to handle very large profiles.
Further processing
Create Profile Report: Recommended to activate. The PDF report provides an overview of the quality of the profile based on statistics, diagrams of gray balances, gradients and gamut representations as well as color separations of converted test files.
Under Preferences, the Default save path for the reports and the Default report format can be selected. If XML is selected as the format, the corresponding XSD files will be created automatically as well.
Save Preview Profile: Is only available in Multicolor printer profiling. By activating this checkbox an ICC preview profile will be created in addition to the printer profile. It can be used as soft proof profile in Adobe Photoshop.
Notes: Preview profiles are only suitable for proofing purposes. Either a preview profile or a CMYK profile can be created in one profiling step, but not both.
Embed profiles: Physically incorporates the used source and target profiles into the DeviceLink. This function is tricky and only recommended if the DeviceLink has to be transferred to a computer which does not have the required source and target profiles. It was implemented mainly for use with certain RIPs which only accept DeviceLinks with embedded source and target profiles.
Save: Creates the printer profile and saves it in the folder Profiles (macOS) or Color (Windows), (macOS: /Users/Username/Library/ColorSync/Profiles, Windows: C:\Windows\System32\spool\drivers\color). Demo and encrypted profiles will be saved in a different location only relevant for ColorLogic applications.
Note: CoPrA-SP profiles are stored in the ColorLogic subfolder Licensed-Profiles.
Preview Profiles
Introduction: Using Preview Profiles for Soft Proofs
Preview profiles allow soft proofing of image files in DeviceLink profiling and Multicolor printer profiling, without converting a file. Multicolor preview profiles provide a true color representation of images to be converted into the Multicolor color space in order to review the achievable result prior to the actual Multicolor conversion (More information can be found further down in the text). The same applies to DeviceLink conversions. Here, too, the DeviceLink preview profile can be used in Photoshop with the original data to visually review how the result of such a conversion would look like.
Preview profiles can be created together with DeviceLink or Multicolor printer profiles by activating the checkbox Save Preview Profile (see screenshots). Preview profiles have the suffix ‘preview‘ and are saved in the folder Profiles (macOS) or color (Windows), (macOS: /Users/Username/Library/ColorSync/Profiles, Windows: C:\Windows\System32\spool\drivers\color). Right clicking on the preview profile and selecting the menu entry Show file in the context menu will take you directly to the location of the selected profile.
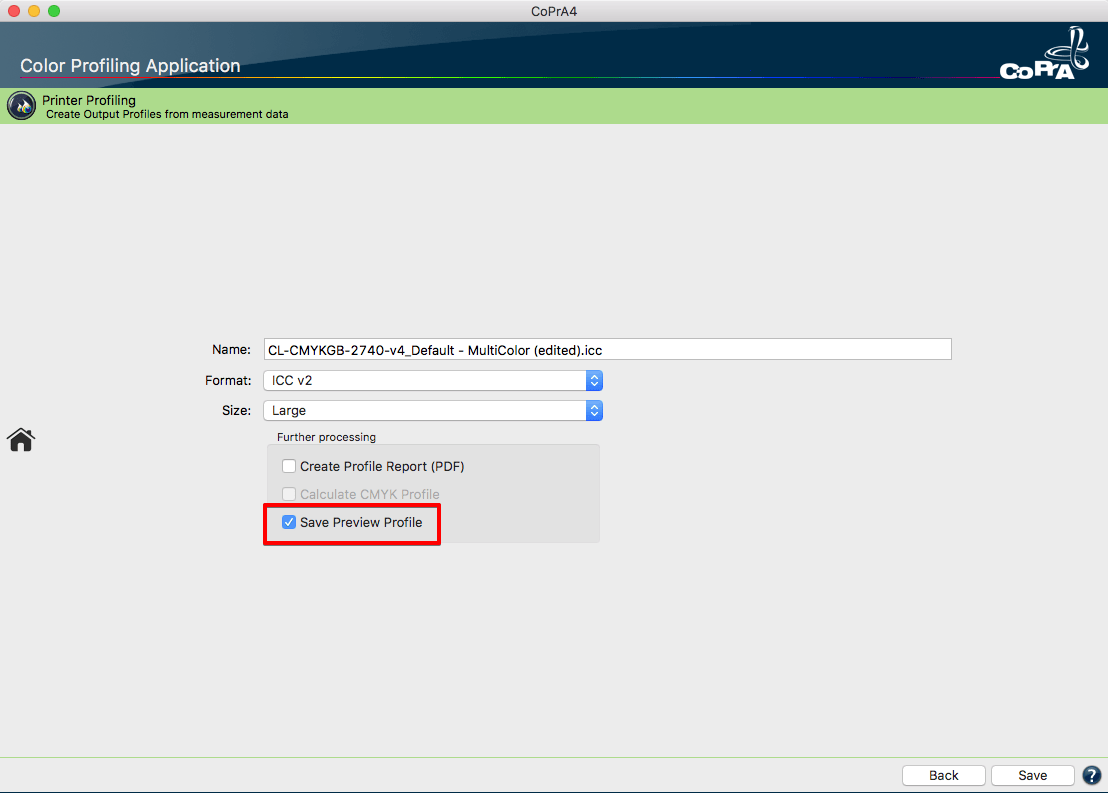
Creating preview profiles in Multicolor printer profiling.
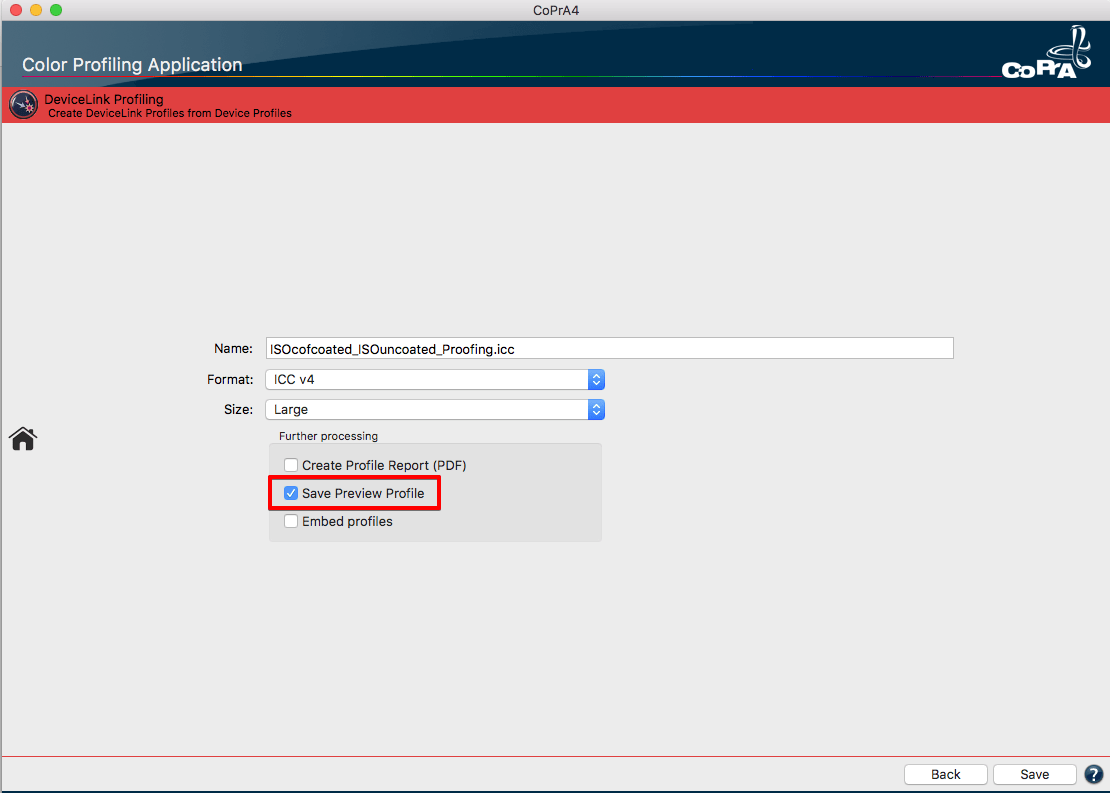
Creating preview profiles in DeviceLink profiling.
A preview profile is a printer profile with the same color space as the source profile of the DeviceLink. It can be used as soft proof profile, for example in Adobe Photoshop. Preview profiles can be created for the following DeviceLink combinations:
RGB-to-CMYK, CMYK-to-CMYK, RGB-to-Multicolor and CMYK-to-Multicolor
Note: The creation of preview profiles is not available for DeviceLink profiles using more than four channels in the source color space since only preview profiles of the color spaces Gray, RGB or CMYK can be used in Photoshop. Multicolor printer profiles are not affected as their preview profiles are always RGB profiles which can be used in Photoshop.
Example: To adapt your RGB image data in RGB mode to the desired CMYK printing condition, use the preview profile of your RGB-to-CMYK DeviceLink as soft proof profile in Adobe Photoshop to check how the image would look like after the conversion. This allows specific RGB adjustments without the need to convert the RGB file early on. A preview profile is a very useful feature, particularly in view of storing RGB image data in media-neutral workflows.
Preview profiles can also be created for Multicolor printer profiles which allows a true color simulation of the color representation prior to application of the Multicolor profile. Although Adobe Photoshop CS4 or higher is able to convert image data using Multicolor profiles, the display of multichannel files is not a true color representation in Photoshop. So far, a true color representation of multichannel files is only possible using additional plug-ins and causes an increased workload. The preview profile function generates an RGB printer profile which features the same color visualization as the original Multicolor profile. Use this preview profile on an original image data for soft proofing.
Note: Preview profiles are only intended for soft proofs and should never be used for the actual conversion. A preview profile provides an excellent visual preview of the expected result of a DeviceLink conversion. However, the special features of the DeviceLink, such as preserving color purity, cannot be 100% emulated.
Using Preview Profiles for DeviceLinks in Adobe Photoshop
- Open the original image data to be converted using a DeviceLink profile in Adobe Photoshop.
- Either assign the Preview profile from CoPrA to this image file, or select the Preview profile in the dialog Customize Proof Condition as Device to Simulate (see screenshot).
Note: The color space of the preview profile is based on the color space of the DeviceLink’s source profile. It is an RGB preview profile for RGB-to-CMYK DeviceLinks and a CMYK preview profile for CMYK-to-CMYK DeviceLinks. - Click Preserve CMYK Numbers to get a virtually exact preview of the expected color representation for the DeviceLink conversion.
Note: Pipette values do not correspond to the final DeviceLink conversion. Only the color representation in the soft proof does.
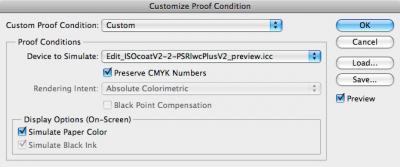
Using Multicolor Preview Profiles in Photoshop
- Open the original image data to be converted using a Multicolor printer profile in Adobe Photoshop (for example an RGB image).
- Select the Preview profile from CoPrA in the dialog Customize Proof Condition as Device to Simulate. Find the profile in the list of RGB profiles. The naming is based on the Multicolor profile name: Profile name_preview.icc
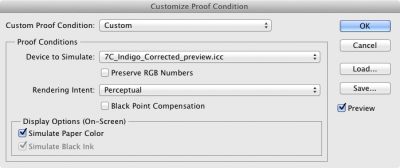
- Select the desired Rendering Intent and disable the checkbox Preserve RGB/CMYK Numbers.
Note: Eyedropper values do not correspond to the final DeviceLink conversion. This is only for a soft proof.
Profile Reports
Profile reports can be created for Printer or DeviceLink profiles. To do so, activate the checkbox Create Profile Report in the last step of the profiling or, when updating profiles, the checkbox Create Profile Comparison Report.
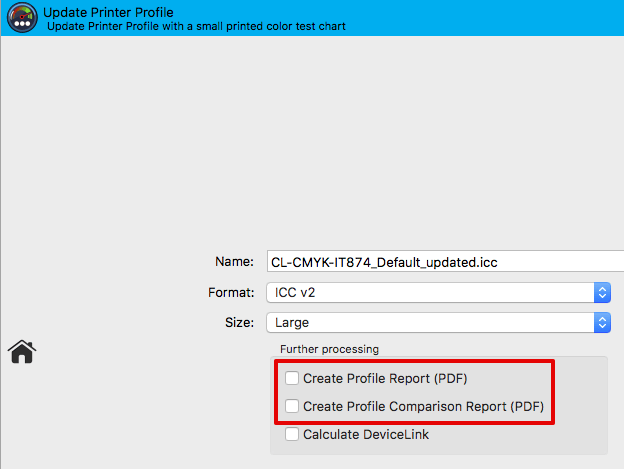
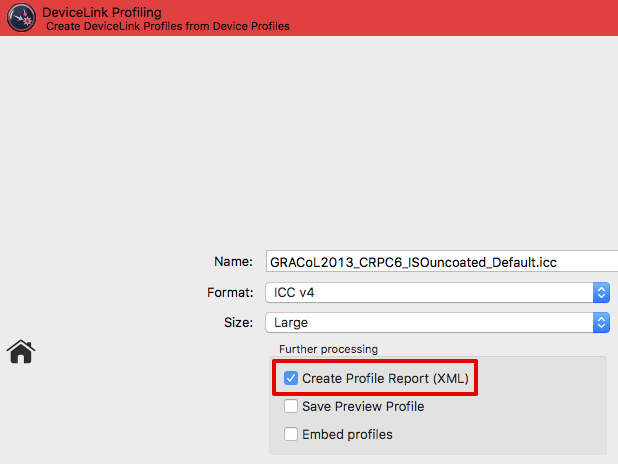
Depending on the type of profile the report contains various statistical data, such as statistics about profile precision (Integrity, Precision, Black Point, White Point etc.), graphic representations of curves and gamuts (Gray Balance, Gradients etc.), conversions of test images, separations and color patches to evaluate the smoothness or the purity of colors. All this facilitates the detection of artifacts that may be present.
Profile reports can be created at any time in Batch Overview or in Profile Manager which, by the way, is not restricted to ColorLogic profiles.
Under Preferences you can define some basic settings for the creation of the profile report, such as the file location, the report format (PDF or XML) or the DeltaE method (dE76 or dE2000).
Note: If a profile comparison report is created when updating a profile, the measurement data obtained from the update test chart will be compared to the data of the original profile (reference profile).
If the checkboxes Brightener Compensation or Measurement Correction have been activated, the data of the original profile will not be compared to the measurement data from the update test chart but to the data modified by these options.

