Images and Vectors
Overview
The processing of CMYK, RGB, Gray and Lab objects (images and vectors) can be individually defined and precisely controlled. For conversion, device profiles or DeviceLinks can be assigned to both images and vectors, or embedded profiles can be used. Alternatively, the SmartLink function can be employed to create high-quality DeviceLink profiles “on-the-fly” for the conversion of any object.
By default, the same settings are used to convert images and vectors, but they can also be processed independently using custom settings.
The rendering intents selected under Images/Vectors are only used for the conversion of PDF files under certain conditions – see below. For image data such as TIFF, JPEG, PSD, and PSB, the rendering intents selected under Images are automatically used.
Image Color Conversion
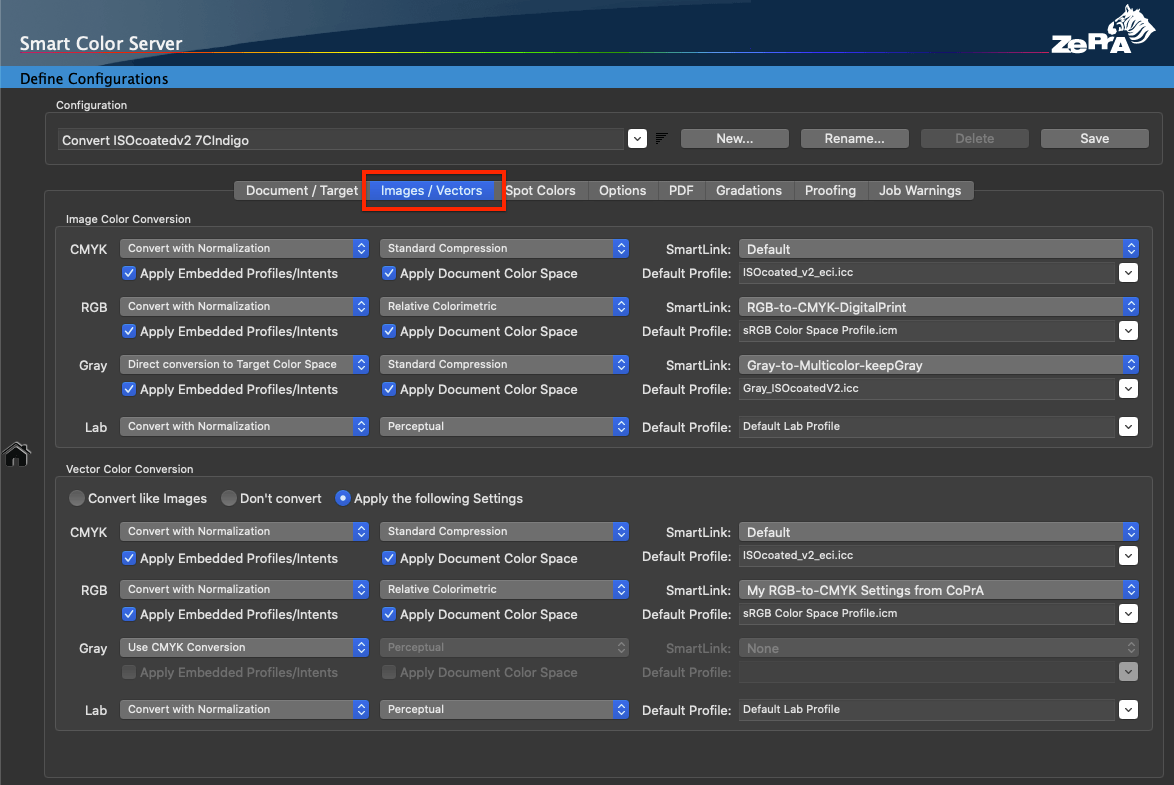
The panel Image Color Conversion provides settings to convert individual images such as TIFF, JPEG, PSD and PSB files or images within a PDF file. There are three conversion settings for CMYK, RGB, Gray and Lab:

- No Conversion: Images are not converted
- Convert with Normalization: First converts the image data to the ICC device profile selected as the Document Color Space in the Document/Target tab (this is the normalization step). In the second step, the conversion settings made in the Document/Target tab are applied to the image data. This often leads to a second conversion of the image data – according to the settings – into the target profile set under Target Color Space.
Notes: In the PDF context, conversion to the Document Color Space is also referred to as normalizing and is common practice. For the conversion of pure pixel data (PSD, TIFF, JPEG) the two-step conversion using Convert with Normalization is usually not recommended. - Direct conversion to Target Color Space: Converts the image data from the source color space to the profile selected under Target Color Space without first converting it to the Document Color Space.
A fourth setting is available for grayscale images:

Use CMYK Conversion: The gray components of grayscale images are converted with the same settings used for CMYK. If a DeviceLink conversion by SmartLink is selected under CMYK, the gray images remain gray even after the conversion and are not built up in four colors.
Note: A caution notice [invalid selection] is shown when converting from Gray color spaces using a user-defined conversion method/SmartLink setting with an inappropriate CMYK Default Profile. Solution: Select a gray ICC profile in the Default Profile drop-down menu to ensure a correct conversion.
Such an error can occur, when deviating from the default conversion method Use CMYK Conversion and when selecting a SmartLink preset (Gray-to-XX) instead.

SmartLink:
The SmartLink function uses the source profiles embedded in an image’s data and automatically calculates the DeviceLink profile required for conversion between source and target profiles for each object. ZePrA then applies the profile at object level.

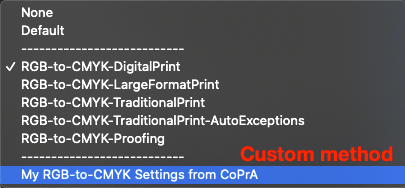
The SmartLink drop-down menu contains all possible SmartLink options for a given color space (the screenshot below shows the SmartLink options for RGB images). This allows the application of a specific SmartLink method for a particular color space conversion, making the conversion tailor-made.

The default setting when creating new configurations employs a dedicated Default method for each color space and conversion step, but if required, other methods or custom methods can be used.
Note: Only use a custom SmartLink method if you need to deviate from the Default setting.
If SmartLink is not to be used and a normal ICC conversion with device profiles is to be performed, select None in the drop-down menu.
Note: This may be necessary to get the same color conversion between flattened and non-flattened objects in the PDF when flattening is enabled.
Selecting a Rendering Intent

Generally, the rendering intents are defined for each object in the PDF and are used by ZePrA when the Apply Embedded Profiles/Intents checkboxes are enabled. If you want to use the rendering intent set here rather than the embedded rendering intents, activate the Ignore PDF Rendering Intents checkbox in the Options tab.

Detailed information on rendering intent selection can be found below.
Apply Embedded Profiles/Intents: Uses embedded ICC device profiles and embedded rendering intents of the PDF file for CMYK, RGB, Gray images, or vector data.

The embedded rendering intent is used together with the embedded profiles, and the manually set rendering intent is ignored.
To ensure high-quality color conversions without loss of accuracy when using embedded rendering intents, the Black Point Compensation checkbox should be activated in the Options tab.

Apply Document Color Space: Allows the color space defined as document color space to be applied to undefined images and vectors with the same color space. This makes it possible to set up a single hot folder and configuration for all types of PDF files to be converted to a single target color space.
This option is enabled by default when a new configuration is set up using the Auto Setup Wizard.

If both checkboxes, Apply Embedded Profiles/Intents and Apply Document Color Space, are activated, ZePrA first checks whether an embedded profile is available. If this is the case, this profile is used. If no embedded profile is present, ZePrA checks whether the color space of the image matches the document color space. If this is the case, this profile is used for the image. Only if there is no match, the Default Profile will be used.
Note: To ensure that a specific Default Profile is used in any case, the checkboxes Apply Embedded Profiles/Intents and Apply Document Color Space should be disabled.
Vector Color Conversion
Vector Color Conversion defines how individual vector objects of a PDF file are processed. By default, vectors and images are converted with identical settings, but they can also be processed independently with custom settings:

Convert like Images: The default setting. Vector objects are converted with the same settings as images.
Note: For PDF files with flattened transparencies, it is likely that pixel and vector data of the same color are directly adjacent. If images and vectors are converted with different settings, color differences may occur between adjacent pixel and vector objects of the same color. Images and vectors are therefore converted with identical settings by default. This avoids color differences.
Don’t convert: Vector data is not converted, whereas image data is converted.
Apply the following Settings: Allows to define individual conversion settings for CMYK, RGB, Gray, and Lab.
The following three conversion settings are available:

- No Conversion: Vectors are not converted.
- Convert with Normalization: First converts the vector data to the ICC device profile selected as the Document Color Space in the Document/Target tab (this is the normalization step). In the second step, the conversion settings made in the Document/Target tab are applied to the vector data. This often leads to a second conversion of the vector data – according to the settings – into the target profile set under Target Color Space.
Notes: In the PDF context, conversion to the Document Color Space is also referred to as normalizing and is common practice. - Direct conversion to Target Color Space: Converts the vector data from the source color space to the profile selected under Target Color Space without first converting it to the Document Color Space.
A fourth setting is available for grayscale vectors:

Use CMYK Conversion: Files composed of grayscale vectors can also be converted using the setting Use CMYK Conversion. The gray components are converted with the same settings used for CMYK. If a DeviceLink conversion by SmartLink is selected under CMYK, the gray vectors remain gray even after the conversion and are not built up in four colors.
To ensure high-quality color conversions, DeviceLink profiles should be used with or without SmartLink.
SmartLink:
The SmartLink function uses the source profiles embedded in a vectors’s data and automatically calculates the DeviceLink profile required for conversion between source and target profiles for each object and applies the profile at object level.
The SmartLink drop-down menu contains all possible SmartLink options for a given color space. This allows the application of a specific SmartLink method for a particular color space conversion, making the conversion tailor-made.
The default setting when creating new configurations employs a dedicated Default method for each color space and conversion step, but if required, other methods or custom methods can be used.
Note: Only use a custom SmartLink method if you need to deviate from the Default setting.
If SmartLink is not used and a normal ICC conversion with device profiles is to be performed, select None in the drop-down menu.
Note: This may be necessary to get the same color conversion between flattened and non-flattened objects in the PDF when flattening is enabled.
Selecting a Rendering Intent

Generally, the rendering intents are defined for each object in the PDF and are used by ZePrA when the Apply Embedded Profiles/Intents checkboxes are enabled. If you want to use the rendering intent set here rather than the embedded rendering intents, activate the Ignore PDF Rendering Intents checkbox in the Options tab.

Detailed information on rendering intent selection can be found below.
Apply Embedded Profiles/Intents: Uses embedded ICC device profiles and embedded rendering intents of the PDF file for CMYK, RGB, Gray images, or vector data.

The embedded rendering intent is used together with the embedded profiles, and the manually set rendering intent is ignored.
To ensure high-quality color conversions without loss of accuracy when using embedded rendering intents, the Black Point Compensation checkbox should be activated in the Options tab.

Apply Document Color Space: Allows the color space defined as document color space to be applied to undefined images and vectors with the same color space. This makes it possible to set up a single hot folder and configuration for all types of PDF files to be converted to a single target color space.
This option is enabled by default when a new configuration is set up using the Auto Setup Wizard.

If both checkboxes, Apply Embedded Profiles/Intents and Apply Document Color Space, are activated, ZePrA first checks whether an embedded profile is available. If this is the case, this profile is used. If no embedded profile is present, ZePrA checks whether the color space of the vector matches the document color space. If this is the case, this profile is used for the image. Only if there is no match, the Default Profile will be used.
Note: To ensure that a specific Default Profile is used in any case, the checkboxes Apply Embedded Profiles/Intents and Apply Document Color Space should be disabled.
Rendering Intents
Generally, the rendering intents are defined for each object in the PDF and are used by ZePrA when the Apply Embedded Profiles/Intents checkboxes are enabled. If you want to use the rendering intent set here rather than the embedded rendering intents, activate the Ignore PDF Rendering Intents checkbox in the Options tab.
The selection of a suitable rendering intent is crucial for the optimal conversion of PDF objects. Therefore, separate rendering intents can be used for the conversion of CMYK, RGB, Gray, and Lab objects.

To ensure precise color conversions, ZePrA completely recalculates the conversion of source and target profiles on-the-fly. The same algorithms are used as in ColorLogic’s CoPrA profiling software.
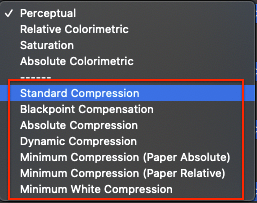
In addition to the standard rendering intents, ZePrA contains five more rendering intents that are only available with the SmartLink option activated.

Additional SmartLink Rendering Intents
The SmartLink module provides seven additional rendering intents to avoid inharmonic color conversions, which can result from differently calculated tables for source and target profiles.

To ensure precise color conversions, ZePrA completely recalculates the conversion of source and target profiles on-the-fly. The algorithms are the same as ColorLogic’s CoPrA profiling software.
Note: These additional rendering intents are only available with SmartLink enabled. If the checkbox Use SmartLink is not activated or SmartLink has not been licensed, only the four standard rendering intents are available.
Standard Compression: This is the default method. It uses a perceptual conversion that is well suited for all types of gamuts, i.e., also for conversions between color spaces of different sizes. Neutral tones are converted using a relative colorimetric approach, and the appearance of the gray axis always depends on the paper white of the target profile. Therefore, the gray axis of the transformed file will appear yellowish on a very yellowish paper. The same gray axis will appear bluish on a bluish paper. For very small color gamuts, for example in newspaper printing, the dark tones are raised slightly to achieve more image definition in these areas.
Blackpoint Compensation: Use Blackpoint Compensation to achieve the same results with a perceptive conversion as with “Relative Colorimetric with Black Point Compensation”. When converting from large to small color spaces, the image definition is preserved in the highlights and shadows, unlike with a pure Relative Colorimetric conversion. Neutral tones are converted using the Relative Colorimetric intent. Out-of-gamut colors are cut off.
Absolute Compression: This method is based on the absolute colorimetric rendering intent in terms of color reproduction and is recommended when the paper tones differ significantly (the color gamuts can be similar or different). In contrast to the Standard Compression and Blackpoint Compensation, the paper tint is compensated in the gray balance. The rendering of neutral colors is based on the absolute colorimetric rendering intent, without paper tone simulation in the highlights. If, for example, the paper white is significantly more yellow than in the reference, the gray axis appears neutral despite the yellowish paper tone. This ensures that the color appearance of the original file is preserved as best as possible on a target medium with a different paper tint. The contrast range in the highlights and shadows is adapted to avoid any loss of image definition.
Minimum Compression (Paper Absolute): This method is largely similar to the absolute colorimetric intent and only compensates close to the black and the white point.
In addition, the white point of the source color space is not simulated, but scaled to the white point of the target color space, thus ensuring a pure paper white.
Use this rendering intent to achieve a close reproduction, for example when using print standards such as ISO Coated V2 or GRACoL2006 Coated1v2 on a digital printer.
Note: As for the absolute colorimetric rendering intent, ensure that the target color space is larger or has at least a similar size to avoid any loss of image definition. For color conversions from larger to smaller color spaces use Absolute Compression to maintain the gray balance of the source color space.
Minimum Compression (Paper Relative): This method is largely similar to the relative colorimetric intent and only compensates close to the black and the white point. It is similar to Minimal Compression (Paper Absolute) but uses relative colorimetric instead.
Dynamic Compression: Compares the source color space with the target color space and generates a compression that minimizes out-of-gamut areas. This setting preserves the brightness of the original color space while reducing the saturation, and therefore also preserves the image definition. As for the Standard Compression, the gray axis of the conversion is built relative to the paper white of the target profile. This approach is well suited when the source and target profiles have a very large dynamic range and contrast, for example, in RGB-to-CMYK conversions.
Note: This method is now only available in ZePrA for compatibility reasons, and no longer in CoPrA. We recommend using Automatic Paper Relative instead.
Minimum White Compression: This method is similar to Minimum Compression (Paper Absolute). Both rendering intents compress the white point without paper simulation, however, there is an important difference: The Minimum Compression is a rather perceptual rendering that additionally compresses the black point, so the maximum dynamic range is utilized without loss of detail in the shadows. In contrast, the Minimum White Compression compresses the white point but not the black point, so a close absolute colorimetric match between source and target color spaces can be achieved. This can be useful for the color representation across various media, color matching or printing on slightly differing media. It can be regarded as close to absolute colorimetric rendering without paper tint simulation.
Note: Remember that the target color space should be larger than the simulated color space (or similarly large) to avoid loss of detail and vividness (similar to the absolute colorimetric rendering intent). For conversions from large to small color spaces, instead use our rendering intent Absolute Compression if the gray balance of the source color space is to be preserved.
Important: To ensure that an on-the-fly DeviceLink profile created with SmartLink uses the rendering intent set under Configurations > Images/Vectors, activate the checkbox Ignore PDF Rendering Intents in the Options tab.

