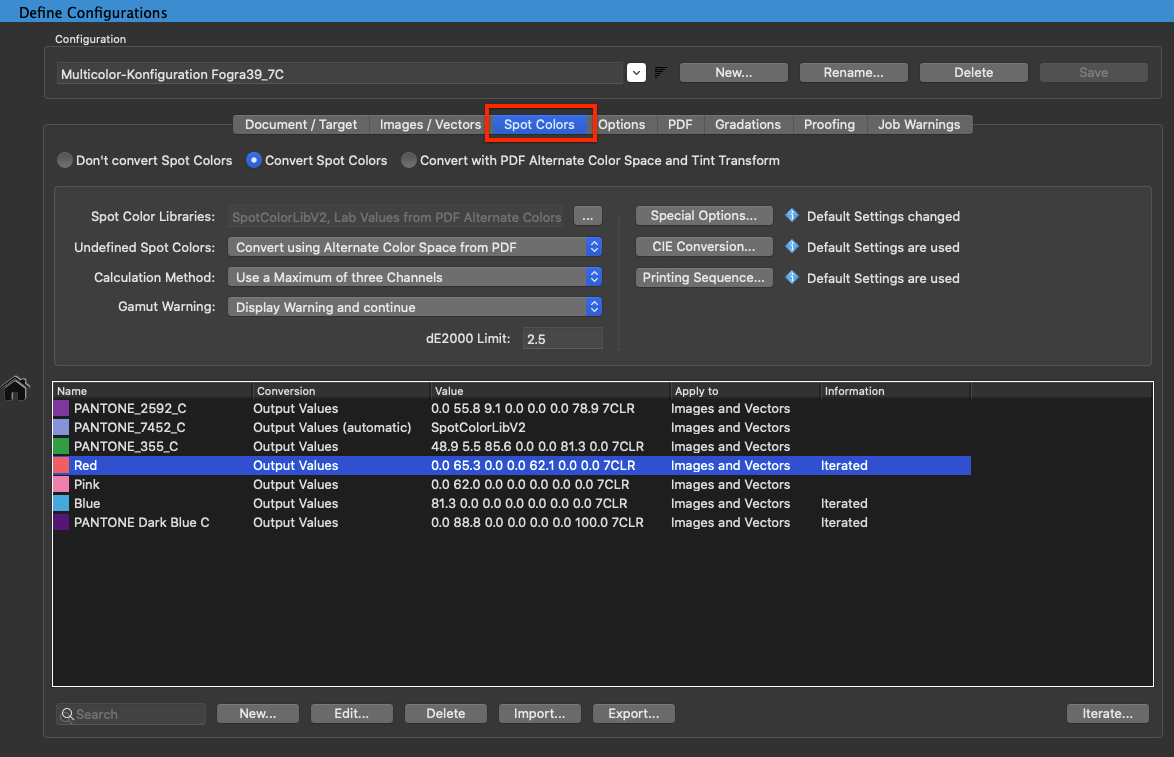
Spot Colors
ZePrA’s Spot Color module offers the most accurate methods for converting spot colors of PDF files into CMYK, RGB or Multicolor color spaces. It requires a spot color license which is included in ZePrA XXL but it is also available as add-on module.
The Spot Color module
- is part of ZePrA XXL, including a Multicolor license
- can be obtained as add-on for ZePrA (requires a spot color licence)
- is part of the Multicolor add-on (requires a Multicolor licence)
How to achieve the best possible printing results:
- Create a Spot Color Library. For best results, try to match and measure color values of spot colors as closely as possible based on either the printing process or a proofer, or based on the requirements of the customers. The more complete a spot color library, the better ZePrA can automatically color convert spot colors of PDF and image files into the target color space. The spot color libraries in ZePrA contain fundamental descriptions of the spot colors, e.g., measured values of the solid tone and tints (gradations), measurements on white and black, opacity and information as to whether they are non-printing channels, such as cutting marks, register marks or the like. Further information is available under Global Settings/Spot Colors.
- As an alternative to separate spot color libraries, CxF/X-4 spectral data for spot colors can be included and travel with the PDF files. ZePrA can take advantage of this information and can be set to prefer this dynamic data over the library. Read more below under Spot Color Libraries.
- Apply the spot color libraries or CxF/X-4 data of the configuration to the PDF and image files. In the Configuration/Spot Colors dialog, specify how spot colors are to be converted into the target color space. All configurations receive these fundamental descriptions from the Spot Color Libraries to determine the most accurate Lab or spectral values.
Converting spot colors in pixel based formats: Spot colors from image files (ZePrA supports TIFF, PSD and PSB pixel formats) can be converted by creating the spot colors as alpha channels with spot color attribute.
Without spot color module: The alternate color space colors indicated in the PDF file are used to convert spot colors to the target color space which results in inferior quality. Read more below under Working without the Spot Color Module.
Note: In many cases, standard conversion without using a custom spot color library does not result in sufficiently good rendering of the spot color, nor does it produce a substitute process color that prints well.
Retaining user defined spot colors: Retaining user defined colors is critical to print production. This is required in packaging printing, for example, when areas for punch marks, braille, varnish, folding and trim marks are to be retained.
Converting Spot Colors
Spot color objects can be converted into CMYK, RGB or Multicolor. For example, spot colors will be converted into CMYK if the target profile defined in ZePrA is a CMYK profile.
There are three options to process spot colors:

- Don’t convert Spot Colors: All spot color objects remain unchanged. If necessary, use the Gradations function to make additional tone value corrections to spot color gradients.
- Convert Spot Colors: Spot colors are converted to process colors. For example, in digital printing spot colors have to be converted.
- Convert with PDF Alternate Color Space and Tint Transform: Uses the alternate values (Alternate Color Space and Tint Transform) stored in the PDF for the respective spot color. This results in a much lower quality reproduction than when using a spot color library with spectral data and gradients and the ColorLogic calculation methods. This option is used for comparison with results obtained by PDF viewers and preflight tools if spot color conversions were performed with them.
Note: The high-quality ColorLogic calculation methods are not used in this case.
All following steps require the spot color module.
Convert to Target
Under Define Configurations/Convert Spot Colors to Target Color Space, spot-color objects are converted into CMYK objects if the target profile is a CMYK profile. Use the Convert Spot Colors to Target Color Space option if spot colors are not wanted in the final print job.
If the Convert Spot Colors to Target Color Space option is not activated, all spot-color objects remain unchanged. If necessary, use the Gradations function to make additional tone value corrections to spot-color gradients.
Spot Color Libraries
Select the spot color library or multiple libraries that should primarily be used to perform the conversion. Spot Color Libraries can be selected using the button to the right of the library display.
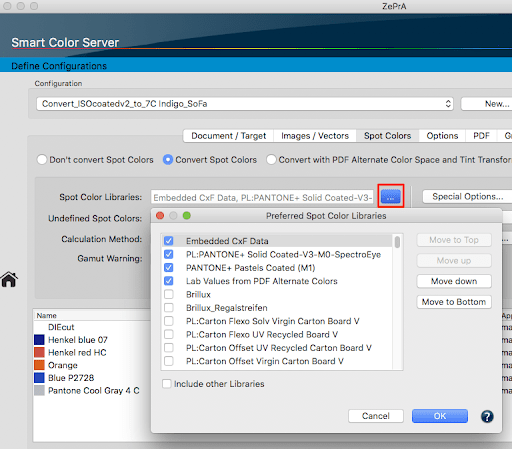
Preferred Spot Color Libraries: Select a single or multiple spot color libraries.
Include other Libraries: Searches other libraries for matching spot color names. The default use of this option is not recommended because there is a possibility of automatically selecting a spot color from a library that does not match the capabilities of the target printer.
Example: If one of the spot color libraries contained a spot color that was printed on OPP film, but the target profile was printed on paper, it would not match. Therefore it is recommended, to manually select those libraries that fit the printer’s requirements.
Prioritize Spot Color Libraries
The top library has the highest priority, the others are considered in the order from top to bottom. The order of the selected libraries can be changed with the buttons Move up, Move down, Move to Top, Move to Bottom.
Move to Top: Moves the selected spot color library to the top of the list.
Move to Bottom: Moves the selected spot color library to the bottom of the list.
Further Options for Spot Color Conversion
Embedded CxF Data: Automatically uses any available CxF/X-4 spectral data for spot colors in PDF/X files. CxF/X-4 has been an ISO standard since 2015 and has been designed to define spot colors by measuring and storing spectral information of ink solids and tints, on substrate and process black. This spectral definition allows color management systems like ZePrA to better proof and reproduce spot colors.
Note: With ColorAnt L (from version 5), CxF/X-4 data can be embedded in PDF/X files.
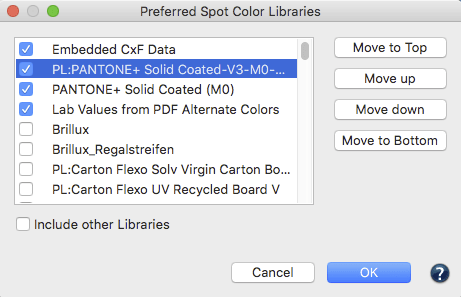
Lab Values from PDF Alternate Colors: Uses the alternative Lab color space instead of a library. Newer versions of Adobe InDesign save Lab PDF replacement color values instead of CMYK in the PDF file. If spot colors do not have CxF values or are not available in a spot color library, you can use the alternate Lab value from the PDF file.
Note: If the alternate color space in the PDF file is not Lab but, for example, a CMYK color space, it will not be used and will be considered undefined by ZePrA.
Undefined Spot Colors
Defines how spot colors that are neither contained in a library nor defined in the lower table of the Spot Colors tab are to be converted.
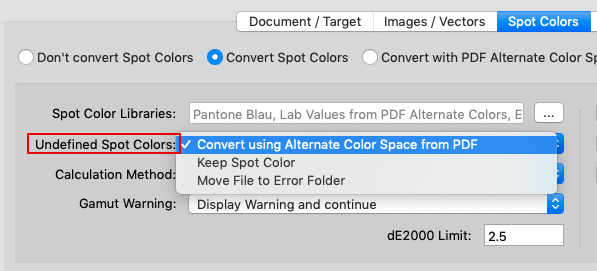
- Convert using Alternate Color Space from PDF: Undefined spot colors will be converted by the possibly less accurate alternate color stored in the PDF, which may lead to poorer quality results.
Note: The high-quality ColorLogic calculation methods are not used in this case. - Keep Spot Color: All undefined spot colors are preserved and not converted.
- Move File to Error Folder: If an undefined spot color is found, ZePrA displays an error message for the corresponding job on the Overview page. The file is moved to the Error folder of the corresponding queue.
Note: Files can contain multiple undefined spot colors, even if only one is displayed in ZePrA’s Overview.
Calculation Method
The Calculation Method specifies how a spot color, a combination of spot colors and process colors, or multiple spot colors are converted to the target color space.

The following Calculation Methods are available:
- Precise Match – Proofing: Reproduces spot colors on a proofing printer as precisely as possible. This method is not meant to be used in production as it may use all process colors to achieve the closest match (based on DeltaE 2000). The full tone is calculated with the aim of generating the smallest possible DeltaE 2000 value. No channel reduction or print optimization is applied.
- Visual Match: The visually best conversion with high colorimetric accuracy and good printability. Solid tones are converted with the fewest number of channels that are absolutely necessary for good colorimetric accuracy. Channels will be reduced or clipped to 100% if the deltaE increases only slightly compared to the proofing method. Single-color and two-color combinations are also included in the search for the best color combination. Tints may be rendered with more channels than the solid tone if needed for a good match. Spot colors that are present in combination with process colors or other spot colors may consist of several process colors after conversion. This option is suitable for digital printing, large format inkjet printing or offset printing with a fine screen ruling.
- Use the least Number of Channels possible: Converts spot color solids and tints with the least number of channels and still delivers colorimetrically acceptable results. In rare cases, for some dark solids, up to four channels can be used to achieve a good match. Single-color and two-color combinations are also included in the search for the best color combination. Usually, three or fewer channels are used to render spot colors. Typically, tints are rendered either with the same channels used for the solid, or with one channel more if needed for a better match. After conversion, overprinting spot colors consist of as few process colors of the target color space as possible. Choose this method for packaging printing, where the purest possible colors are to be produced.
- Use a Maximum of three Channels: This method is similar to the calculation method Use the least Number of Channels possible, but ensures that no more than three channels are used. Tints also use a maximum of three channels. Choose this method for packaging printing, where the purest possible colors are to be produced and no more than three process colors for spot color conversion may be used, even if that results in a less accurate match. Single-color and two-color combinations are also included in the search for the best color combination.
- Use a Maximum of two Channels: The conversion is limited to the use of only one or two process colors selected for each spot color. Tints use a maximum of two channels as well. This results in very clean separations that are easy to print, but not necessarily very accurate in colorimetric terms. It is recommended to use this function only for single spot colors and not generally for all spot color conversions.
ZePrA converts spot colors automatically visually and print optimized (channel minimized). A visually optimized conversion will prioritize the lowest visual color difference based on ColorLogic’s own DeltaE method.
This may result in more process colors being used to simulate the spot color. Our channel reduction method prioritizes the use of as few channels as possible while maintaining a low DeltaE 2000 value. Channels will only not be used if the resulting color is still close to the original spot color.
Note: ColorLogic’s own DeltaE methodology is very close to DeltaE2000 but is more suitable in certain areas, especially for larger color differences for which DeltaE2000 has proven not to be well suited.
Gamut Warning
The Spot Color module delivers extremely accurate color rendering in the conversion of spot colors to process colors. However, it is possible that some spot colors are outside the printable gamut of the target profile and thus prevent precision rendering. In this case, a deltaE Limit (dE 2000) can be set under Gamut Warning to receive a warning message.

Choose a Gamut Warning
None: No warning or error message during spot color conversion to the target color space.
Display Warning and Continue: Displays a warning if the specified dE2000 Limit is exceeded during the conversion of spot colors to the target color space. The processed file is also highlighted in yellow in the Jobs and Queues Overview. The file is then converted and moved to the Output folder.
Display Error: The file is not converted and is highlighted in red in the Jobs and Queues Overview. Subsequently it is moved to the Error folder.
Keep Spot Color and Show Warning: The spot color causing the warning will not be converted and is preserved. All remaining spot colors will be converted. The converted file is highlighted in yellow in the Jobs and Queues Overview and is moved into the Output folder or the Warning folder (if this folder has been created in the Queue settings).
Note: Gamut warnings for spot colors can be disregarded. See details under Edit Spot Color Conversions.
Special Options
The Special Options button opens a dialog for specifying the Merging Color Space, the Linearity of tints and other general conversion settings. When using default settings, the message Default Settings are used is displayed next to the Special Options button in the Spot Colors dialog.

Merging Color Space: Defines the color space to be used for overprints and tints calculation. While spot colors are always converted to the ICC profile defined as Target Color Space the overprints and tints could either be assumed to simulate the Document or the Target Color Space. The following options are available in the drop-down menu:
- Automatic (default): Uses mostly the profile defined as target color space but the document color space is used if an RGB working space profile is selected as target profile (see Example 3 below).
- Target Color Space: Uses the target profile for all overprint and tints calculations. Example: Typical production printing with spot colors converted to the target color space.
- Document Color Space: All calculations use the document profile.
Example 1: In proofing we want to inspect how ISO coated V2 and two spot colors interact visually (overprints of the spot colors with CMYK) and not how the two spot colors are overprinting in the proof printer’s profile.
Example 2: If the target profile is an RGB inkjet printer for production printing we would nonetheless pick spot color properties from a reference data or reference profile (document color space) instead of the target profile.
Example 3: For soft proofing of a CMYK+Spot Color file we do not want to see the tints and overprints in the RGB monitor color space (or AdobeRGB etc.). Instead, we want to see how the gradations and overprints would look like if printed together with CMYK (document color space) and that should then be rendered to the RGB monitor color space.
Linearity: Defines how tints of spot colors are calculated. This is especially important if there are no tints available (no measurements on white background) and only the full tone of a spot color is defined. The following options are available in the drop-down menu:

- Automatic: If the tints of a spot color are available (measurements on white background) then they will be used as target values. If only the full tone of a spot color is defined, the average linearity of the corresponding ICC profile will be used. The profile to be used depends on the Merging Color Space setting.
- Use ISO 20654 (SCTV) for all Tints: Uses the ISO method to calculate the linearity of all tints. This option forces SCTV linearity, even when tints are included in either the ZePrA’s spot color library or embedded as CXF/X-4 in the job. If the spot color library or CxF/X-4 data contains tints, the hue of the tints is still preserved in the calculation, but the linearity is calculated according to ISO 20654. Consequently, this option adjusts the linearity derived from the measurements of the tints to the linearity according to ISO 20654.
Note: Use this option if you want to overwrite the linearity and use SCTV consistently for all spot colors even those where tint measurements are available that deviate from SCTV. - Use ISO 20654 (SCTV) for undefined Tints:
- This is the default Linearity setting. It improves the overall rendering of tints when only the full tone is specified. In the process, the SCTV linearity curve is applied to spot color tints for which no tint measurements are stored in ZePrA’s spot color library.
When tints are available, ZePrA uses this information to render the tints (e.g., if CxF/X-4 measurement data is available for a spot color, or if the used spot color library contains measurements of spot color tints on white background).
Note: This is the recommended option as in many cases no measurements of the tints are available. However, if these tints and the associated linearity are available, they will be used.
For existing configurations (ZePrA 11 and below) where the Linearity has not been explicitly specified, this setting is adopted. This affects configurations which have been created via the Auto Setup Wizard and have not been edited afterwards. However, if the Linearity has been changed manually and then set to Automatic again, this setting is fixed and will be retained in the configuration.
Avoid Dot-on-Dot Combinations: Activating this checkbox prevents process color combinations that could produce Moiré effects in AM printing such as Cyan and Orange, Magenta and Green or Black and Violet.
Example: If the target color space is a Multicolor profile and printing is done with AM screening then mostly Cyan and Orange, Magenta and Green and Black and Violet are on the same angles which might produce Moiré or other dot-on-dot effects if printed together.
Enabling the checkbox prevents the typical color combinations listed above, therefore preventing Moiré or other dot-on-dot effects. However, if disabled, the spot color conversion can use any combination of process colors.
Note: Enabling the checkbox may reduce the ability for a perfect color match.
Prevent the Use of more than one Gamut Extending Color when converting spot colors: This feature helps to avoid mottle issues when two or more extended gamut inks are printed together.

Note: Using that option might limit the accuracy of spot color rendering in certain cases.
Don’t convert Spot Color “All”: Register marks and other black printer marks are often created with the specific spot color “All”. In order to avoid conversion of this specific spot color to the target color space, activating the option Convert Spot Colors will automatically activate the checkbox Don’t convert Spot Color “All”.
Clip Output Values below (0-20): Defines the percentage threshold value for process color breakdowns. This feature is specific to Flexo print production.
Example: If printing tints below 3% is unstable on press, enter 3 as threshold in the number field to prevent usage of process color breakdowns with less than 3%.
Note: If the threshold is set too high, the conversion of light spot colors may result in higher deltaE values. Therefore, set the percentage with caution.
Black Start: Defines the starting point for using black in spot color conversions.
Note: When converting spot colors to process colors, usually black is used whenever possible. However, in some applications this can lead to peppering effects for light colors using low resolution printing. In this case a late black start will use more of the other process colors and with a very late black start (e.g. setting 100%) it can be forced to use no black at all in the process color build. The use of very low values (below 10) is not recommended.
Prefer CMYK up to an additional dE00 Value of: This function allows spot colors to be converted to the CMYK components of a Multicolor profile even if the combination with other gamut extending process colors is equally possible, or even if less process colors would be used. By default, the same internal deltaE00 tolerances that are used for the selected Calculation Method are applied here, hence the Prefer CMYK up to an additional dE00 Value of input field is empty. If you would like to allow a higher tolerance for the use of CMYK builds you can enter an additional dE00 value.
Note: This value is added to the dE00 match of each spot color for the various Calculation Methods, hence it is recommended to use only a small value such as 1 to 3 to avoid rendering the spot colors with an overall dE00 threshold that is too high.

Tip: We recommend enabling the Prefer CMYK feature when using the Minimize Output Channel option.
Note: Custom values entered under Clip Output Values below, Black Start or Prefer CMYK up to an additional dE00 Value of are preserved even if the checkbox is unticked and the number field is grayed out. This is useful when testing an option with a custom value.
Printing sequence
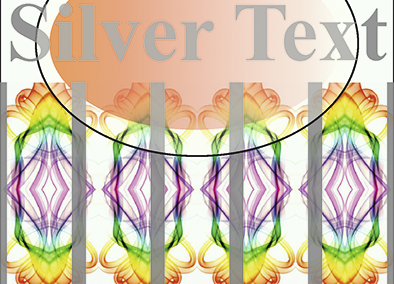
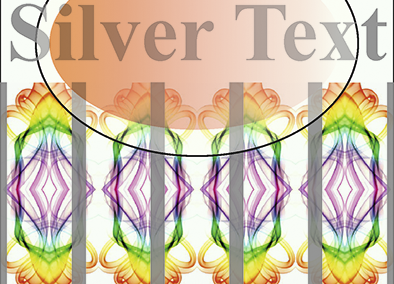
The printing sequence plays an important role when converting spot colors. For example, there is a difference in the color reproduction depending on whether the spot color Silver is printed on top of or underneath the spot color Orange as shown in the two examples below (left: Silver on Orange, right: Orange on Silver).
Another aspect that needs to be considered in regard to the printing sequence of transparent spot colors is the opacity of a color (see the opacity description under Edit Spot Color). If transparent spot colors are to be converted into process colors, ZePrA automatically considers the opacity and the printing sequence of spot colors.

The Printing Sequence dialog offers several options to define the sequence of spot colors according to your printers requirements. Only refers to spot colors. Process colors such as CMYK or the channels of a Multicolor target profile cannot be defined here.
- The PDF specification allows the printing color sequence to be saved in the PDF file. If the printing sequence is correctly defined in the PDF file and the checkbox Use Printing Sequence from Document is enabled, ZePrA uses this information without the need to manually bring all of the spot colors into the right order. Please note that this feature is rarely set or used correctly by PDF-creation programs. If enabled it overwrites the three options below and uses the document settings. However, in case document settings are not available, one of the following options will be used:
- Dark -> Light: Automatically sorts all spot colors from the dark to the light L* values. This is a typical ink sequence setting in Flexo and Offset printing and the default setting in ZePrA.
- Light -> Dark: Automatically sorts spot colors from light to dark L* values.
- Custom Printing Sequence: Works in combination with the Add and Delete buttons below the table. Add the names of the spot colors and arrange the desired printing sequence from top to bottom using the Move up and Move down buttons.
Note: A minimum of two spot colors must be defined in order to be applicable.
ZePrA can only interpret the printing sequence of PDF files correctly, if objects consisting of several spot colors and/or process colors have been created together in one DeviceN object – see also Dissolve Overprinting under Transparency/Overprinting.
Note: The printing sequence of spot colors in image files such as PSD or TIFF files is determined by the order of their appearance in the channels panel, with the topmost channel printing as the topmost spot color. Therefore the settings of the Printing Sequence dialog have no effect on image files.
However, the printing sequence for images can be defined in Photoshop:
- Select the Channels tab (in Photoshop)
- Arrange the channels manually in the required order
- Save the Photoshop file with the custom channel order and use it in ZePrA
CIE Conversion
The CIE Conversion is very useful for special applications such as textile printing. In the textile industry the standard illumination is D65 and the standard observer is 10 degrees.
The Lab values used for conversion can be changed by selecting the desired Illumination and Observer settings. Changes only apply to spectrally defined spot colors and are only useful if the target profile was created with a matching illumination and observer.
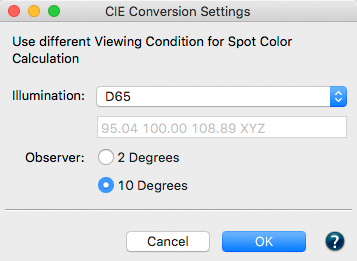
Note: The default setting is D50 and 2 Degrees.
Typically, printer profiles are optimized for D50 viewing conditions, however, for different tasks, e.g. photos in a gallery under incandescent light (roughly corresponds to viewing condition A) or presentation displays under a trade fair lighting with suboptimal lighting conditions (e.g. fluorescent light), the lighting conditions can be taken into account when creating the profile.
To do so, select one of the three predefined viewing conditions or manually enter the measured viewing condition as Kelvin value or as XYZ value.
Alternatively, simply drag and drop a measurement file (TXT or CSV file) of the measured light onto the value field. ZePrA extracts the white point from the file and displays the value.
To select a spectral light measurement select the entry Emission in the drop-down menu Illumination and then select your measurement data file in the subsequent dialog or just drag and drop your measurement data file onto the drop-down menu.
Edit Spot Color Conversion
Individual spot colors can be adjusted within a Configuration. This feature allows to apply specific rules to a spot color which is then handled differently from the general setting defined for spot color conversion.
This tool is also useful to check the conversion outcome and DeltaE results of a single spot color. Spot color rules listed in the table can be edited or deleted.
Creating New Spot Color Rules
Click New to open the dialog Edit Spot Color Conversion and select the spot color to be adjusted by entering the Name of that spot color.
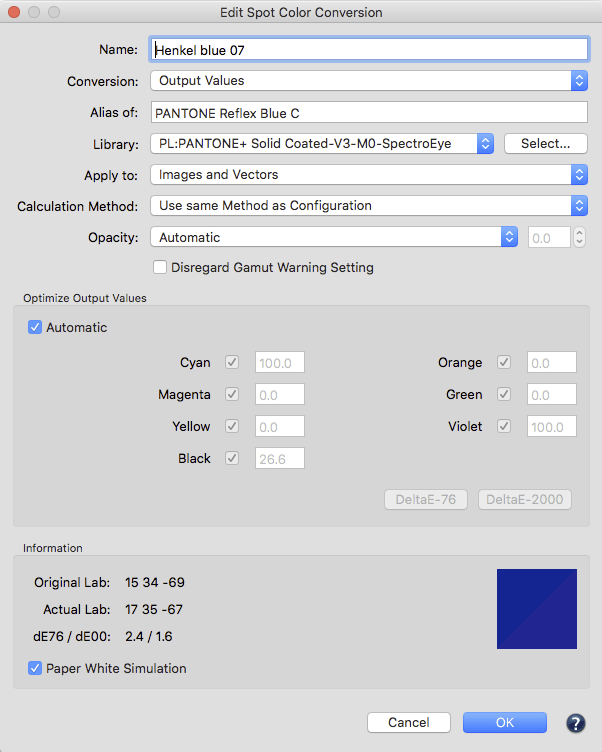
Detailed processing settings for a spot color
When the spot color is displayed:
If the spot color is available in the color libraries under the name entered, the names of the libraries are displayed next to Library, and the Lab color value together with a true-color preview of that spot color is displayed in the Information section underneath.
If several libraries are shown, the same spot color name exists more than once and you need to choose the correct Library for this configuration.
If the spot color is not displayed:
If the spot color is not available in the color libraries, the drop-down menu Library remains disabled.
Tip: Check the spelling of spot color names. Check upper- and lower-case characters and use wildcards. Underscores in name elements are interpreted as spaces.
Use of wildcards
If identical spot colors have different names, work with wildcard characters when entering the channel name. For example, to process a spot color named Pantone 123c or Pantone 123 CVC with the same library, use the (?) wildcard to replace exactly one number or letter combination behind the wildcard or use the (*) wildcard to replace all combinations. Entering Pantone 123* refers to spot colors named Pantone 123C or Pantone 123 CVC.
Alias of: If the spot color name was not found (for example because you have used a wildcard), specify an Alias. To do so, click the Select button next to Library. The Select Spot Color dialog opens. Select the desired Library and all spot colors of that library will be displayed.
Select the name of the spot color and click OK.
Tip: Use the search field below the table to simplify the search. Just type in part of the name and all spot colors with names including this character string are instantly displayed. Click on the X icon to delete your search entry.
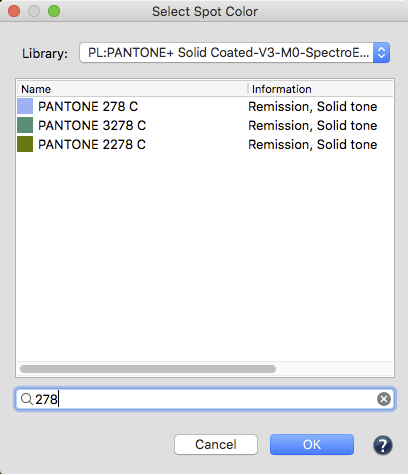
The alias name of the spot color is now displayed in the Edit Spot Color Conversion dialog and used for further processing.
Note: If the color selected as the alias has already been created in the table, the color conversion that was set up in the table is used. This ensures that identical colors are always processed in the same way.
Conversion: Offers five processing options for spot colors:
- Output Values: This is the default setting for the conversion of spot colors to process colors. Output values are automatically calculated by ZePrA. The calculated output values are grayed out in the Optimize Output Values field below.
- Alternate Color Space from PDF: Ignores the library and uses the alternate color value (alternate color space) defined for the full tone of the spot color in the PDF file. This option is available to prevent/minimize compatibility issues with standard conversions in other tools. However, the high-end ColorLogic technology is used to calculate overprinting colors.
- No Conversion: Leaves the spot color untouched.
- Remove: Deletes all appearances of the spot color from the file.
- Replace: Allows to change the name and values of a given spot color in a file.

Apply to: Specifies whether the color conversion is applied to Images only, Vectors only, or both. The default setting is Images and Vectors. This allows to create the same spot color twice and to perform different conversions for images and vectors.
Calculation Method: Seven calculation methods are available. The calculation method effects both, the automatic output value optimization, and, in particular, the overprinting of spot colors.
Note: If the checkbox Automatic under Optimize Output Values is enabled, the color values will be updated automatically when changing the Calculation Method.
- Use Same Method as Configuration: The default setting. Uses the setting defined under Configuration/Spot Color.
- Precise Match – Proofing: Reproduces spot colors on a proofing printer as precisely as possible. This method is not meant to be used in production as it may use all process colors to achieve the closest match (based on DeltaE 2000). The full tone is calculated so that the lowest possible DeltaE 2000 value results. No channel minimizing and print optimization is applied.
- Visual Match – Utilize More Channels: The visually best conversion with high colorimetric accuracy and with good printability. Solid tones and gradients of spot colors are converted with a minimum of channels and are still colorimetrically accurate. Spot colors that are present in combination with process colors or other spot colors may consist of several process colors after conversion (up to four). This option is suitable for digital printing, large format inkjet printing or offset printing with a fine screen ruling.
- Use the least Amount of Channels possible: Converts solid tones and gradients of the spot color with a minimum of channels and colorimetrically accurate, however after conversion, overprinting spot colors are composed of as few process colors as possible from the target color space. Choose this method for packaging printing, where the purest possible colors are to be produced. Single-color and two-color combinations are also included in the search for the best color combination. Mostly not more than three channels will be used for rendering the spot colors.
- Use a Maximum of three Channels: Similar to the option Use the least Amount of Channels possible but makes sure that no more than a maximum of three channels will be used. Choose this method for packaging printing, where the purest possible colors are to be produced and no more than three process colors must be used for spot color conversion. Single-color and two-color combinations are also included in the search for the best color combination.
- Use a Maximum of two Channels: Best for one or two process colors providing the best colorimetric match is automatically selected for each spot color. Results in very clean separations that are easily printed, but not necessarily very exact in colorimetric terms. It is recommended only for individual, manually created spot colors.
- Use one Output Channel only: Useful for print packaging production. The spot colors used for text and bar codes should be converted using a maximum of one process color.
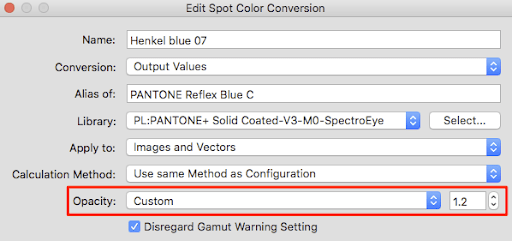
Opacity: Allows to adjust the opacity from within the configuration which provides a quick and easy way to apply different opacity levels without the need to open the library.
- Automatic: Uses the opacity values from the spot color library. Zero corresponds to no opacity.
- Custom: Allows to enter a user defined value. This setting overwrites the library opacity.
Note: This allows opacity changes for PantoneLIVE colors which currently can’t be set in the library.
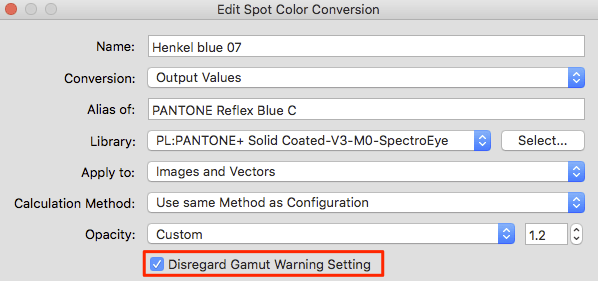
Disregard Gamut Warning Setting: Enabling this checkbox ignores any gamut warnings set for the selected spot color in the Configuration/Spot Colors/Gamut Warning dialog. This is useful if it is known and accepted that certain spot color conversions have higher deltaEs while other spot color conversions should be within the defined deltaE2000 Limit and should raise a warning if exceeded.
Optimize Output Values
This section provides numerous possibilities for controlling how the solid tone of your spot color is to be converted to the target color space. The color channels displayed correspond exactly to the channel names used in the target color space and later in the converted PDF file.
The Automatic checkbox is activated by default, ensuring the best possible optimization of the conversion in terms of printing and color based on the selected Calculation Method. The calculated process colors are grayed out in the value fields and can’t be edited. The Information section shows the Actual Lab and deltaE76/deltaE2000 values calculated for the spot color.
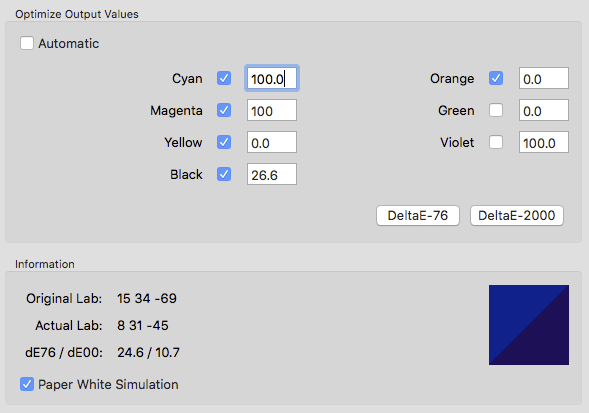
If the Automatic checkbox is deactivated, process color values can be entered in the number fields. The expected color impression (based on the entered values) is displayed as Actual Lab and in the color preview. Try different values to obtain best the color result.
It is also possible to specifically map a spot color onto a process color channel by entering a value in the required channel and setting the other channels to zero.
Use the DeltaE-76 or DeltaE-2000 buttons to perform the best possible color calculation based on specified values for the channels of the target profile. The Lab color value is calculated and displayed under Information, as is the expected color difference compared to the original color in deltaE76/deltaE2000. Using the two buttons, the calculation is performed strictly according to the colorimetric rules and does not take any technical printing aspects into account, which would be the case when using the Automatic function where channel minimization takes place.
Tip: When minimizing deltaE, use the checkboxes for the process colors to manipulate the calculation. Only active channels are affected by the calculation.
Example: If the value of an individual channel is to be kept, enter this value and deactivate the channel by unticking the checkbox. If zero is entered and the channel is deactivated, the channel will not be used. When calculating the minimum DeltaE with one of the two buttons, the 100% value of this channel is taken into account for calculation, but not changed.
In the Information area, Original Lab shows the measured value from the library while Actual Lab shows the color value calculated with the selected process colors of the target profile.
In addition, the expected color difference is displayed in both, DeltaE76 and DeltaE 2000.
With Paper White Simulation enabled, the coloration of the substrate, which represents the target color space, is taken into account. Calculation of the Original Lab, Actual Lab value and color distances (DeltaE) is performed accordingly.
Note: It is recommended to enable Paper White Simulation.
Split Color Preview: The split color preview shows how the original color (top, left‑hand triangle) and the calculated color (bottom, right-hand triangle) will look when printed. The color preview is in true color on a calibrated and profiled monitor.
Spot Color List
Use the list to check specific spot colors or to define their conversion independently from the automatic processing in ZePrA. There are various ways to add relevant spot colors to the list.

The search function can be used to find specific spot colors quickly. Spot color libraries can also be searched for Lab values. If the search text is of the form “L a b Lab“, ZePrA searches for spot colors matching the specified value. Since exact matches often fail due to rounding and non-precise input, a tolerance is applied.

Name: Displays the spot color names
Conversion: Displays the method of conversion – Output Values, Alternative Color Space or No Conversion. Settings can be changed in the Edit Spot Color Conversion dialog.
Value: The spot color table indicates whether the target values are calculated automatically or if they have been set manually. If target values have been set manually, they are shown as numeric values in the Value column.
Apply to: Shows what the conversions have been applied to – Images only, Vectors only, or both Images and Vectors according to the settings of the Edit Spot Color Conversion dialog.
dE76/dE00: Displays the deltaE values (dE76/dE00) for custom spot colors. The deltaE values of this table are automatically updated on-the-fly each time the settings for spot colors are changed (this can take a few seconds).

New, Edit, Delete: Access and edit the processing options for spot colors by:
- Clicking on New
- Double-clicking on a spot color in the table or selecting an entry and enable Edit
Export and Import: These functions allow you to export rules from a configuration and import them into another configuration.

Context menu: Right-Click on one of the spot colors to bring up a context menu which can be used to change the processing mode individually for selected spot colors. In addition Cut, Copy, Paste and Delete are available.
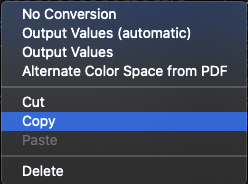
Note: A simple way to use a spot color setting in another configuration is to Copy an entry in the table via the context menu, navigate to the Spot Colors tab of the other configurations and transfer it in the table via the context menu with Paste.
Iterate - Spot Color Iteration
Iterate spot colors to improve color differences (expressed in deltaE2000) until the measured deltaE values are within the desired tolerances.
Detailled information can be found under Spot Color Iteration.
Working without the Spot Color Module
Without a Spot Color license, it is not possible to create or use color libraries. Accordingly, the Global Setting for creating Spot Color Libraries is not available on the navigation panel.
In the Spot Colors tab under Configuration in ZePrA, use either the Convert Spot Colors checkbox or Convert with Alternate Color Space and Tint Transform to resolve and convert all spot colors created as DeviceN colors. However, only the alternate color value stored in the PDF is used for the conversion. This alternate color value may be indicated as CMYK, RGB or Lab color definition.
Depending on the color space of the Alternate Color Space, colors are processed with the CMYK, RGB or Lab settings made under Images/Vectors in ZePrA. Be sure that the selected settings match the conversion goals. Conversion via the alternate color space is very limited compared to using spot color libraries and, for quality reasons, is not recommended.
The option Don’t Convert Spot Color “All” under Special Options is automatically activated to prevent unwanted conversion of register marks and other printer marks.
Without a spot color license, the options for selecting Spot Color Libraries and Calculation Methods are grayed out and cannot be used, as are all the other quality options.
In the table below, use the New button to enter the name of a spot color that you want to exclude from conversion.
In the Edit Spot Color Conversion window, enter the exact name of the spot color as indicated in the PDF. The use of upper and lower case letters is not important in this context and is automatically recognized by ZePrA.
Select No Conversion in the drop-down menu Conversion.
Other spot colors to be resolved with the PDF substitute color (alternate color space) do not need to be explicitly specified because the PDF alternate color space is always used automatically. ZePrA’s other (very useful) processing options are not available without a spot color license.
Note: Purchase the additional module for processing spot colors at any time.


