

Preferences
Protected Mode
The Protected Mode prevents unintentional changes to configurations, queues, registration (and license) and other settings.
In Protected Mode new configurations cannot be created or existing configurations and queues cannot be edited using the Auto Setup Wizard. Importing configurations and changing the registration is also prevented. Only file processing and starting or stopping queues are possible.
If an action that is protected is to be performed deactivate the Protected Mode under Preferences.
The Protected Mode can be used with or without a password.
Set Password: Enter a secure password and confirm by entering it a second time. If a password has been set, it must be entered each time the protected mode is to be deactivated. To remove or change the password, click Reset Password.
Set password for Protected Mode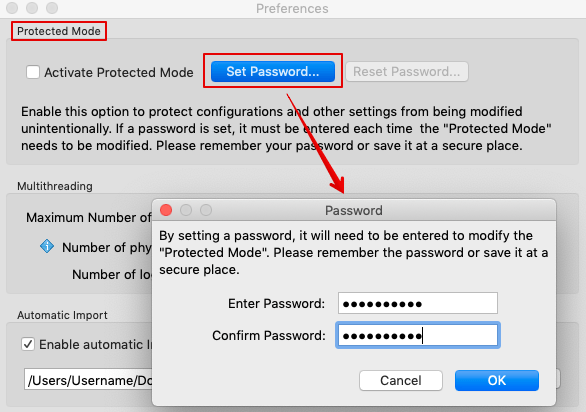
Multithreading
ZePrA works in 64-bit mode which allows the use of additional memory for simultaneous processing of multiple files. Thanks to multithreading, ZePrA supports modern multi-core CPUs and can process multiple files simultaneously. As a result PDF files are processed much faster. ZePrA uses the same number of threads as there are CPUs in the system by default. The number is shown in the number field next to Maximum Number of Threads and can be changed. However, the processing speed does not increase if you use more threads than CPUs available. It is recommended to use fewer threads so the system can use the computing power for other tasks.
Example: On a 4-core MacBook Pro with ZePrA 4 processing of 135 files with a size of 2.8 GB took 30 minutes, whereas ZePrA 6 and higher only take 7 minutes. Using 8 threads would slow down processing.
Setting the number of threads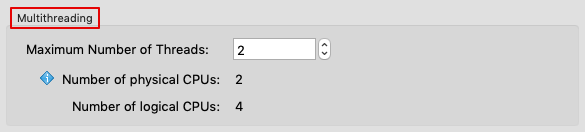
Multithreading
ZePrA works in 64-bit mode which allows the use of additional memory for simultaneous processing of multiple files. Thanks to multithreading, ZePrA supports modern multi-core CPUs and can process multiple files simultaneously. As a result PDF files are processed much faster.
However, the processing speed does not increase if you use more threads than physical CPUs available. It is recommended to use fewer threads so the system can use the computing power for other tasks.
The number of threads that can be used depends on the available CPUs of the computer and the ZePrA license.
With the base license ZePrA Process, three threads can be used simultaneously, while the Multithreading module makes all threads available that are possible on the system.
Note: For ZePrA 12 and lower, only one thread can be used without the Multithreading module.
The Multithreading module is part of the Complete Color Management - Process Plus or Multicolor packages, but can also be added to the ZePrA Process package.
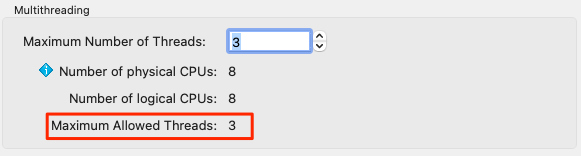
The Maximum Allowed Threads information indicates the maximum number of threads that can be used with the ZePrA base license.
The screenshot shows an example of a computer with 8 CPUs, of which up to 3 can be used with the ZePrA Process base license:
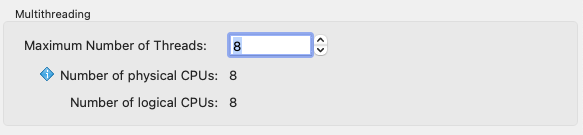
If the Multithreading module is licensed, the information Maximum Allowed Threads is not displayed and up to 8 threads can be used in this case, enabling even higher processing speeds:
Note: Multiple threads greatly accelerate the processing of multiple jobs, but the processing of a single large file is not significantly faster.
Automatic Import - ZePrA's cloud function
When ZePrA is used on multiple computers within a company, the cloud feature Automatic Import allows sharing configurations and spot color libraries by deploying a shared folder in the cloud (DropBox, Google Drive, internal cloud) or on the internal network. The folder supports ZePrA's spot color libraries (*.ccf files), spot colors in CxF files, ZePrA configurations (*.ccf files), and CoPrA DeviceLink settings for SmartLink (*.dlcfg and *.sicfg files).
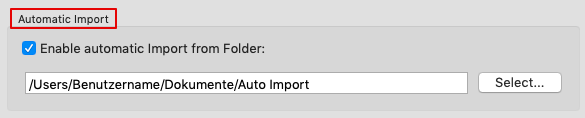
Specifying the location for the Auto Import folder
Example: A flexo printer is continuously adding new spot colors for use in ZePrA's spot color conversion. By saving the spot color library to the shared folder, each ZePrA installation, no matter where it is located, will automatically receive the updated file. It is important that all ZePrA applications have access to the cloud folder.
Files (such as ICC profiles, configurations, spot color libraries, gradations or SmartLink settings) that are moved or copied into the Auto Import folder are transferred to ZePrA’s internal dataset and can then be used by ZePrA.
When the file in the Auto Import folder is replaced by a newer version, it will be updated in ZePrA’s internal datasets as well.
Notes:
- Make sure to only add supported files to the Auto Import folder. For example, subfolders with jobs do not belong there.
- If an unsupported file has been added to the Auto Import folder, the import is stopped, and a red workflow warning is shown. In such cases, the Auto Import folder is deactivated in the Preferences. To reactivate it, the problematic file must first be deleted and then the checkbox Enable automatic Import from Folder must be ticked again in the Preferences.
- If a file in the Auto Import folder is deleted, it is not deleted in ZePrA’s internal dataset. For example, if a SmartLink setting has been deleted in the Auto Import folder, it is still available in ZePrA’s internal dataset and if this setting is deleted in ZePrA’s dataset, it is still available in the Auto Import folder.
Logo for Spot Color Report and Proofing Information
A custom company logo for the Spot Color Report, the Job Report and the Proofing Information can be specified in this section. Accepted image formats are TIFF, JPEG or GIF in RGB color space.
![]()
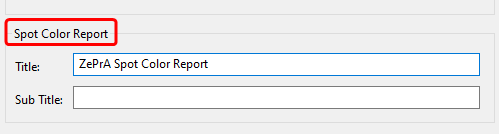
Spot Color Report
The default title of spot color reports created by ZePrA can be replaced by any individual title. In addition, an individual subtitle can be added to the report as well.
Note: To revert back to the default title, simply delete the custom title from the text box.
Job Management
In the Job Management section, you can specify when and whether or not older jobs are to be deleted from the list of processed jobs. Note that the information about these jobs is also completely removed.
Note: Deleted jobs and the associated configurations cannot be restored.
Jobs that are no longer needed can be deleted automatically
CLI
Use ZePrA settings from the current use account in CLI: Check the box to make the settings of the current user account available to the CLI. This allows ZePrA to be used within automated workflows from other vendors.
Note: This function is addressed to experts among ZCMD users only. It is intended for the case that the ZePrA GUI and all its configurations and settings are managed and used under one user account, but the CLI is to be used on the same computer with a different user account. This case could occur when other systems need to connect to ZePrA via the CLI with a different user account. For the CLI to work properly, it requires access to the settings created in the ZePrA GUI, and these are typically stored in special folders in the corresponding user account. To make the settings available to the CLI, the checkbox must be activated and the CLI must be given access rights to the ZePrA settings folders in the other user account. This is usually accomplished by running the CLI under an admin or super user account.

Enabling the checkbox allows ZePrA to be used within automated workflows from other vendors.