Use of Multicolor profiles

Multicolor Profiles

Use of Multicolor profiles

ZePrA supports the use of Multicolor printer profiles and Multicolor DeviceLink profiles (RGB-to-Multicolor, CMYK-to-Multicolor and Multicolor-to-Multicolor).

Use of Multicolor profiles in PDF workflows

In ZePrA, Multicolor profiles can be used as document color space, as target profile or Multicolor DeviceLink profile for color conversion.

This is particularly important in the prepress stage for packaging printing when image data is available as RGB or CMYK files. You can therefore place RGB and CMYK image files directly in the finished document, create a PDF file from them and then convert this document in ZePrA to the required Multicolor color scheme for printing. Another interesting field of application is the printing of photo books in so-called Hifi-Color printing processes using 6 or 7 inks.

Note: A Multicolor license is required to use the Multicolor functions.

When preparing the data, ZePrA generates a so-called DeviceN PDF file in which each individual channel is named after the channel names of the Multicolor target profile. DeviceN has been the standard color definition within PDF for many years to describe spot colors for print production. This provides a high degree of compatibility with the proven spot color processing of common applications. The generated PDF files can usually be evaluated with current versions, for example of Adobe Acrobat Professional, in the separation preview and can be processed with current PDF workflow systems. It is also possible to place PDF files into and export them from current Adobe InDesign documents. ZePrA supports the PDF/X-5n standard, which enables the embedding of Multicolor profiles in PDF files.

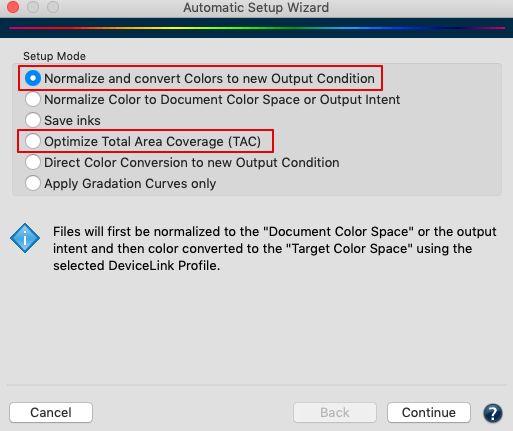
By default, a configuration created with Auto Setup does not embed the Multicolor target profile in image data, but in the Output Intent of PDF files. In the case of a converted PDF/X file (for example, a PDF/X-4, -X-3, or -X-1a file), the color converted file is converted to a PDF/X-5n file.

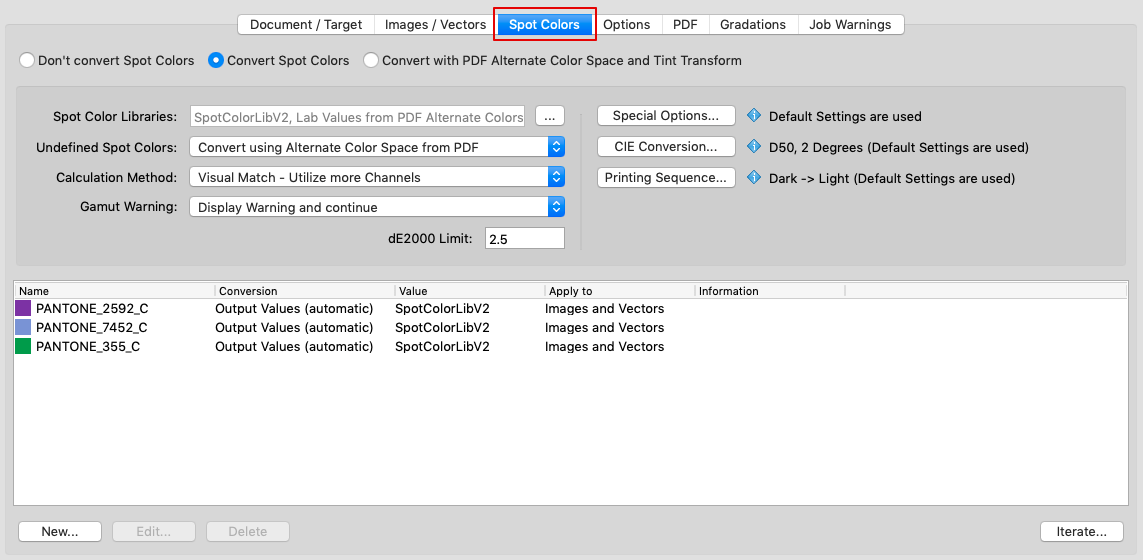
Before using a Multicolor printer profile that you select as target color space in the Document/Target tab of the Configurations tool, or in case of a Multicolor DeviceLink profile, check that the channel names and Lab color definitions have been entered according to your specifications.

If the checkbox Embed into Output File is activated, ZePrA transfers the channel names and color definitions from the Multicolor printer profile selected as the target color space to the color converted PDF file.

If this checkbox is not activated, the channel names and color definitions are taken from the Multicolor DeviceLink profile. So make sure that the channel names and Lab color definitions in the target profile and DeviceLink profile are identical. The names of the color channels (Colorants) and the Lab color definitions can be adapted in CoPrA with the Profile Manager for each Multicolor printer and DeviceLink profile according to your specifications.

Depending on the used Multicolor profile, the contained channel designations and the subsequent workflow outside of ZePrA, we recommend that tests of the complete workflow be carried out in advance to ensure that everything runs smoothly.

Convert image data with Multicolor profiles

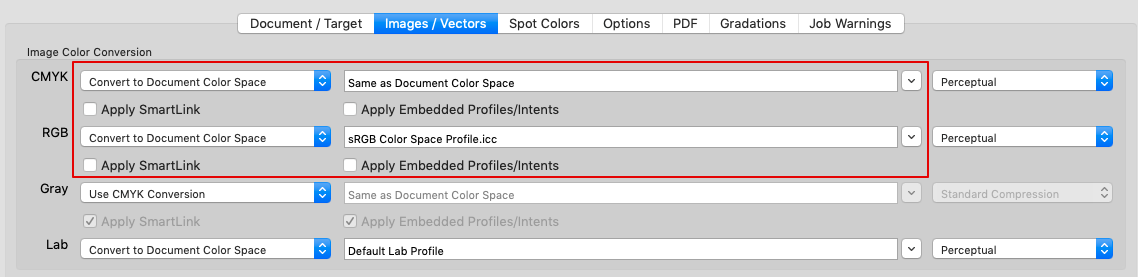
ZePrA supports PSB, PSD, TIFF and JPEG files when converting image data with Multicolor profiles. Since the current file format specifications (as of May 2019) do not support embedding Multicolor profiles in TIFF, JPEG, PSB and PSD files, you should disable profile embedding for image data conversion in the Document/Target tab. We recommend saving image data converted to Multicolor as PSB or PSD files in Photoshop and then processing them with ZePrA. Of course you can also place PSB and PSD image files converted with Multicolor target profiles by ZePrA in Adobe InDesign.

ZePrA distinguishes between the following cases when converting image data from Multicolor files (can be set under Configurations/Options/Image quality):

  • If the channel names of the Multicolor target profile are CMYK+X, a TIFF file will be generated provided that Preferred lossless Format is set to TIFF.
  • If the channel names of the Multicolor target profile are not CMYK, a PSD file is created.
    Note: TIFF only supports CMYK+X.
  • If the Compression Method is set to Automatic, an attempt is made to preserve the format or to generate a TIFF file. However, if a JPEG file or a non-CMYK Multicolor profile is present, a PSD file is created.
    Note: JPEG generally does not support Multicolor color spaces.

ZePrA and PDF Preflighting

ZePrA and PDF preflight

PDF-Preflight

Check the following aspects regarding color with a PDF preflight:

Check number and type of color channels present in the PDF file

Extra spot colors may be required or unnecessary depending on the print job. The preflight allows you to determine whether the number and labeling of the color channels are appropriate for the print job.

Undefined spot colors can be processed using ZePrA’s spot color module. If the spot color module has not been licensed, spot colors can at least be converted using the alternate color space (PDF). This provides the same results as a preflight program. Further information on the spot color module can be found in the Spot Color Processing chapter.

Once the job has been processed in ZePrA, the spot colors occurring in the PDF file can be checked by right-clicking on the processed job in the Overview to open the context menu and selecting Show Job Properties to open the Job Report. This is particularly useful when not using an additional preflight program.

Check RGB or CMYK objects containing embedded profiles

For fully automated workflows that are running without additional approval by the customer, we recommend printers only accept pure CMYK PDF files that have correctly embedded profiles. For other data, we recommend to optimize them with ZePrA and then send a low-res CMYK soft proof to the customer for approval.

Note: A standard queue created with Auto Setup (Normalize and convert Colors to new Output Condition) that uses the SmartLink function optimizes all RGB, CMYK, and Gray objects of a PDF file by using DeviceLink profiles. Any embedded profiles are taken into account in the conversion. Alternatively, a standard queue can be duplicated to change the handling of embedded profiles (see next section Ignoring CMYK Objects with Embedded Profiles).

The profiles embedded in the PDF file can be checked after job processing by right-clicking on the processed job in the Overview to open the context menu and selecting Show Job Properties to open the Job Report.

Ignoring CMYK objects with embedded profiles

In some workflows, especially in print shops, it is common to remove embedded profiles from CMYK objects (images and vectors). It is often assumed that the profiles have been added incorrectly and will cause problems in a subsequent ICC conversion.

When the SmartLink function is not licensed, this procedure follows the default setting for Auto Setup queues. When the SmartLink function is licensed, embedded profiles are taken into account. SmartLink conversions, which preserve primary and secondary colors, as well as separation, ensure clean conversions.

If embedded profiles are to be ignored or the SmartLink function is not to be used – for example, in Auto Setup queues for normalizing and color conversion or for SaveInk applications – deactivate the corresponding checkboxes (Apply Embedded Profiles/Intents or Apply SmartLink) in the Images/Vectors tab. This ensures that embedded CMYK profiles are not used. Instead, select Same as Document Color Space and convert with the profiles set in the Document/Target tab.

Check the maximum Total Area Coverage (TAC)

For print shops, it is important that the specifications for the data delivery and the order confirmation clearly indicate the maximum Total Area Coverage that is expected for the type of paper to be used and also the printing standard the client should prepare the printing data.

When printing on newspaper or uncoated paper and the maximum Total Area Coverage is significantly exceeded, this indicates that image data has not been optimized for the respective printing standard. Usually these are image data for coated paper in offset printing.

When optimizing PDF files via standard queues in ZePrA, the following alternatives are available in Auto Setup:

Normalize and convert Colors to the new Output Condition: Converts the data – for example from coated paper to uncoated newspaper paper – and optimizes the color appearance.

Optimize Total Area Coverage (TAC): Limits the maximum total amount of color without changing the color appearance.

Check overprinting CMY objects without any black

Checking overprinting CMY objects without any black is a rather rare special case. Regarding high color stability during production, fast drying times, and ink savings, we recommend using ColorLogic’s SaveInk queues for as many print jobs as possible.

However, if an overprinting object of a PDF file is composed of all CMY colors without any black, the resulting color impression from the overprinting object and the background may change after color optimization, due to the overprinting rules of the PDF standard. For an underlying object, the color of a channel is only completely visible if no color is present in the respective channel of the overprinting object. If an overprint object has just a slight amount of color in a channel, then only the color component of the upper (overprinting) object is visible.

If CMY parts of SaveInk profiles are unintentionally replaced by black and the overprinting behavior changes as a result, but the color is still to be saved, a new SaveInk profile must be created for which the exception Preserve 0% Black is activated. This special exception is located in the SaveInk module of the CoPrA profiling software.

Integration with Enfocus Switch

Enfocus Switch Integration

Working with Enfocus Switch

Even for highly advanced and efficiently configured applications like ZePrA, there are still application scenarios where special file treatment or an additional approval step for optimized PDF files make sense. This particularly applies to print providers and printing companies who receive PDF data from numerous customers that have been produced in a variety of different ways. The combination of ZePrA with Enfocus Switch and a preflighting solution has proven to be very successful for this kind of application.

Combination of Enfocus Switch, PitStop Server and ColorLogic ZePrA

ZePrA | Share with ZePrA

Share with ZePrA

Use CoPrA’s DeviceLink settings in ZePrA

Share CoPrA’s DeviceLink settings with ZePrA

Sharing settings with ZePrA (CoPrA 5 and lower)

Due to the close connection between CoPrA (ColorLogic’s profiling solution) and our color server ZePrA, the profile settings from CoPrA can be used to calculate DeviceLink profiles in ZePrA.

By selecting the checkbox Share with ZePrA in CoPrA, the settings of your DeviceLink and SaveInk profiles are transferred directly to ZePrA and can be used there as SmartLink Method.

The SmartLink Method in ZePrA allows calculation of the necessary DeviceLink and/or SaveInk profiles for the conversion of PDF files on-the-fly, without the need to create these DeviceLinks in advance.

The DeviceLink tool in CoPrA: SmartLink can use the profile settings from CoPrA to create DeviceLinks in ZePrA

To do so, make all the required settings in CoPrA by entering all relevant information in the DeviceLink tool under Rendering, Exceptions, and Color GenerationClick Save As and enter a name for the setting. Confirm with OK, then activate the Share with ZePrA checkbox. 

The so created methods shared with ZePrA are then available as SmartLink Method in the drop-down menus of both the Auto Setup and the Configurations.

Note: Only saved settings can be shared with ZePrA. Default or edited presets cannot be shared.

Sharing settings with ZePrA (CoPrA 6 and higher)

The SmartLink Method in ZePrA allows to create DeviceLinks and SaveInk profiles for the conversion of PDF files on-the-fly, without the need to create these DeviceLinks in advance.
Due to the close linkage between CoPrA and ZePrA, profiling settings specified in CoPrA can be used by ZePrA to create the required profiles.

The settings are accessible via a shared folder which has the advantage that CoPrA and ZePrA do not need to be installed on the same computer. The shared folder must simply be accessible by both ZePrA and CoPrA, either over the network, a shared local folder or the cloud.

Procedure

In CoPrA

  1. Under Preferences, enable the checkbox Share CoPrA Settings with ZePrA Auto Import Folder and select ZePrA’s Auto Import folder.
    Note: The Auto Import folder must be activated in ZePrA as well.
    If the checkbox is enabled and the Preferences dialog closed with OK an information message will appear asking the user if all shared presets should now be copied to the defined Auto-Import Folder.

  2. In the DeviceLink tool, define all required settings by entering all relevant information under Rendering, Exceptions and Color Generation.
  3. Click Save As and enter a name for the setting. Confirm with OK, then activate the Share with ZePrA checkbox.

  4. CoPrA Settings created that way and shared with ZePrA are available for selection as SmartLink Method in the drop-down menus of both the Auto Setup and the Configurations settings.

Note: Only saved settings can be shared with ZePrA. Default or edited presets cannot be shared.

In ZePrA

Make sure to enable the Auto Import function in ZePrA’s Preferences and to use the same folder as CoPrA. CoPrA’s DeviceLink and SaveInk settings are now accessible in ZePrA and can be used there as a SmartLink Method. SmartLink can now create custom DeviceLinks which can be used in ZePrA configurations.

Basic information on the Auto Import folder

Files (such as ICC profiles, configurations, spot color libraries, gradations or SmartLink settings) that are moved or copied into the Auto Import folder are transferred to ZePrA’s internal dataset and can then be used by ZePrA.
When the file in the Auto Import folder is replaced by a newer version, it will be updated in ZePrA’s internal datasets as well.
Note: If a file in the Auto Import folder is deleted, it is not deleted in ZePrA’s internal dataset. For example if a SmartLink setting has been deleted in the Auto Import folder, it is still available in ZePrA’s internal dataset and if this setting is deleted in ZePrA’s dataset, it is still available in the Auto Import folder.