ColorAnt | Evaluate

Evaluate - Proof Evaluation

Evaluation of Proof Measurement Data

Evaluate – Proof Evaluation

The Evaluate tool can be used to check whether the proof measurement data from a media wedge fulfills the requirements for a contract proof according to ISO 12647-7 or a validation print according to ISO 12647-8.

In addition, a PSD evaluation can be performed using two different evaluation methods: “Side-by-Side” or “Media Relative”.

Moreover, the Evaluation Method G7 gray balance allows the measurement data to be checked for G7® conformity.

Finally, a fully detailed report can be created with a pass/fail indicator.

Notes

  • The Proof Evaluate tool supports all color spaces including Multicolor and spot colors. It is a powerful addition to ZePrA’s proofing feature, as it allows you to use the reference files of the dynamic media wedges created by ZePrA for proof evaluation.
  • For redundant measurement values, the median is determined and all duplicates (i.e., all patches with identical DCS values) are removed before evaluation.
    This procedure prevents duplicates as well as outliers from unjustifiably influencing the proof evaluations.
  • The Evaluate tool supports all color spaces as either reference data or reference ICC profile. In addition, it checks whether the selected wedge is actually suitable for evaluation and displays a corresponding message.
  • The Evaluate tool is available from ColorAnt L.

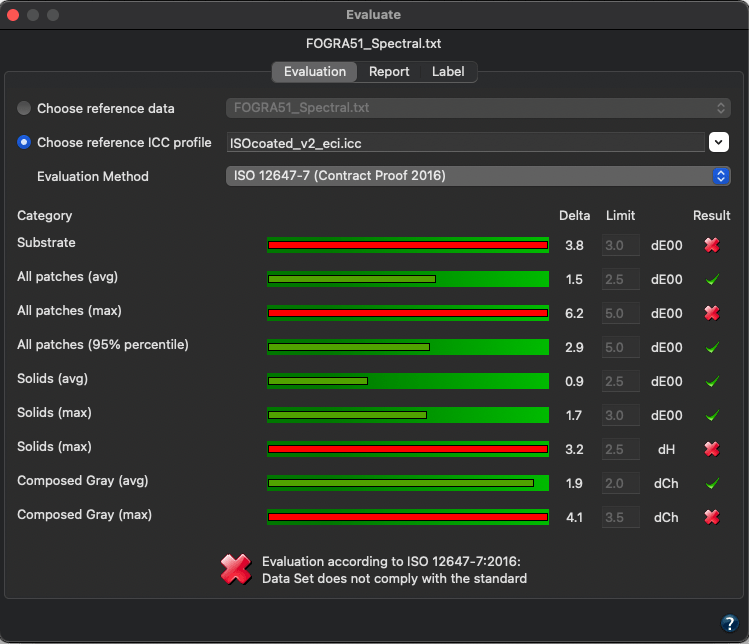
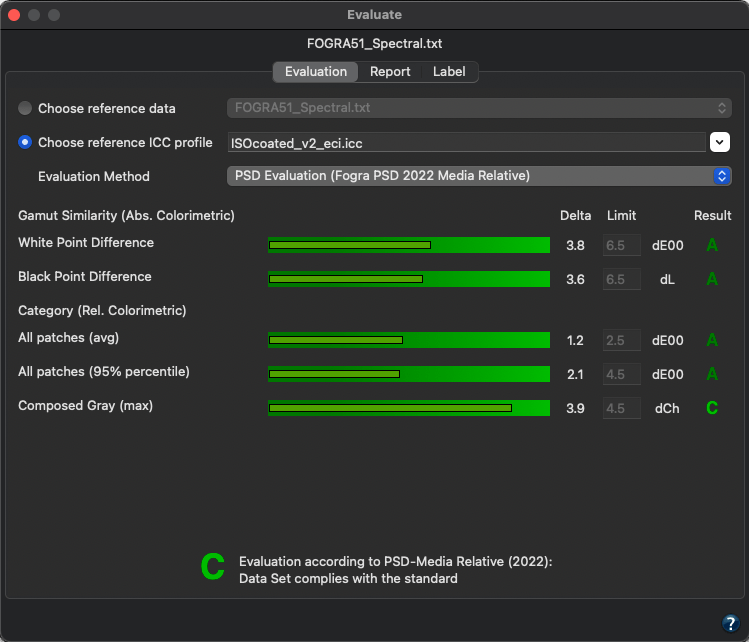
The Evaluation tab immediately shows the categories related to the chosen standard, the deltas to the reference, and a score with either a ✓ (passed) or an ✕(failed).

An overall score indicates if the proof has passed or failed.

There are two ways of selecting your reference:  

  • Choose reference data: This drop-down menu contains all data loaded under Data Sets that fit the selected proof measurement data as a reference, which means the number of patches and the color space must match. Select the reference that you want to compare with the selected media wedge measurement data. If dynamic media wedges were used in ZePrA, the corresponding reference data can be used for the proof evaluation in ColorAnt.

    Using reference data from ZePrA:
    1. Open the reference file of the ZePrA configuration in ColorAnt. It is located in ZePrA’s Report folder of the corresponding queue.
    2. Select Measure to measure the media wedge in the proof printout
    3. Open the resulting measurement file and click the Evaluate button.
    4. Select the original reference file from ZePrA under Choose reference data in the Proof Evaluation window.
  • Choose reference ICC profile: This drop-down menu contains all ICC profiles that fit the selected proof measurement data as reference in terms of the same color space. Choose the reference ICC profile that you want to compare with the selected media wedge measurement data.
    Note: The ICC profile is used to create virtual reference values (absolute colorimetric). Depending on the accuracy of the ICC profile, the quality of the reference data can vary from very exact (e.g., CMYK profiles created by CoPrA) to less exact (e.g., small Multicolor profiles).  

Evaluation method: Select a method to either evaluate a Contract Proof according to the ISO 12647-7 standard, a Validation Print according to the ISO 12647-8 standard, to evaluate your data according to Fogra’s PSD standard (ProcessStandard Digital), or to check the measurement data for G7® conformity. The PSD standard is based on the tolerances defined by Fogra and provides guidelines to increase process stability in digital printing. Further information can be found on the Fogra website.

ISO 12647-7 (Contract Proof 2016): For the evaluation of a binding contract proof use this method. 

ISO 12647-8 (Validation Print 2021): Checks the conformance of printing systems that produce a hard-copy validation print, directly from digital data, which is intended to simulate the expected appearance of material printed per a characterized printing condition. The method considers the latest tolerances published in 2021.

G7 gray balance: This method checks the measurement data for G7® conformity to ensure accurate and consistent color reproduction. G7® is an internationally recognized method for calibrating printing presses and proofing systems.

Notes

  • Recently, other visualizations of the final printed product have found a place in the printing/proofing workflow because designers and print buyers prefer not to go to the expense of using an ISO 12647-7 compliant contract proof any earlier in the process than necessary. In many situations, participants in the workflow require a hardcopy visual reference of lesser quality than a contract proof. In the past, those prints varied widely in quality and were often referred to as design proofs, concept proofs, layout prints, etc. That quality level is here being referred to as a validation print.
  • The All Patches ratings do not include Boundary Patches for wedge evaluations.
  • Wedge evaluation: For small charts with less than 150 patches, such as Media Wedges, all Boundary Patches are omitted.
  • Chart evaluation: For larger charts with more than 150 patches, such as the IT-8, the Boundary Patches are taken into account.

PSD Evaluation

The PSD reflects the different customer requirements for the degree of color match with three different quality levels, the quality types A, B and C. Here, A represents a better approximation than B, which in turn is better than C. The overall rating depends on the lowest rated Category. If a value exceeds the tolerance limit, a red X indicates that the evaluation has failed. Quality types A to C thus indicate that all values are within the respective tolerances and that the evaluation has passed (shown in shades of green).

This gradual evaluation of the quality with regard to color reproduction can be achieved with two different evaluation methods: Side-by-Side or Media Relative.

PSD Evaluation (FOGRA PSD 2022 Side-by-Side): Side-by-side is a long-established method based on simultaneous and immediately adjacent color matching. The deviation tolerances apply to the comparison of the target values, defined by the color reference, and the measured values of the OK sheet.

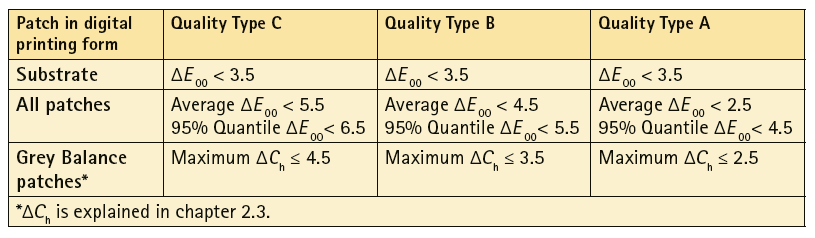
From the Fogra PSD Handbook: Deviation tolerances for Side-by-Side reproductions. Version: PSD 2022

From the Fogra PSD Handbook: CIEDE2000 tolerances for spot colors. Version: PSD 2022

PSD Evaluation (FOGRA PSD 2022 Media Relative): The media-relative evaluation consists of two steps. First, the similarity between the reference and the current output color gamut is checked using the white and black points. A similarity is mandatory to perform the colorimetric evaluation in the second step.

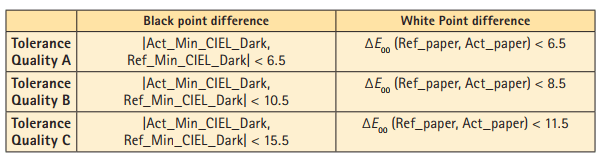
From the Fogra PSD Handbook: CIELAB tolerances for gamut differences to check if media-relative is applicable. The color differences for the white color are very similar when using ΔE ab or CIEDE2000. The CIEDE2000 tolerances shall take precedence. CIELAB 1976 color differences are given in brackets. Version: PSD 2022

The calculation of the media-relative CIELAB color values only takes place if the criteria specified for the first step are met. They are the starting point for the final color evaluation based on all control patches in the second step.

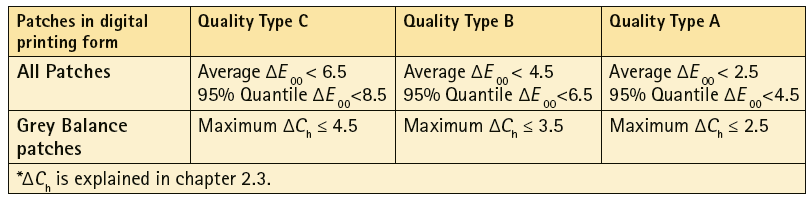
From the Fogra PSD Handbook: Deviation tolerances for media-relative reproductions. Version: PSD 2022

Note: Reliable results can only be achieved with absolute colorimetric measurement data, so please do not use relative or scaled (e.g., converted with perceptual rendering intent) measurement data.

Specify spot colors: When evaluating Multicolor measurement data, the additional colors can be evaluated as process colors or as spot colors. In most cases, with typical Multicolor media wedges, all colors are process colors, but with ZePrA-created dynamic media wedges, additional spot colors may also be included in the file.
Specify spot colors opens a dialog where you can define whether a color is included in the selected Evaluation Method calculation as a Process color or as a Spot color.

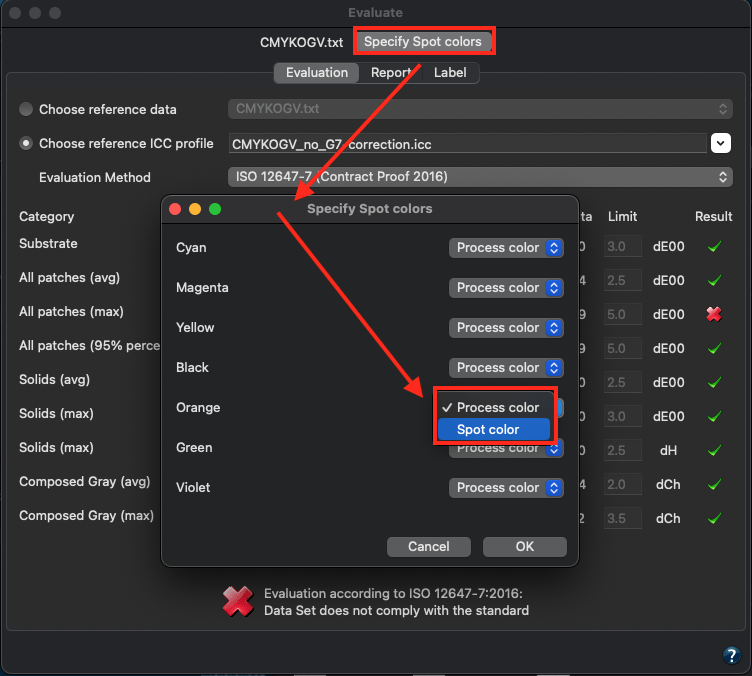
By default, all channels of Multicolor data are defined as process colors and included in the evaluation All Patches.

However, if spot colors are present and should not be treated as process colors, e.g., in the case of dynamic media wedges in ZePrA, they can be defined as spot colors. In this case, they are not included in the All Patches evaluation, but are evaluated separately and displayed in a separate Spot color evaluation line.

Note: The button for the Specify spot colors dialog is shown for Multicolor data only.

Report

The available input fields depend on the selected Evaluation method. Enter the required information according to the selected ISO standard.

Save Report: Saves the report in the location and format (PDF, HTML, XML) specified in Settings.

The report contains all the information that you have entered, the summary from the evaluation dialog, a list of all patches with their names or IDs, the device color space, the Lab reference values, the Lab measurement value and the delta.
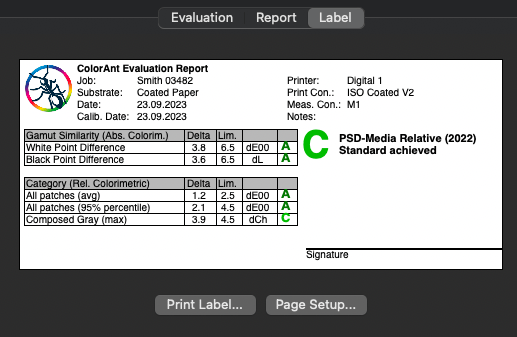
Label

Allows you to print a label with the evaluation results directly from within ColorAnt. The tab shows a preview of the label to be printed. The label contains the data entered in the Report tab and a table with the data from the Evaluation tab. It also indicates if the print is Accepted or if the evaluation has failed (X) and provides space for a signature.

Note: The label layout is optimized for DYMO 99012 labels (format 89mm x 36mm). For other formats, adjustments may be necessary to achieve optimum results.

Video Tutorial

How to Use the Proof Evaluation Tool in ColorAnt in combination with ZePrA

Learn step-by-step how to use the Proof Evaluation tool in ColorAnt for the evaluation of a proofing media wedge created with ZePrA. In this example, we will be demonstrating the special feature of ZePrA to create a dynamic media wedge using process and spot colors and how to use the supplied reference data from ZePrA for evaluation of a Contract Proof.

CoPrA | Preferences

Preferences

Define basic settings

Preferences

View

Choose the tool that opens at startup. Allows quick access to the preferred tool. By activating the checkbox Do not display informational popups graphical information about tools of the Sidebar will no longer be displayed. However, tool tips for features will still be shown.

Profiles

Profiles: Select the location for your profiles. By default profiles are stored in the system profile folder (except for CoPrA SP licences). To store your profiles in a different location, for example a network folder, simply activate the checkbox Custom profile folder and specify the storage path.
Subfolders for the various profile classes and color spaces are created automatically.

Note: Profiles which are not stored in the system profile folder may not be available for other programs.
For Mac users: Create a subfolder in the ColorSync profile folder to store all profiles created by CoPrA in one place. These profiles will still be accessible for all programs using ICC profiles.

Overwrite existing preview profiles automatically: Preview profiles can be created when creating DeviceLinks or Multicolor profiles but they can also be created in Batch Overview or Profile Manager. By activating the checkbox Overwrite existing preview profiles automatically existing preview profiles will be overwritten without warning.

Share with ZePrA

Due to the close linkage of CoPrA and ZePrA, DeviceLink profiling settings specified in CoPrA can be used by ZePrA to create profiles required for the conversion of PDF files on-the-fly.

With CoPrA 6 and higher the settings are accessible via a shared folder which has the advantage that CoPrA and ZePrA do not need to be installed on the same computer. The shared folder must simply be accessible by both ZePrA and CoPrA, either over the network, a shared local folder or the cloud.

Share CoPrA Settings with ZePrA Auto Import Folder: Enable the checkbox to share CoPrA’s settings with ZePrA and select ZePrA’s Auto Import folder.

Note: If the checkbox is enabled and the Preferences dialog closed with OK an information message will appear repeatedly asking the user if all shared presets should now be copied to the defined Auto-Import Folder.

ZePrA’s Auto Import Folder
Files (such as ICC profiles, configurations, spot color libraries, gradations or SmartLink settings) that are moved or copied into the
Auto Import folder are transferred to ZePrA’s internal dataset and can then be used by ZePrA.
When the file in the Auto Import folder is replaced by a newer version, it will be updated in ZePrA’s internal datasets as well.
Note: If a file in the Auto Import folder is deleted, it is not deleted in ZePrA’s internal dataset. For example, if a SmartLink setting has been deleted in the Auto Import folder, it is still available in ZePrA’s internal dataset and if this setting is deleted in ZePrA’s dataset, it is still available in the Auto Import folder.

Profile Manager Options

The default 3D gamut viewing method of CoPrA 9 and higher is based on an axis ratio of 1:1:1. This means that the axis ratio of L to a+ (a-) as well as to b+ (b-) is identical. Up to CoPrA 8, the L axis was twice as long in ratio (see screenshots).

To use the 2:1:1 axis ratio view used in CoPrA 8 or older, change the 3D Gamut Axes Ratio (L:a:b) setting.

Please note that the 3D gamut view options also affect the gamut view in the Printer Profiling tool on the Color Generation tab.

Report Creation

Default save path: Reports (in PDF, XML and XSD format) are automatically saved in the folder specified here.

Default report format: Select the preferred file format for the report, either PDF or XML. If XML is selected as the format, the corresponding XSD files will be created automatically as well.

Default DeltaE Method: Determines the DeltaE method to calculate color differences for profile reports (dE76 or dE2000).

Open profile reports automatically with default viewer: If enabled, the profile report will be opened and displayed by the default PDF or XML viewer immediately after its creation.

Report Customization

Here you can enter a subtitle or add your own company Logo to the profile report. By default CoPrA’s icon is used.

Protected Mode

The Protected Mode allows to lock and protect all custom settings. If activated – with or without a password – changing a selected profiling setting is denied. This feature proves to be practical if multiple operators in an organization are creating profiles and only a defined set of settings should be used instead of every operator using his own settings. Once the protected mode is activated, options in the Preferences are disabled and importing and exporting of settings is denied.

If you need stricter permissions, the Protected Mode can be used with a password.

Set Password: Enter a secure password and confirm by entering it a second time. If a password has been set, it must be entered each time the protected mode is to be deactivated. To remove or change the password, click Reset Password.

Note: Remember your password well or keep it in a safe place!

CoPrA | User Interface

Main Window

Access CoPrA’s functions from one central location

Special Features

Profile search in drop-down menus
All profile drop-down menus function like search fields. Simply type in some letters of the desired profile and only those profiles containing these letters will be shown in the list. To select a profile simply click on it.

Alternatively you may open the drop-down menu with the arrow on the right and select a profile from the full list as usual. Right-clicking on the arrow displays the most recently created ICC profiles available for selection from the list.

Loading data files
Load opens and displays existing measurement data files.
A right click on Load opens a list with recently used files. Selecting an entry in the recently used files list while pressing the CMD key takes you to the folder containing the file.
Alternatively, drag and drop the data into the window to extract and view the data.

Context menus
A right-click on an entry in a list or table opens a context menu with useful tools specific to the respective table or list content. This is especially true for the Profile Manager, where the context menu contains many interesting features.

Next and Back buttons
The two buttons Next and Back at the bottom of most windows allow navigating within tools.

Notifications
CoPrA contains a notification message service (similar to ZePrA’s Troubleshooting) that allows multiple messages to be displayed at the bottom of the window. If more than one notification or warning is available, this is shown in the icons with the number of warnings. When clicking on the icon or the warning text, all warnings are shown.

Sidebar

Sidebar

The controls to configure and use CoPrA can be found in the Sidebar. Clicking on the Home icon at the left of the window opens the Sidebar which allows a quick selection of the desired tools.

To launch a specific module, click on the corresponding button of the Sidebar. The colored bar of the upper left corner under Color Profiling Application indicates the active module.

Printer Profiling

New Printer Profile

Create printer profiles 

Update Profile

Update profiles using optimized measurement data

DeviceLink Profiling

DeviceLink

Create DeviceLink profiles from standard ICC profiles

Editing

Create DeviceLinks using individually modified test charts

SaveInk

Create ink saving DeviceLink profiles

Iterate

Improve DeviceLink profiles

Linearization

Optimize primary color gradations

Recalculate

Recalculate DeviceLink profiles with a different profile

Tools

Image Conversion

Convert image files for profile evaluations

Profile Manager

Manage profiles in one convenient place

Batch Overview

Monitor and manage profiling jobs or reports

Menu Bar

CoPrA

CoPrA (macOS only): Allows access to the dialogue About (see below), Preferences and Services and quits CoPrA.

Preferences: Define CoPrAs settings, such as the preferred starting page, overwriting of preview profiles or report settings.

Detailed Information can be found here.

Navigation

Navigation (Windows only): In this menu, change the Preferences and select CoPrA’s various modules (the modules can also be accessed via the sidebar). The menu also shows the shortcuts for the individual modules.

Navigation (macOS only): Select CoPrA’s various modules (the modules can also be accessed via the sidebar). The menu also shows the shortcuts for the individual modules.

Tools

Import Settings: Import CoPrA settings to the preset menu

Export Settings: Export CoPrA’s settings for backup or to load in another system

Cleanup Settings: All settings found under the entry [EDITED] will be deleted automatically when using the command Cleanup settings from the Tools menu.

Open EditTargets folder: Opens the EditTargets folder:

Windows: C:\Program Files(x86)\CoPrAX\EditTargets

macOS: Applications\CoPrAX\EditTargets

Open Testcharts folder: Opens the Testcharts folder:

Windows: C:\Program Files(x86)\CoPrAX\Testcharts

macOS: Applications\CoPrAX\Testcharts

Help

Online Help: Opens CoPrA’s Online Help (internet connection required).

Quick Start Guide: Opens the online help page for the Quick Start Guide (internet connection required).

What’s New: Links to the online help page with the new features and bug fixes in CoPrA (internet connection required).

readme.txt: Contains the release notes with short information about the latest changes.

Registration: Load and activate licenses, request a demo license or get more information about the licenses.

Check for update: Checks whether a new program version is available (internet connection required).

Save Support Data: Creates a compressed and encrypted text file that contains important support information.

About: Opens the registration dialog. Contains information about the version and build number.

CoPrA | Registration

Registration

Register and activate CoPrA

Registration

Activation


Installing a Permanent License

A permanent license will be provided by your dealer after purchasing the application. Permanent licenses are available as computer-based or dongle licenses.

Computer-based licenses are always tied to the computer on which the software (CoPrA, ZePrA or ColorAnt) is installed. This is useful for temporary test purposes. Computer-based licenses are also required if the computer lacks an USB port or space for an USB dongle, i.e. a rack server.

USB dongle licenses are serialized to the dongle. The USB dongle communicates with the appropriate software license and enables the software to be used on different computers. To assign the license to the USB dongle, it must be connected to the computer before starting the software.

After purchasing the software, a permanent license file (*.lic) will be sent via email.


Activating a License

Load the license file in the tab License details under Registration to activate the application.

After installing the permanent license file, the licensed modules are displayed under License details.


Using One License File on Multi-User Systems

macOS

Copy the license files of ColorLogic applications into the following folder:

/Users/Shared/ColorLogic/LicenseInstall.

  • Create the folder if it does not exist.
  • Check the folder permissions.
  • When the application is launched, it will check the specified folder by default.

Windows

Copy the license files of ColorLogic applications into the following folder: C:\Users\Public\Documents\ColorLogic\LicenseInstall.

  • Create the folder if it does not exist.
  • Check the folder permission.
  • When the application is launched, it will check the specified folder by default.

License Details

License status: The expiry date for time limited versions of the software (for example, NFR or demo licenses) is shown at the bottom right of the software window. No expiry date is displayed for full versions.

Available Features: Shows the activated modules and add-ons.

Complete instructions on how to download and install ColorLogic applications and how to request and activate a demo license can be found here.

Demo Licenses


ColorLogic offers 14-day trial licenses for the applications CoPrA, ZePrA and ColorAnt allowing the user to evaluate the software features and performance.


Restrictions with Demo Licenses

All profiles created with a demo license in CoPrA can only be used correctly in ColorLogic applications.

A ZePrA demo license gives users a 14-day evaluation period to try all the functions of ZePrA within the application. All files converted with a demo license in ZePrA are watermark protected. If it becomes necessary to test ZePrA within a workflow without the watermark during the test period, contact your dealer for instructions.


Requesting a Demo License

  1. Click on Registration in the lower left corner of the sidebar.
  2. Click on the tab Demo license request.
  3. Enter all required information.
  4. After selecting the country, the software shows a list of available dealers in that region. Select a dealer and click on Send direct request. The relevant demo license will be send to the specified email address within a few minutes.
  5. Save the license file (*.lic) contained in the email on the computer being used.
  6. Load the license file in the tab License details under Registration to activate the respective application.

The expiration date of demo licenses is shown under License details right after activation.

FAQ


Does the license file have to be saved on the USB dongle for USB dongle-based licenses?
No, the license file does not have to be saved on the USB dongle. However, it is recommended if the application is to be used on several computers, as the required license file is then always available.

Why does my software not work anymore?
Please make sure that the USB dongle is plugged in and that the serial number of the license file matches the serial number under Registration.

What is the correct order to start the application with USB dongle based licenses?
First plug the USB dongle into your computer, then start the software and load the license under Registration.

What if the application with a computer-based license is to be used on another computer (e.g. if the old computer is broken)?
In this case, please contact the dealer from whom you purchased the software. He will provide you with a document (License Transfer Agreement) for you to sign, in which you agree to delete the old license file and not to use the software on the old computer anymore. You will then receive a new license file for the new computer.

Important: If a computer-based license is to be used, the application must be installed on exactly the computer on which you want to work permanently. You should also make sure that no USB sticks etc. are present before you start the software and open the Registration dialog.

Tip: If you send the serial number to the dealer, it is best to copy and paste the serial number from the Registration dialog (this is easier than writing it down or sending a screenshot). The permanent license file runs only and exclusively on this computer. If you have a computer-based license, you cannot use the software on another computer.

Registering and Downloading ColorLogic Software