
Image Conversion
Overview
The Image Conversion tool applies the complete user-defined color management workflow to the selected image and allows comparing its effects against the original source image.
A preview of the selected image is shown in the preview pane on the right. Using the comparison area of the image preview you can compare the source image file with the conversion to the target profile based on the source profile and the selected rendering intent.
The image preview uses either the embedded profile of the loaded image or – if there is no embedded profile – the specified Source Profile to convert the image colors to the Target Profile via the selected rendering intent. Since the complete color management workflow is applied to the display profile, the image is shown in true colors (provided the monitor is properly calibrated).
Note: Conversions can be saved in piled layers in a single file to better check different color conversions in Photoshop.
The comparison area can be resized using an adjustable overlay tool. This way, the effects of the defined color management workflow can easily be compared to the original source image.

The Toggle Preview button switches the entire visible preview area so that either the image rendered with the Source profile, or the Target profile is shown.

To change the size of the comparison area, the adjustable overlay tool can be picked in the opposite corner of the selected preview, i.e. in the bottom right corner of the Source profile preview and in the top left corner of the Target profile preview.

Zoom: The zoom function allows a closer look at image details and thus a better comparison of the complete user-defined color management workflow on the selected image.
There are three ways to adjust the zoom:
- Via the mouse wheel: Mouse wheel up zooms in, mouse wheel down zooms out.
- Via percentage input in the zoom input field.
- Using the arrow keys next to the zoom input field.
The Fit Image option scales the image to the maximum size of the full image in height or width, depending on the image orientation.
Fit Width scales the image to the maximum width (recommended for images in portrait format).

Fit Height scales the image to the maximum height (recommended for images in landscape format).

Procedure
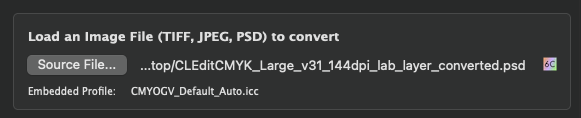
Load an image file (TIFF, JPEG, PSD) to convert
Either drag-and-drop the file to be converted onto the Source File button or click the button and select the file.
A preview of the image is displayed in the preview pane on the right. The comparison area of the preview pane shows the image after the conversion to the target profile using the source profile and the selected rendering intent. It can be resized using the adjustable overlay tool. This is done by moving the lines up/down or left/right while holding down the left mouse button.
Note: The Image Conversion tool does not support retaining Photoshop layers or transparencies. Nonetheless image files such as Photoshop PSD and TIFF files with layers or transparencies will be converted correctly, however, only the compatibility layer will be color converted while additional layers and transparencies are removed.
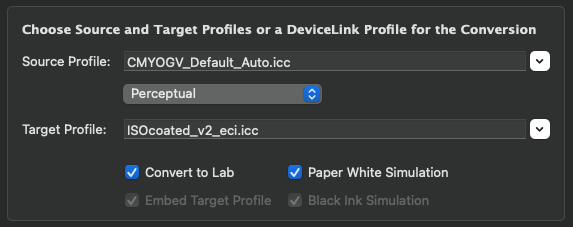
Choose a source and target profile or a DeviceLink profile
Apply either a normal ICC conversion with source and target profile or a DeviceLink conversion.
For a standard ICC conversion from source to target profile, the Rendering Intent can be defined. In addition to the typical four ICC rendering intents, Blackpoint Compensation is available as a fifth option.
Notes:
- Blackpoint Compensation is the relative colorimetric intent with additional black point compensation, as in Adobe Photoshop.
- All profile drop-down menus function like search fields. Simply type in some letters of the desired profile and only those profiles containing these letters will be shown in the list. To select a profile simply click on it.
Alternatively you may open the drop-down menu with the little arrow on the right and select a profile from the full list as usual.
For a DeviceLink conversion select the desired DeviceLink profile from the drop-down menu Source Profile. In this case it is not necessary to select other settings, such as the Target Profile or a rendering intent, therefore, these settings are grayed out.
Note: Image Conversion supports serialized profiles as well as encrypted demo profiles. Serialized profiles are those created with CoPrA SP (Serialized Profiles). Profile quality can be evaluated from either serialized or encrypted demo profiles when converting images.
If a serialized profile is to be embedded in the converted image file using Embed target profile, CoPrA will decode and embed the profile in the converted image with a smaller grid size. This ensures that other applications display the converted file correctly. Note, however, that this profile cannot be used for production purposes as the profile quality is reduced. For that reason, such profiles are marked as LOW QUALITY VERSION FOR DEMO ONLY in the file name.
Convert to Lab: Converts the image into the Lab color space which is useful for comparing images with differing target color spaces or to evaluate the color appearance of Multicolor profiles. The latter is very convenient as Adobe Photoshop does not display Multicolor images correctly in the preview and does not support conversions from Multicolor to Lab.
Paper White Simulation: This option can be used as a soft-proof in the preview for the defined color management workflow. If activated, the complete profile settings and rendering intents will be simulated on the screen under Target, including the paper white simulation.
In addition, when the Convert to Lab checkbox is enabled, the Paper White Simulation checkbox can also be activated. If activated, the conversion to Lab uses the absolute colorimetric rendering intent, if disabled, it uses the relative colorimetric rendering intent.
Embed target profile: If a target profile is available it can be embedded in the converted file. This is also true for target profiles of DeviceLinks.
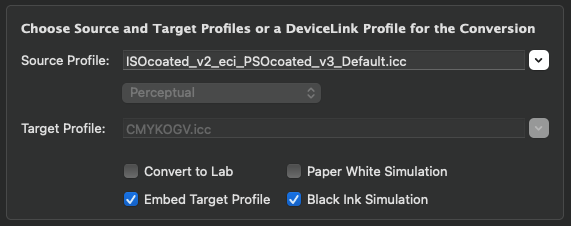
Black Ink Simulation: This option can be used as a soft-proof in the preview for the defined color management workflow. The complete profile settings and rendering intents are simulated on the screen under Target, simulating the Black Ink (relative colorimetric rendering intent).
Note: When both the Convert to Lab and the Black Ink Simulation checkboxes are enabled, the relative colorimetric rendering intent is used when converting to Lab.
If both simulations (Paper White Simulation and Black Ink Simulation) are disabled, the rendering intent Relative Colorimetric with Black Point Compensation is used.
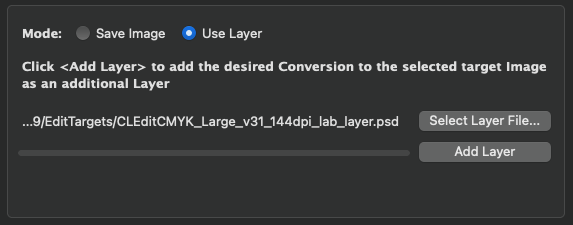
Select a Mode
Save Image: Saves the converted image. Available file formats are TIFF, JPEG or PSD.
Note: Only suitable file formats are listed, since some formats do not support all color spaces.
Use Layer: Allows adding layers to a converted image in PSD file format. Other formats can not be selected.
For layers converted with a SaveInk DeviceLink profile, the InkSave value is shown.

This allows the creation of a multi-layer file using different SaveInk profiles and an ink saving/quality comparison in Photoshop.
The saving of each profile is also immediately shown as information at the bottom of the Image Conversion tool.
Note: The InkSave value is displayed for CMYK-to-CMYK conversions and CMYK SaveInk DeviceLink profiles only. CMYK-to-CMYK conversions may result in higher ink consumption and therefore negative InkSave values.
Add Layer: To test various profiles, the same original image can be converted again with different profiles, and the resulting files can be stacked as layers in a single file. Such a PSD file allows users to switch between the layers in Photoshop to evaluate the quality of the conversions. For a better identification of the profiles that have been used the layer names contain the profile names and the rendering intents.
Select Layer File: Defines the image file to which the new layer will be added. Either accept the suggested file name or enter a custom file name.