ZePrA | Working with Transparencies

Working with Transparencies

Working with Transparencies

Transparency Flattening and Sharpening

Many users often think of only photographic images when sharpening PDF data.  However, when flattening transparencies, vectors and texts can also be converted into pixel-based images. These pixel-based images are treated like photos when the Sharpening option is activated This can lead to adverse results. A difference in sharpness between adjacent objects in the form of a vector or text can cause visual issues and inconsistencies. For production, sharpening effects should always be tested in advance.

Use caution when flattening transparencies with ZePrA. Sharpening takes place before conversion and flattening. In contrast, sharpening without transparency reduction in ZePrA takes place after conversion.

Depending on the composition of the elements in the layout software on the one hand, and the parameters for flattening the transparencies and sharpening in ZePrA on the other, extreme sharpening can produce visually undesirable effects.

The negative effects only become apparent at the most extreme sharpening Amount with a Threshold of 0. Since JPEG artifacts usually show minimal color differences, a high Threshold is the most important factor to avoid unwanted effects.

The following example shows the effects of different sharpening levels. In this case, the graphic designer has placed an object with drop shadow over a gradient.

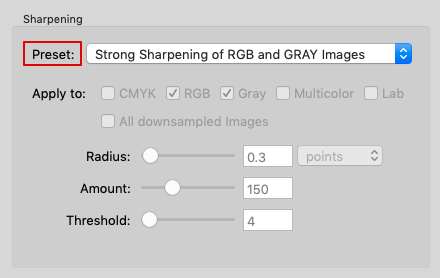
When flattening the transparencies, the flattened elements were compressed using the JPEG format. With an extreme sharpening setting, the artifacts part of the gradient underneath the drop shadow, which is usually invisible, become intensified when converted into a JPEG image. The following sharpness settings were used from top to bottom:
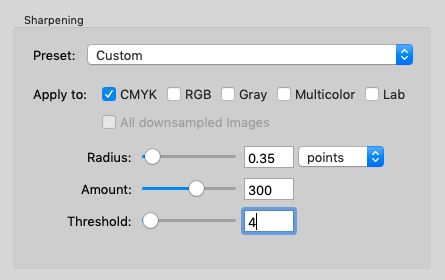
  • No Sharpening
  • Radius 0.35 points, Amount 80, Threshold 8
  • Radius 0.35 points, Amount 300, Threshold 4
  • Radius 0.35 points, Amount 500, Threshold 0


Converting PDF files containing transparencies

When converting PDF files with transparencies, the transparencies can either be preserved or flattened using Transparency Flattening.

During conversion, each object – with or without transparency – is converted separately, preserving the structure of the PDF document.

Unfortunately, there are so many variations in the blending of transparencies and the stacking order of semi transparent objects that there is no simple rule as to when transparencies ought to be flattened or not.

Flattening requires the resolution of the platesetter to be specified; therefore, it is best to perform transparency reduction as late as possible in the workflow.

ColorLogic recommends performing the conversion in ZePrA first without transparency flattening and then to check the converted file with a transparency-compatible PDF viewer (e.g. Adobe Acrobat Pro or Callas PDF Toolbox). If the converted file is visually correct and the desired total amount of coverage is maintained, continue working with the file.

If the file contains artifacts after conversion, uncheck the Convert all transparent Elements in PDF Files checkbox under Configurations/PDF and convert the file again.

This changing this setting often helps to preserve the impression of the original file (see figure below), since ZePrA excludes certain transparency modes from the conversion.

The checkbox Convert all transparent Elements in PDF Files is active by default.

However, if there are still artifacts after deactivating this function, use Transparency Flattening.

Note: Transparency Flattening is based on the Callas SDK, which in turn uses Adobe’s PDF engine for transparency flattening. Therefore, the results achieved with ZePrA’s Transparency Flattening are identical to those achieved with the current versions of Callas pdfToolbox.

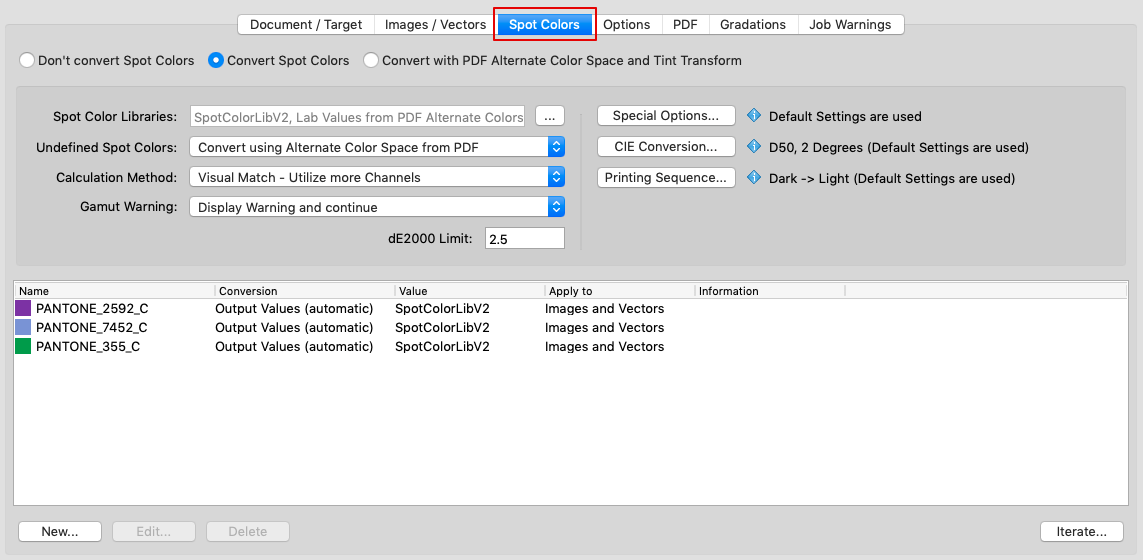
Converting Spot Colors containing Transparencies

For transparency flattening of PDF files containing transparent objects composed of process and spot colors, Adobe’s transparency flattening preserves spot colors to preserve the impression of the original but sets them to “Overprint”. Transparency-reduced PDF files should therefore always be viewed with “Overprint preview” enabled in the PDF viewer (e.g. Adobe Acrobat Pro). Simple PDF viewers, such as the Preview in macOS, or many apps on tablets, display such files incorrectly due to the missing overprint feature.

If ZePrA is to be used for high-quality spot color conversions instead of the PDF preflight program or the RIP, activate the checkbox Convert Spot Colors under Configurations/Spot Colors and spot colors are converted to process colors in the best possible way.

Note: Spot colors that are converted will be set to “Overprint” due to the transparency reduction and can mix with process colors. This can lead to unwanted results and the disappearance of converted spot color objects. If this happens, select Transparency Flattening and either Dissolve Overprinting or use the extreme method Rasterize Document.

Transparency Flattening, Image Quality, and File Size

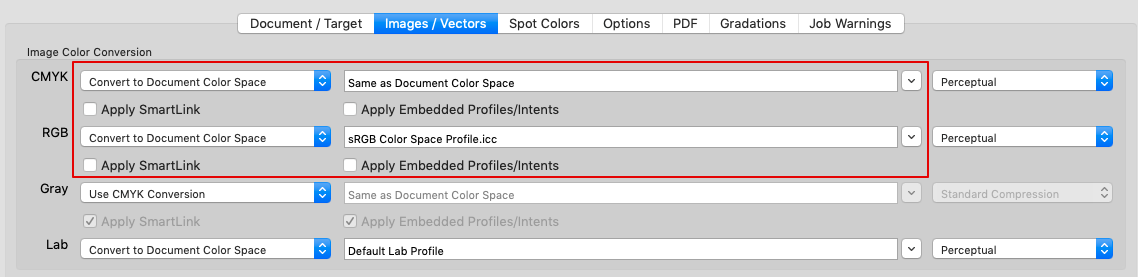
When reducing transparencies, the resulting rasterized objects are created with lossless ZIP compression. This guarantees the best quality but also results in larger files compared to JPEG compression. Even PDF files with JPEG-compressed images will have ZIP-compressed images due to transparency flattening. If the file size is to be reduced, and a reduced quality is acceptable, change the Compression Method to JPEG (in the Image Quality panel under Configurations/Options).

Note: The Compression Method is only considered by ZePrA when performing a conversion. When performing a Transparency Flattening without conversion, no compression change is made, and rasterized objects are ZIP-compressed.

ZePrA | Sharpening

Sharpening

(For example, in-house RGB workflows)

Sharpening Images

Optimal sharpening refers to the scaled final format of an image in the print data. The following section assumes that editing high-resolution RGB images, placing these images in the layout program, creating the PDF data, and processing the data with ZePrA are connected workflows within an application suite. The summary of these steps is referred to here as an in-house RGB workflow.

With in-house RGB workflows it is possible to work with high-resolution originals of the RGB images in the layout program and then generate a PDF/X-3 or PDF/X-4 file that also contains high-resolution RGB images. Finally, ZePrA handles the color management, the downsampling to the final resolution, and the sharpening. 

After the RGB images have been reduced to the final resolution and color converted to CMYK, a stronger sharpening than is usual for pre-sharpened CMYK images should be applied in ZePrA. To do so, select Strong Sharpening of RGB and Gray Images in ZePrA under Configurations/Options/Sharpening/Preset.

For documents that contain RGB images and already sharpened CMYK images it is recommended to limit sharpening in ZePrA to RGB images.

Note: If transparencies are used in the layout program, it is essential to ensure that there is no  transparency reduction, as RGB data is inevitably converted to CMYK if the RGB image is affected by transparent objects. Transparency reduction is mandatory when creating PDF/X-3 files, whereas transparency is explicitly allowed in PDF/X-4 files. If all RGB images are sharpened in ZePrA, the transparency reduction, should also take place in ZePrA.

ZePrA | Screen Preview

Screen Preview

Previewing PDF and image files

Previewing PDF and image files

ZePrA’s Screen Preview displays a true color representation of files processed via queues on the monitor, with overprinting elements and transparency effects displayed correctly.

The Screen Preview uses a rasterized version of the processed file.

ZePrA is among the very few PDF and image preview applications that allow a true color preview of PDF and image files with Multicolor profiles.

Typically, jobs processed by ZePrA contain the target color space embedded as output intent. The Screen Preview automatically uses that profile and the monitor profile set in the operating system preferences for display. If no profile is embedded, ZePrA uses the target profile of the configuration used to process the file as the Simulation Profile. This allows a potentially true-color preview of files (provided the monitor is calibrated correctly).

How to display a Screen Preview

  1. Open the Overview from the sidebar.
  2. Right-click a job in Processed Jobs to open the context menu.
  3. Choose Screen Preview.

  4. Your file will open in a new window.

  5. Click on the colored symbol in the title bar to open the Screen Preview Color Management Settings.
    Select the desired Simulation Profile from the drop-down menu and the rendering intent with a checkbox for the preview of the image (only profiles that fit the color space of the loaded image are available).
    If the configuration has the target profile embedded as output intent this will be shown in the drop-down menu with the key word Output Intent and if the target profile is not set to be embedded the key word is Target Profile. In both cases, the corresponding profile from the configuration is selected and shown in brackets.
    If the checkbox Paper White Simulation is selected, the absolute colorimetric rendering intent is used, if the checkbox is deselected, the relative colorimetric rendering intent is used.
  6. Click Apply to view the selected file with these settings and Save to save and close the window with these settings. The next time you open the window, these settings will be used again.

    Note: In general, it is recommended to use a dimmable standard light box with a reference proof next to the monitor for visual comparison when selecting the correct screen preview intent.

Screen Preview Settings ZePrA 9 and lower

Simulation Profile: The colors are rendered to the monitor profile using the selected simulation profile. By default, the output intent that was embedded into the processed file by ZePrA is used. It is displayed in brackets. This setting is similar to the output preview of Adobe Acrobat.

Note: The Default Profiles and the checkbox Prefer embedded Profiles are only relevant if the Simulation Profile differs from the color space of the file.

Rendering Intent: A color conversion method (rendering intent) must be selected for the calculation. In addition to the standard ICC-Intents, there are four extra ColorLogic intents:

  • Black Compensation
  • Relative+ and Absolute+: Only have an effect if the black point in a matrix monitor profile is lighter than L* = 0, which makes the Screen Preview slightly darker, especially in the shadows, which usually results in a visually better match with a reference proof.
  • Relative Lightness: Is based on the Absolute Colorimetric intent with paper tone simulation. The brightness of the paper tone simulation is scaled to the maximum displayable brightness of the monitor, whereby the colorfulness of the paper tone simulation and the gray balance of the preview as a whole are preserved. This setting is useful if the absolute colorimetric preview provides a visually too dark display, as is often the case in newspaper printing.

If no simulation profile is available in the file (no profile is shown in brackets), select the appropriate profile from the drop-down list. Suitable rendering intents here are the colorimetrically based and the special ColorLogic intents.

The monitor profile stored in your system is automatically selected to display the screen preview on your monitor.

Click Apply to view the selected file with these settings and Save to save and close the window with these settings. The next time you open the window, these settings will be used again.

Note: In general, it is recommended to use a dimmable standard light box with a reference proof next to the monitor for visual comparison when selecting the correct screen preview intent.

Use of Multicolor profiles

Multicolor Profiles

Use of Multicolor profiles

ZePrA supports the use of Multicolor printer profiles and Multicolor DeviceLink profiles (RGB-to-Multicolor, CMYK-to-Multicolor and Multicolor-to-Multicolor).

Use of Multicolor profiles in PDF workflows

In ZePrA, Multicolor profiles can be used as document color space, as target profile or Multicolor DeviceLink profile for color conversion.

This is particularly important in the prepress stage for packaging printing when image data is available as RGB or CMYK files. You can therefore place RGB and CMYK image files directly in the finished document, create a PDF file from them and then convert this document in ZePrA to the required Multicolor color scheme for printing. Another interesting field of application is the printing of photo books in so-called Hifi-Color printing processes using 6 or 7 inks.

Note: A Multicolor license is required to use the Multicolor functions.

When preparing the data, ZePrA generates a so-called DeviceN PDF file in which each individual channel is named after the channel names of the Multicolor target profile. DeviceN has been the standard color definition within PDF for many years to describe spot colors for print production. This provides a high degree of compatibility with the proven spot color processing of common applications. The generated PDF files can usually be evaluated with current versions, for example of Adobe Acrobat Professional, in the separation preview and can be processed with current PDF workflow systems. It is also possible to place PDF files into and export them from current Adobe InDesign documents. ZePrA supports the PDF/X-5n standard, which enables the embedding of Multicolor profiles in PDF files.

By default, a configuration created with Auto Setup does not embed the Multicolor target profile in image data, but in the Output Intent of PDF files. In the case of a converted PDF/X file (for example, a PDF/X-4, -X-3, or -X-1a file), the color converted file is converted to a PDF/X-5n file.

Before using a Multicolor printer profile that you select as target color space in the Document/Target tab of the Configurations tool, or in case of a Multicolor DeviceLink profile, check that the channel names and Lab color definitions have been entered according to your specifications.

If the checkbox Embed into Output File is activated, ZePrA transfers the channel names and color definitions from the Multicolor printer profile selected as the target color space to the color converted PDF file.

If this checkbox is not activated, the channel names and color definitions are taken from the Multicolor DeviceLink profile. So make sure that the channel names and Lab color definitions in the target profile and DeviceLink profile are identical. The names of the color channels (Colorants) and the Lab color definitions can be adapted in CoPrA with the Profile Manager for each Multicolor printer and DeviceLink profile according to your specifications.

Depending on the used Multicolor profile, the contained channel designations and the subsequent workflow outside of ZePrA, we recommend that tests of the complete workflow be carried out in advance to ensure that everything runs smoothly.

Convert image data with Multicolor profiles

ZePrA supports PSB, PSD, TIFF and JPEG files when converting image data with Multicolor profiles. Since the current file format specifications (as of May 2019) do not support embedding Multicolor profiles in TIFF, JPEG, PSB and PSD files, you should disable profile embedding for image data conversion in the Document/Target tab. We recommend saving image data converted to Multicolor as PSB or PSD files in Photoshop and then processing them with ZePrA. Of course you can also place PSB and PSD image files converted with Multicolor target profiles by ZePrA in Adobe InDesign.

ZePrA distinguishes between the following cases when converting image data from Multicolor files (can be set under Configurations/Options/Image quality):

  • If the channel names of the Multicolor target profile are CMYK+X, a TIFF file will be generated provided that Preferred lossless Format is set to TIFF.
  • If the channel names of the Multicolor target profile are not CMYK, a PSD file is created.
    Note: TIFF only supports CMYK+X.
  • If the Compression Method is set to Automatic, an attempt is made to preserve the format or to generate a TIFF file. However, if a JPEG file or a non-CMYK Multicolor profile is present, a PSD file is created.
    Note: JPEG generally does not support Multicolor color spaces.

ZePrA and PDF Preflighting

ZePrA and PDF preflight

PDF-Preflight

Check the following aspects regarding color with a PDF preflight:

Check number and type of color channels present in the PDF file

Extra spot colors may be required or unnecessary depending on the print job. The preflight allows you to determine whether the number and labeling of the color channels are appropriate for the print job.

Undefined spot colors can be processed using ZePrA’s spot color module. If the spot color module has not been licensed, spot colors can at least be converted using the alternate color space (PDF). This provides the same results as a preflight program. Further information on the spot color module can be found in the Spot Color Processing chapter.

Once the job has been processed in ZePrA, the spot colors occurring in the PDF file can be checked by right-clicking on the processed job in the Overview to open the context menu and selecting Show Job Properties to open the Job Report. This is particularly useful when not using an additional preflight program.

Check RGB or CMYK objects containing embedded profiles

For fully automated workflows that are running without additional approval by the customer, we recommend printers only accept pure CMYK PDF files that have correctly embedded profiles. For other data, we recommend to optimize them with ZePrA and then send a low-res CMYK soft proof to the customer for approval.

Note: A standard queue created with Auto Setup (Normalize and convert Colors to new Output Condition) that uses the SmartLink function optimizes all RGB, CMYK, and Gray objects of a PDF file by using DeviceLink profiles. Any embedded profiles are taken into account in the conversion. Alternatively, a standard queue can be duplicated to change the handling of embedded profiles (see next section Ignoring CMYK Objects with Embedded Profiles).

The profiles embedded in the PDF file can be checked after job processing by right-clicking on the processed job in the Overview to open the context menu and selecting Show Job Properties to open the Job Report.

Ignoring CMYK objects with embedded profiles

In some workflows, especially in print shops, it is common to remove embedded profiles from CMYK objects (images and vectors). It is often assumed that the profiles have been added incorrectly and will cause problems in a subsequent ICC conversion.

When the SmartLink function is not licensed, this procedure follows the default setting for Auto Setup queues. When the SmartLink function is licensed, embedded profiles are taken into account. SmartLink conversions, which preserve primary and secondary colors, as well as separation, ensure clean conversions.

If embedded profiles are to be ignored or the SmartLink function is not to be used – for example, in Auto Setup queues for normalizing and color conversion or for SaveInk applications – deactivate the corresponding checkboxes (Apply Embedded Profiles/Intents or Apply SmartLink) in the Images/Vectors tab. This ensures that embedded CMYK profiles are not used. Instead, select Same as Document Color Space and convert with the profiles set in the Document/Target tab.

Check the maximum Total Area Coverage (TAC)

For print shops, it is important that the specifications for the data delivery and the order confirmation clearly indicate the maximum Total Area Coverage that is expected for the type of paper to be used and also the printing standard the client should prepare the printing data.

When printing on newspaper or uncoated paper and the maximum Total Area Coverage is significantly exceeded, this indicates that image data has not been optimized for the respective printing standard. Usually these are image data for coated paper in offset printing.

When optimizing PDF files via standard queues in ZePrA, the following alternatives are available in Auto Setup:

Normalize and convert Colors to the new Output Condition: Converts the data – for example from coated paper to uncoated newspaper paper – and optimizes the color appearance.

Optimize Total Area Coverage (TAC): Limits the maximum total amount of color without changing the color appearance.

Check overprinting CMY objects without any black

Checking overprinting CMY objects without any black is a rather rare special case. Regarding high color stability during production, fast drying times, and ink savings, we recommend using ColorLogic’s SaveInk queues for as many print jobs as possible.

However, if an overprinting object of a PDF file is composed of all CMY colors without any black, the resulting color impression from the overprinting object and the background may change after color optimization, due to the overprinting rules of the PDF standard. For an underlying object, the color of a channel is only completely visible if no color is present in the respective channel of the overprinting object. If an overprint object has just a slight amount of color in a channel, then only the color component of the upper (overprinting) object is visible.

If CMY parts of SaveInk profiles are unintentionally replaced by black and the overprinting behavior changes as a result, but the color is still to be saved, a new SaveInk profile must be created for which the exception Preserve 0% Black is activated. This special exception is located in the SaveInk module of the CoPrA profiling software.