What is Push-2-ZePrA ?
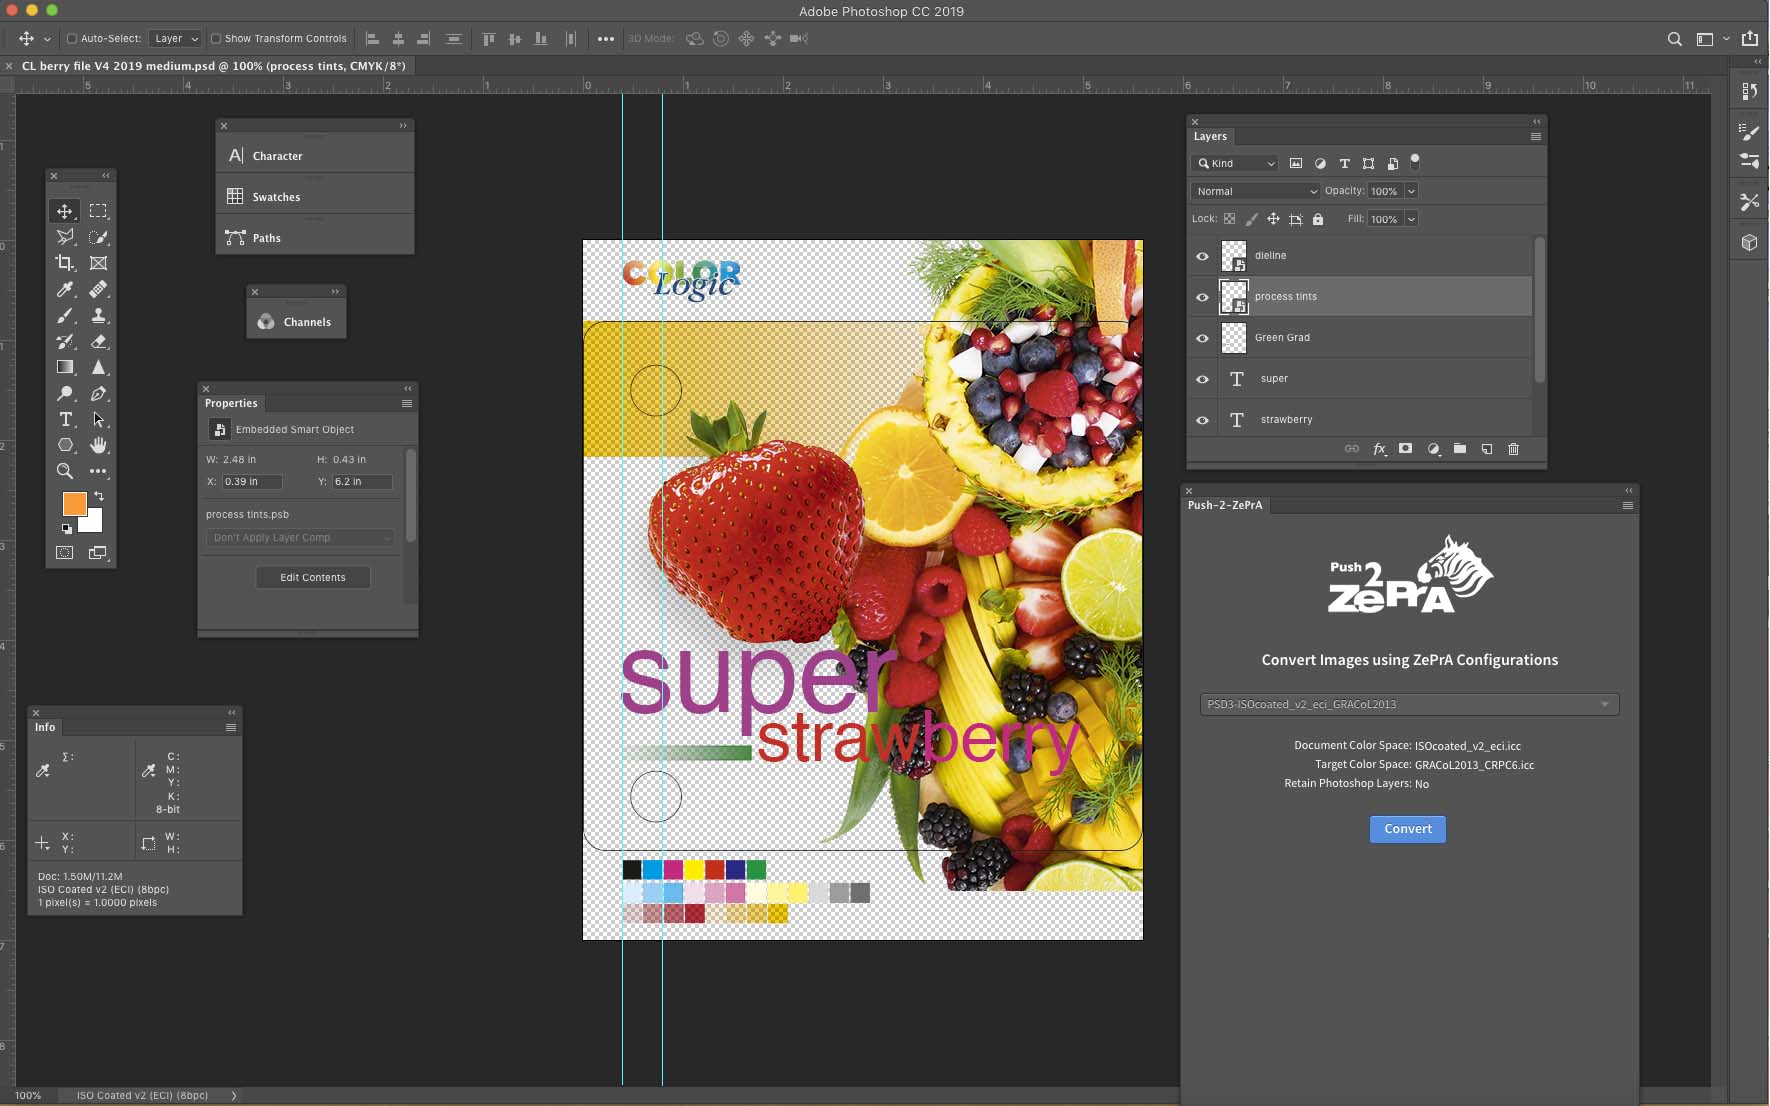
Push-2-ZePrA is an Adobe Photoshop extension that allows color converting an image file selected in Photoshop with ColorLogic’s color server ZePrA from Photoshop. Depending on the color server settings high quality color conversions with DeviceLink profiles will be performed leading to better color rendering of images than typical color conversion with Photoshop. Even spot colors can be converted if the selected ZePrA configuration is set up accordingly. The converted file will be opened up in Photoshop so that you do not need to leave Photoshop in order to get the best possible color converted images.
Push-2-ZePrA System Requirements
System Requirements for Push-2-ZePrA version 3
- macOS 10.15 and higher
- Windows 10 and higher
- Adobe Photoshop CC 2021 and higher.
- ZePrA 11
- Supported file formats: TIFF, JPEG, PSD and PSB
- Unsupported file formats: PNG, PDF and EPS
- On macOS systems with M1/M2 Apple Silicon processors make sure that you start Photoshop via Rosetta. The Push-2-ZePrA extension does not run natively on M1/M2 chips.
System Requirements for Push-2-ZePrA version 1 and 2
- macOS 10.13 and higher
- Windows 8 and higher
- Adobe Photoshop CC 2017 and higher.
- Supported file formats: TIFF, JPEG, PSD and PSB
- Unsupported file formats: PNG, PDF and EPS
- On macOS systems with M1/M2 Apple Silicon processors make sure that you start Photoshop via Rosetta. The Push-2-ZePrA extension does not run natively on M1/M2 chips.
- ZePrA 9 and higher/Push-2-ZePrA v2 and higher: The 2nd edition of Push-2-ZePrA has network capability. This eliminates the need for ZePrA to be installed on the same computer as Photoshop.
Note: Push-2-ZePrA is integrated with a 1-client license in ZePrA XL and XXL. Additional 5-client or 10-client multi-user licenses can also be purchased. For ZePrA Entry, Basic and L, the Push-2-ZePrA Photoshop extension single and multi-user licenses can be purchased as add-ons.
Installation
- Use the installer for macOS or Windows for your respective operating system.
- Close Photoshop before installation and follow the easy-to-use installer.
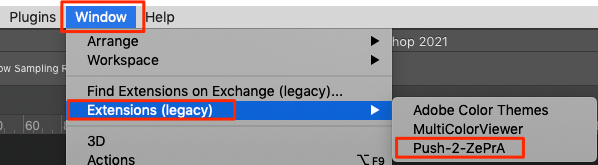
- Once installed, start Photoshop, go to Window/Extensions and select Push-2-ZePrA to open the extension.
Note: The installer on macOS systems will take an additional step to prepare Photoshop. Hence Photoshop must be closed before installation. The warning message is displayed twice. Just click the Allow button twice to install.
Using Push-2-ZePrA locally
Using Push-2-ZePrA locally
Configuring the Push-2-ZePrA clients in Photoshop:
- Once the Push-2-ZePrA extension is installed, start Photoshop, go to Windows/Extensions and select Push-2-ZePrA to open the extension.
- Click the Gear icon. There are two ways to connect to the ZePrA server: locally or remotely. If your Photoshop/Push-2-ZePA installation is on the same computer as the installed ZePrA color server you should always prefer the ZePrA Local option as this is much faster than communicating via the network. Click ZePrA Local.
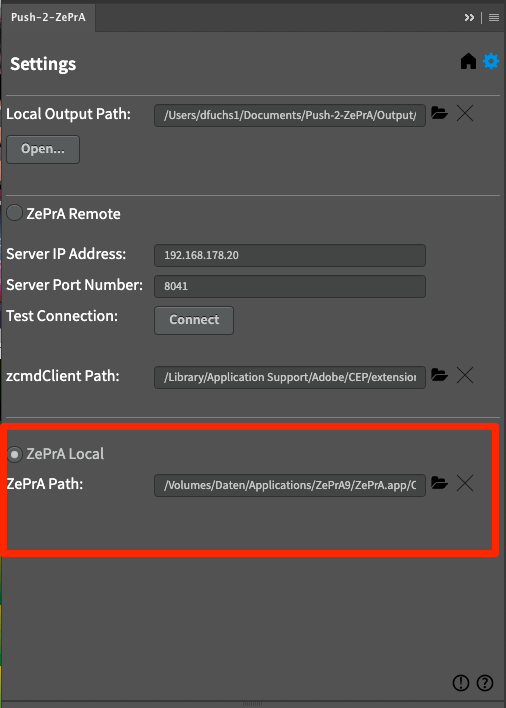
- Under ZePrA Path navigate to the ZePrA.app on macOS or zcmd.exe on Windows and select it.
- Define your Local Output Path (where converted files are to be saved) and click the Home button. You can then immediately use the extension.
Using Push-2-ZePrA locally
When ZePrA is installed on the same computer as Photoshop:
- In Photoshop, open the image to be color converted.
- Click on the Push-2-ZePrA extension.
- On the Home tab select a ZePrA Configuration from the drop-down menu. The drop-down list will show all the configurations set up in ZePrA.
Note: A search option is available here, where any number and letter can be entered and only the configurations containing these numbers and letters are listed in the drop-down menu below. This makes it easier to search for specific configurations, especially if the list of configurations in ZePrA is very long. - Choose a configuration that fits your requirements in terms of Target Color Space and retaining of Photoshop Layers. This information is shown below the drop-down menu and picked from the selected configuration.
- Click Convert.

- After a few seconds, the progress will be displayed, and the converted file will be opened up in Photoshop.
- Output folder for local use: Converted files are always saved in the same location as the original file and the configuration name will be appended to the original file name.
Notes: If the original file has been edited or copied in Photoshop without saving, a temporary file needs to be created by Push-2-ZePrA. The edited and the converted temporary files are saved in the output folder defined under Local Output Path.
If the original file is located in a read-only folder, the user will be asked if the converted file is to be saved in the output folder defined under Local Output Path.
Note: ZePrA’s Command Line Interface (CLI) is used for the conversion but not the ZePrA application itself. Therefore, you won’t find any of the images that have been converted via the Push-2-ZePrA extension in ZePrA’s Overview or hot folders.
Using Push-2-ZePrA over the network
Connecting Push-2-ZePrA with ZePrA over the network
Note: Requires ZePrA 9 or higher and Push-2-ZePrA v2 or higher.
Push-2-ZePrA is network capable from version 2. This eliminates the need for ZePrA to be installed on the same computer as Photoshop.
ZePrA 9 and higher have an integrated Push-2-ZePrA remote server, while the Push-2-ZePrA extension acts as a client application that can access ZePrA from a remote Photoshop installation over the network.
Therefore, several users who have the extension installed in their Photoshop application can remotely access the same ZePrA server. The Photoshop clients can thus be used on different computers, but also under different operating systems than the ZePrA server.
Establishing a connection
Configuring the ZePrA server:
- Open the Server Settings from the Tools menu in ZePrA.
- Specify the IP address of the computer ZePrA is running on and set a Port. See your system administrator for IP and port information. You will need to enter both the IP address and the port number in the Push-2-ZePrA extension on all client computers.
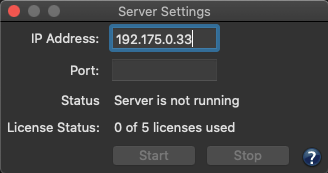
- Click Start to activate the server. The Status changes to Server is running and the License Status indicates the number of licenses in use as well as the number of available licenses.
- Stop closes the server and the extensions will no longer work. Closing ZePrA does not stop the server service but shutting down the computer will. So when restarting the computer make sure to restart the ZePrA server in the Server Settings dialog so that the extensions can access it.
Note: Under macOS the IP address of the computer can be found in the System Preferences/Network settings. Under Windows the IP address can be found under Settings > Network & Internet > Status > View hardware and connection properties.
After a ZePrA update, stop the server and restart both ZePrA and the server. This way the newest version of the server will be used.
Configuring the Push-2-ZePrA clients in Photoshop
- Install Push-2-ZePrA and open it in Photoshop.
Note: On Macs with Apple Silicon M1 chip make sure to start Photoshop with Rosetta – see System Requirements. - Click the Gear icon.
- There are two ways to connect to the ZePrA server: locally or remotely. If your Photoshop/Push-2-ZePA installation is on the same computer as the installed ZePrA color server you should always prefer the ZePrA Local option as this is much faster than communicating via the network. If your Photoshop/Push-2-ZePA installation is on a different computer, use the ZePrA Remote option.
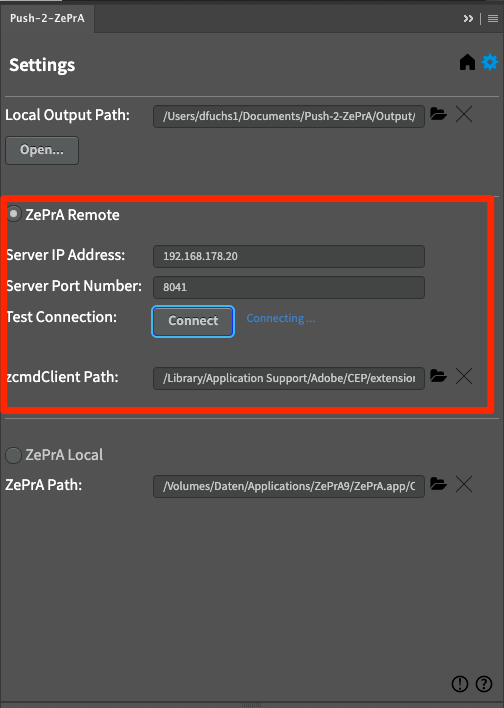
- To use the ZePrA Remote option, enter the previously defined ZePrA server settings (Server IP Address and Server Port Number) under ZePrA Remote and click the Connect button under Test Connection. The connection status is displayed.
- When the connection is successfully established, define your Local Output Path (where converted files are to be saved) and click the Home button. You can then immediately use the extension.
Note: If all available licenses are linked with the ZePrA server, additional Photoshop extension users will not be able to connect to the ZePrA server. The licenses are linked to the ZePrA server on a first come first served basis.
Note: In order to use the Photoshop extension, the ZePrA remote server must be running. Once the server has been started in ZePrA, it will run even if the ZePrA application is closed later on. Only when the computer is shut down, the server is also shut down and must be restarted in ZePrA after the computer is restarted.
Use the Question mark icon to access the Push-2-ZePrA online help page, and the Exclamation mark icon to get the version numbers of the extension and the ZePrA Remote server.
Using Push-2-ZePrA remotely
When ZePrA is accessed over the network:
- Open up an image in Photoshop to be color converted.
- Click on the Push-2-ZePrA extension.
- Select a ZePrA Configuration from the drop-down menu. The drop down list will show all the configurations set up in ZePrA.
Note: A search option is available here, where any number and letter can be entered and only the configurations containing these numbers and letters are listed in the drop-down menu below. This makes it easier to search for specific configurations, especially if the list of configurations in ZePrA is very long. - Choose a configuration that fits your requirements in terms of Target Color Space and Photoshop Layers retaining. This information is shown below the drop-down menu and picked from the selected configuration.
- Click Convert.
- After a few seconds, the progress will be displayed, and the converted file will be opened up in Photoshop.
- Output folder for network use: Converted files and temporary files are always placed in the output folder defined under Local Output Path and the configuration name will be appended to the original file name.
Note: If the original file is located in a read-only folder, the user will be asked if the converted file is to be saved in the output folder defined under Local Output Path.
Note: ZePrA’s Command Line Interface (CLI) is used for the conversion but not the ZePrA application itself. Therefore, you won’t find any of the images that have been converted via the Push-2-ZePrA extension in ZePrA’s Overview or hot folders.
Recommendations and Troubleshooting
Best Practices
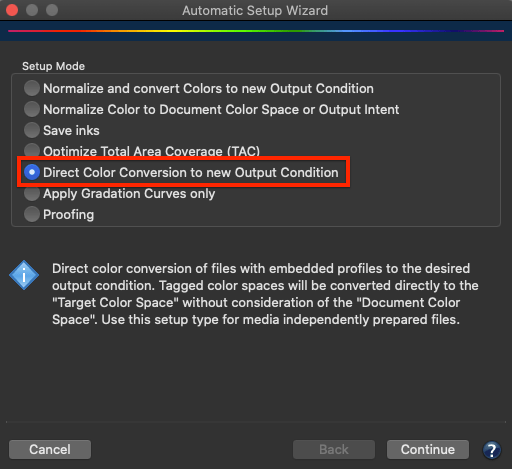
For image conversions, we recommend setting up Direct Color Conversion configurations in ZePrA with the help of the Auto Setup Wizard. With a direct conversion from the image color space to the Target Color Space, double conversions are avoided. It is not recommended to use a Normalize and Convert queue as this can lead to converting the image two times (a double conversion – from the image color space to the Document Color Space and then to the Target Color Space), which typically is not wanted for image conversions.
For any changes in terms of PSD or TIFF file layers handling, color conversion or spot color conversion, please adjust the appropriate ZePrA configuration in the ZePrA color server. The Push-2-ZePrA Photoshop extension uses the configurations, but editing configurations is not supported.
Error Handling
When working with the Push-2-ZePrA extension potential issues might happen:
- When updating Photoshop to a newer version, the Push-2-ZePrA extension may no longer be loaded. In this case, it is recommended to re-install the Push-2-ZePrA extension.
- The Push-2-ZePrA Photoshop extension version 3 is only executable with ZePrA 11.
- The maximum file size that can be processed via the remote connection using the zcmdServer of ZePrA 10 is 512 MB. Larger files can be processed directly via ZePrA Queues.
- The zcmdServer included in ZePrA 11 allows the processing of image files up to a size of 2 GB.
- Please do not use the zcmdServers of ZePrA 10 and 11 at the same time. Make sure the server in ZePrA 10 is stopped (click the Stop button in the Server Settings dialog). After that open the Server Settings dialog in ZePrA 11 and click on Start to activate the zcmdServer of ZePrA 11.
- Select the proper file for conversion: When several images are open in Photoshop keep in mind that only the selected, active document will be converted with Push-2-ZePrA.
- Incomplete conversions: When clicking the Convert button it may take a few seconds until the image is converted. During processing (the progress will be displayed), do not close the Push-2-ZePrA extension nor minimize Photoshop. This will immediately stop the conversion.
- Restricted folders and locations: A warning message appears when trying to save a file in a restricted location. If the selected location (folder) is read-only (for example, the application folder of an operating system), a warning message is displayed prompting you to cancel the conversion or save the converted file to the Local Output Path.
- Troubleshooting job warnings: An error message with the selected configuration appears. In such a situation, check the corresponding configuration in the ZePrA application and check for the cause of the error. It may be that the image file and the setting in the configuration do not match. In such a case, it is suggested to convert the image file in the ZePrA application with the same configuration used in the Push-2-ZePrA extension. The same job warning message may show in ZePrA. Troubleshoot the issue and change the settings in the ZePrA application, until the file conversion works as desired. Once the configuration has been saved in ZePrA go back to the Push-2-ZePrA extension, close it and reopen the extension to update the list of configurations and settings and convert the file in Photoshop again.
Note: Push-2-ZePrA supports the same image file formats as ZePrA, e.g. TIFF, JPEG, PSD and PSB. Unsupported file formats, such as PNG, PDF or EPS, will generate file format errors. - Changes and updates to configurations: When changes or updates to ZePrA configurations have not been applied in the Push-2-ZePrA extension, make sure that the edits have been saved in ZePrA before heading to the Photoshop extension. Then close the extension and start it again so that it refreshes the list of configurations and their settings.
- Support for prior ZePrA versions: ZePrA versions prior to v9 are not supported. The extension may show the settings of configurations from older ZePrA versions, but will not convert files. We do not recommend selecting prior ZePrA versions with the extension and will not be supporting prior versions in future releases.
- Avoid special characters in configuration names: characters such as | < > * ? / \\ : in configurations names with ZePrA. While ZePrA will handle such characters the Push-2-ZePrA extension does not.