

SaveInk DeviceLinks
Introduction
An important application of DeviceLink profiles is ink saving while maintaining the visual color appearance. Today, SaveInk profiling (sometimes referred to as ink optimization) is a popular application for saving ink and enhancing quality in standardized offset, gravure and newspaper printing. Its application in large-format printing is interesting and should be evaluated for cutting the cost of ink consumption.
SaveInk DeviceLink profiles can be created from CMYK or Multicolor profiles.
Multicolor profiles can only be used if a black channel is present as the fourth channel. Profiles that do not follow those rules cannot be used.
Note: The SaveInk tool requires a SaveInk license, the creation of Multicolor SaveInk profiles requires an additional Multicolor licence. ZePrA supports Multicolor SaveInk DeviceLinks (from ZePrA 7 and higher). However, sharing of Multicolor SaveInk presets with ZePrA 7 is not supported. Hence the checkbox Share with ZePrA is disabled for Multicolor.
Creating SaveInk Profiles
Selecting a Profile and a Setting
- Open the tool SaveInk and select the printer profile to use for the creation of a SaveInk profile.
Note: All profile drop-down menus function like search fields. Simply type in some letters of the desired profile and only those profiles containing these letters will be shown in the list. To select a profile simply click on it.
Alternatively open the drop-down menu with the little arrow on the right and select a profile from the full list as usual. - Select a predefined Setting for the SaveInk calculation from the drop-down menu.
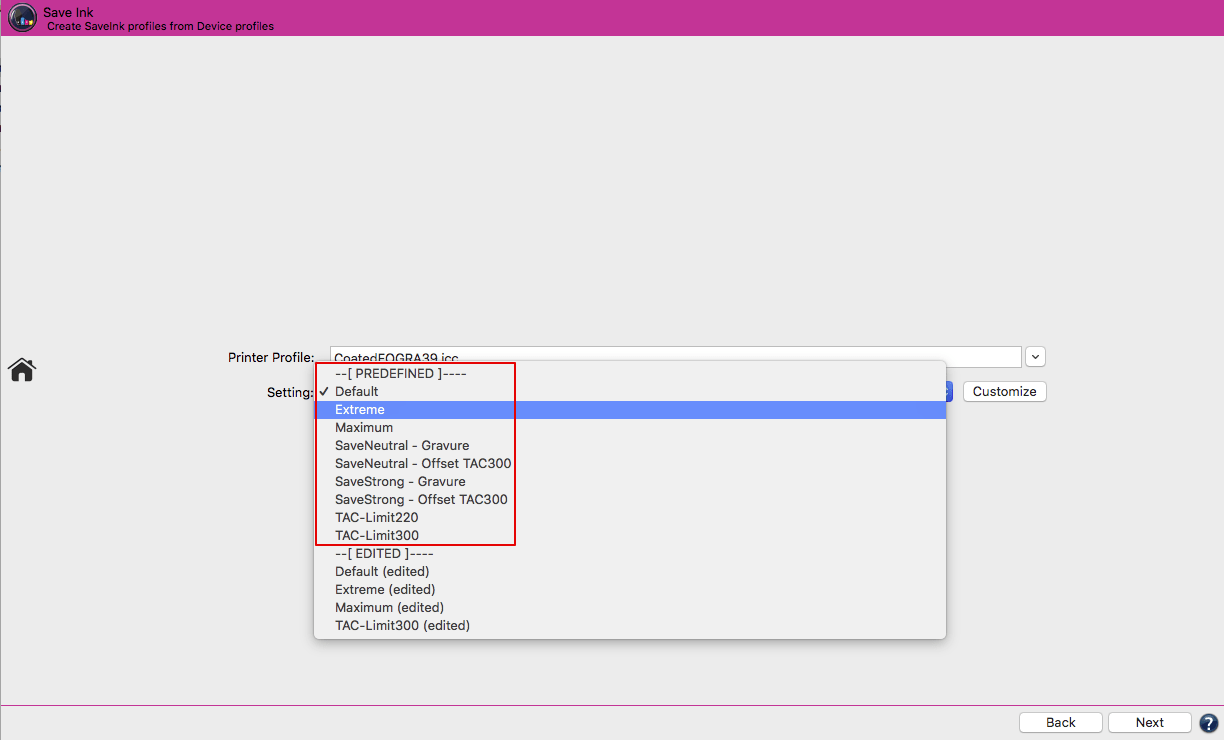
Predefined settings for SaveInk profiles
SaveInk Settings
Default: Use this setting as a starting point, if other presets are not suitable for your print process.
Extreme: Highest ink saving, but with slight visual flaws to the original.
Note: This preset may reduce Secondaries, Duplex and Triplex colors if ink can be saved. If you explicitly want to maintain 200% inks for red, green and blue tones, you should use the slider to reduce the dE-Tolerance instead.Maximum: Maximum color savings with colorimetric accuracy still very high while maintaining the visual color impression. The colorimetric accuracy is best with a dE-Tolerance of 0. This setting requires experienced printers and an excellent command of the standardization.
SaveNeutral Gravure – SaveNeutral Offset TAC 300: Use these settings for gravure or offset printing. These settings moderately increase the black content in neutral color areas. This is ideal for print shops who are looking for a quick introduction to saving ink and want to gain practical experience. These profiles are mainly used to stabilize the printing process and are less suitable for saving ink.
SaveStrong Gravure – SaveStrong Offset TAC 300: Use these settings for gravure or offset printing. They greatly increase the proportion of black and are aimed at printers who have their printing process under control according to the standardization and who want to achieve high ink savings, but still want to leave room for adjustments on the press.
TAC-Limit300 – TAC-Limit220: TAC-Limit profiles do not perform any color conversion and limit only the total amount of color without strongly interfering with the color composition. Use TAC-Limit300 for offset printing and TAC-Limit220 for newspaper printing, for example.
- Customize allows you to specify the Method, the Total Amount of Color, the Ink Saving and to define Exceptions.
Customizing SaveInk Settings
Method
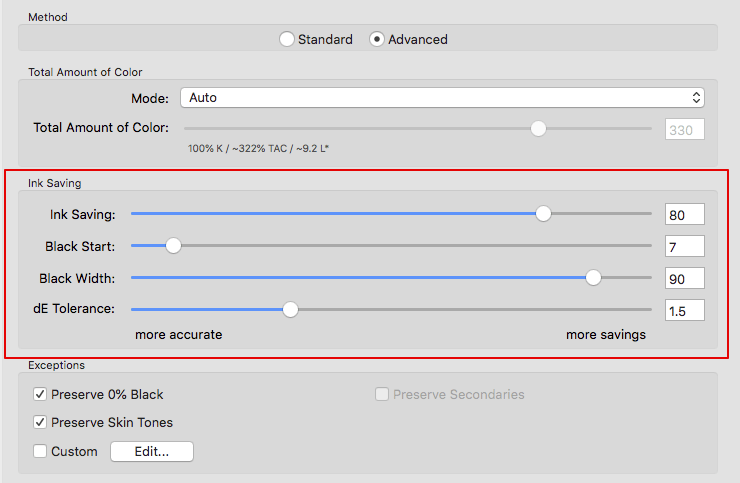
There are two methods available to specify the basic settings for Ink Saving – Standard and Advanced.

SaveInk Methods
Standard: Reduces the settings a user needs to define to a minimum but still achieves economical high quality profiles. Only three settings have to be adjusted: the Total Amount of Color, the Ink Saving slider and the exception Preserve 0% Black. Use this method to get quick results.
Advanced: Allows the user to also define Black Start, Black Width and Exceptions. Use this method to define more precisely how the ink saving performs. When selecting the same settings as in the standard method it will produce identical results.
Total Amount of Color for SaveInk Profiles
The feature Total Amount of Color allows the tonal value limit to be set for your SaveInk profile. Print data which are converted using the SaveInk profile will be limited to the total area coverage set in the profile. The maximum black value is controlled and adjusted automatically.

Setting the Total Amount of Color
Use Mode to specify whether the total area coverage and the maximum black value are to be adopted from the Profile, will be defined manually using Custom or will be calculated automatically using Auto. The maximum black value, the total area coverage and the darkest L* value will be calculated according to the selected method and will be displayed after a short processing. These values reveal, for example, whether a reduction of the total area coverage will result in brightening of the shadows. Brightening can be identified by an increase of the L* value.
Notes:
- In most cases, the mode Auto produces the best results. Assuming the printer profile allows it, it will calculate a slight reduction of the total area coverage without increasing the L* value significantly.
- When using the methods Maximum or Extreme while strongly reducing the total area coverage as well, an identical Lab measurement mapping is possible only to a limited extent.
- If the TAC is below 200% the exception Preserve Secondaries is available.
Ink Saving
Ink Saving Options
Ink Saving: Defines the replacement of composite black (CMY) by pure black. The higher the slider setting, the more colored ink is replaced by pure black. So higher slider settings achieve higher ink savings, but at the expense of the colorimetric accuracy.
Black Start: Defines the starting point for the replacement of composite black (CMY) by pure black. Pure black will be used above the entered value.
Black Width: Defines the range in which black is used outside the color-neutral area. The higher the value, the more black will be used outside the color-neutral area.
dE Tolerance: Allows tremendous ink savings when set to a high dE tolerance. Increases the maximum deltaE between the original profile and the SaveInk DeviceLink profile which results in greater ink savings. In contrast, the predefined settings SaveNeutral, SaveStrong and Maximum use a low dE tolerance setting of 0 deltaE ensuring a very high color and visual accuracy of the profile. However if greater ink savings are desired it can only be done by reducing the visual accuracy, hence a higher dE tolerance setting is required. The ink saving preset Extreme uses a high dE tolerance.
Note: Users can save on ink even more by using a higher dE tolerance setting. We recommend to test ink saving profiles with high dE tolerance settings closely before using them in production.
Exceptions in SaveInk Profiling
Exceptions define the colors to be excluded from ink saving when creating SaveInk profiles.

Setting Exceptions in SaveInk Profiles
Preserve 0% Black: Areas which are built with CMY only (without black) remain unchanged by the SaveInk optimization. This is particularly important when overprinting with CMY colors but results in a considerably reduced ink saving.
Preserve Secondaries: Is only available when the total area coverage (TAC) is set to values below 200%. It allows to obtain highly saturated secondary colors without reduction, although the total area coverage is reduced below 200%.
There is a tendency in current newspaper printing and high-speed InkJet printing to use a TAC of less than 200%. This may result in an unwanted reduction of secondary colors (those who need at least 200% ink) and thus result in washed out colors. Total area coverages over 200% always preserve secondary colors, however, without this exception a reduction below 200% would also reduce red, green and blue tones. This can be avoided by activating this exception as it ensures that full red, green and blue tones remain unchanged while the TAC of dark colors and of the black point is deceased below the set total area coverage of 200%.
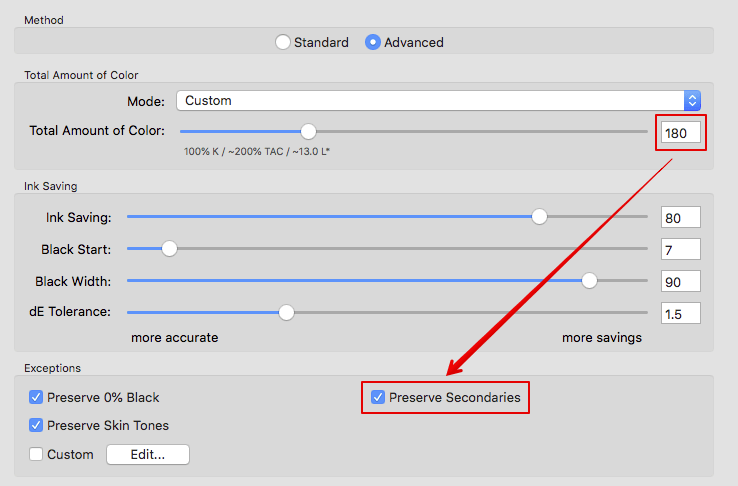
Preserve Secondaries is only available if the TAC is below 200%
Preserve Skin Tones: Excludes skin tones from ink saving. This is an approach especially important for printing systems with coarse raster frequencies (for example, large format InkJet systems with low resolution, newspaper printing or printing processes subject to the ‘Missing Dot’ problem) to reduce the so called peppering effect, visual graying or troubled skin tones.
Note: Exceptions to Preserve Skin Tones and Custom exceptions are not available for Multicolor profiles and are grayed out.
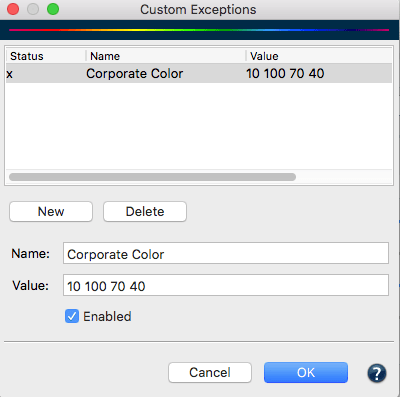
Custom: Specify individual CMYK color values to be excluded from ink saving. These could include specific company colors or corporate identity colors that must remain unchanged. Select Edit to open a window where the CMYK color values can be entered that will be excluded from the SaveInk optimization.
Setting Exceptions for Specific Values
Define Custom Exceptions:
- New creates an entry for a new color.
- Under Value, enter the CMYK value to be excluded from SaveInk conversion. Optionally, assign a name for this color.
- Enter as many colors as required.
- Activate the checkbox Enabled to select the colors to be excluded.
- Click OK to confirm these values.
- Make sure to enable the checkbox Custom.
Profile Settings
Format, Size and Further Processing
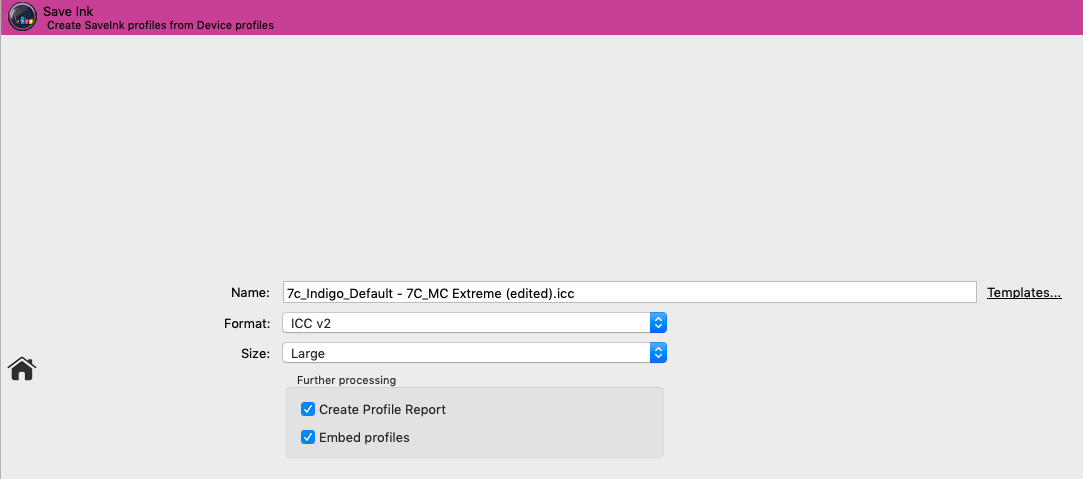
Name: Type in a Name for the profile.
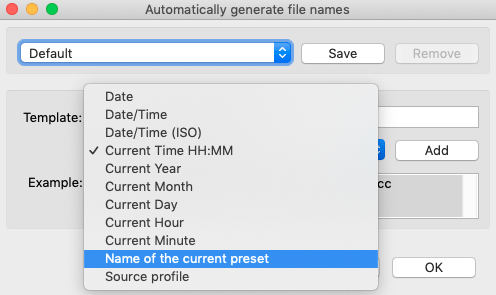
Templates: Allows to select and combine name components from a list of options and save them as custom templates. The last selected template is used when creating new profiles, so the naming of profiles is automated.
Available naming options depend on the current profile type and include Date, Date/Time, Measurement data file name, Source and Target profiles, Name of the current preset and others. Each name component can be added at a user-defined position under Template (the position is selected with the mouse pointer). The Example section below shows the resulting name. Additionally, user defined text can be added at any position within the Template field.
Format: Define the Format of your profile. An ICC format in accordance with specification v2 is recommended as basic setting however, the newer format ICC v4 can also be chosen. In this case, please ensure that your programs support this format correctly.
Note: ColorLogic products handle and use ICC v4 profiles consistently and correctly.
Size: The setting Large is recommended. The size specifies the number of grid points in the profile and determines the amount of disk space required for the generated profile. Small profiles should only be used for test purposes. Very Large profiles can slow down further processing in subsequent programs. Additionally, some programs are not able to handle very large profiles.
Further processing
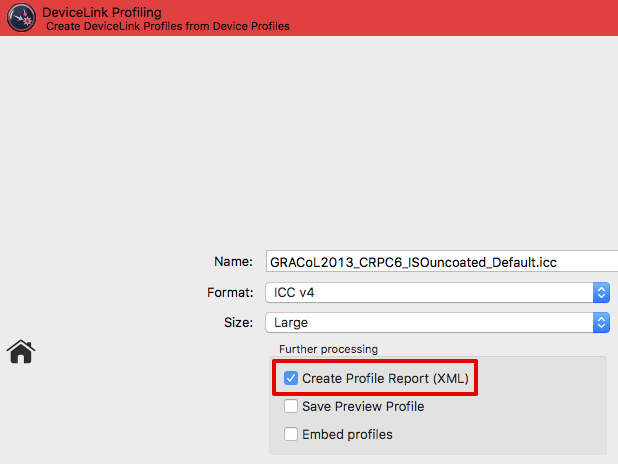
Create Profile Report: Recommended to activate. The PDF report provides an overview of the quality of the profile based on statistics, diagrams of gray balances, gradients and gamut representations as well as color separations of converted test files.
Under Preferences, the Default save path for the reports and the Default report format can be selected. If XML is selected as the format, the corresponding XSD files will be created automatically as well.
Embed profiles: Physically incorporates the used source and target profiles into the DeviceLink. This function is tricky and only recommended if the DeviceLink has to be transferred to a computer which does not have the required source and target profiles. It was implemented mainly for use with certain RIPs which only accept DeviceLinks with embedded source and target profiles.
Save: Creates the printer profile and saves it in the folder Profiles (macOS) or Color (Windows), (macOS: /Users/Username/Library/ColorSync/Profiles, Windows: C:\Windows\System32\spool\\drivers\color). Demo and encrypted profiles will be saved in a different location only relevant for ColorLogic applications.
Note: CoPrA-SP profiles are stored in the ColorLogic subfolder Licensed-Profiles.
Profile Reports
Profile reports can be created for Printer or DeviceLink profiles. To do so, activate the checkbox Create Profile Report in the last step of the profiling or, when updating profiles, the checkbox Create Profile Comparison Report.
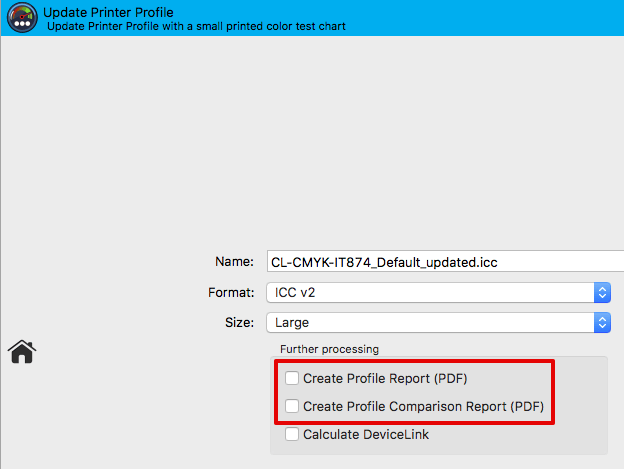
Depending on the type of profile the report contains various statistical data, such as statistics about profile precision (Integrity, Precision, Black Point, White Point etc.), graphic representations of curves and gamuts (Gray Balance, Gradients etc.), conversions of test images, separations and color patches to evaluate the smoothness or the purity of colors. All this facilitates the detection of artifacts that may be present.
Profile reports can be created at any time in Batch Overview or in Profile Manager which, by the way, is not restricted to ColorLogic profiles.
Under Preferences you can define some basic settings for the creation of the profile report, such as the file location, the report format (PDF or XML) or the DeltaE method (dE76 or dE2000).
Note: If a profile comparison report is created when updating a profile, the measurement data obtained from the update test chart will be compared to the data of the original profile (reference profile).
If the checkboxes Brightener Compensation or Measurement Correction have been activated, the data of the original profile will not be compared to the measurement data from the update test chart but to the data modified by these options.